Espresso Ice Cream with Dark Chocolate Swirls
If you’ve got a thing for homemade coffee ice cream, this is the best recipe out there… This espresso ice cream has a decadent crispy dark chocolate magic shell swirling through it. Spiked with Kahlúa the alcohol prevents the ice cream from freezing into a solid impenetrable block. Win-win! Besides, who can say no to coffee Kahlúa ice cream, made from scratch?
How to make the ultimate homemade coffee ice cream
Let’s be honest, many homemade ice creams miss the mark. Either they’re too grainy or icy and hard to scoop or they can taste eggy from not tempering the yolks properly.
I’ve fallen victim to all of those hazards on more than one occasion. There’s so many pitfalls in making ice cream from scratch, it’s almost enough to make you happy to shell out $7 for a measly pint of Haägen Dazs.
Commercially made ice creams are made with specialized equipment and carefully calibrated freezers to keep the product at precisely the right temperature.
But there’s also a bevy of fillers and stabilizers like Guar gum, xanthan gum, carrageenan and mono and di-glycerides commonly used in commercial ice cream making operations that you might not want in your scoops. These ingredients help emulsify the ice cream and keep it creamy, smooth with a firm scooping consistency.
That commercial-grade standard seemed elusive in my home kitchen until I discovered this method. The code has been cracked!
This ultimate espresso ice cream is ultra rich, creamy and smooth and while it doesn’t use the same commercial stabilizers and emulsifiers that the major brands use, the method and ingredients in this coffee kahlua ice cream recipe are based on the same scientific tenets in order to achieve that perfect chew and mouth feel.
Espresso ice cream ingredients:
- Whole Milk
- Cornstarch
- Cream Cheese
- Fine Sea Salt
- Heavy Cream
- Sugar
- Corn Syrup
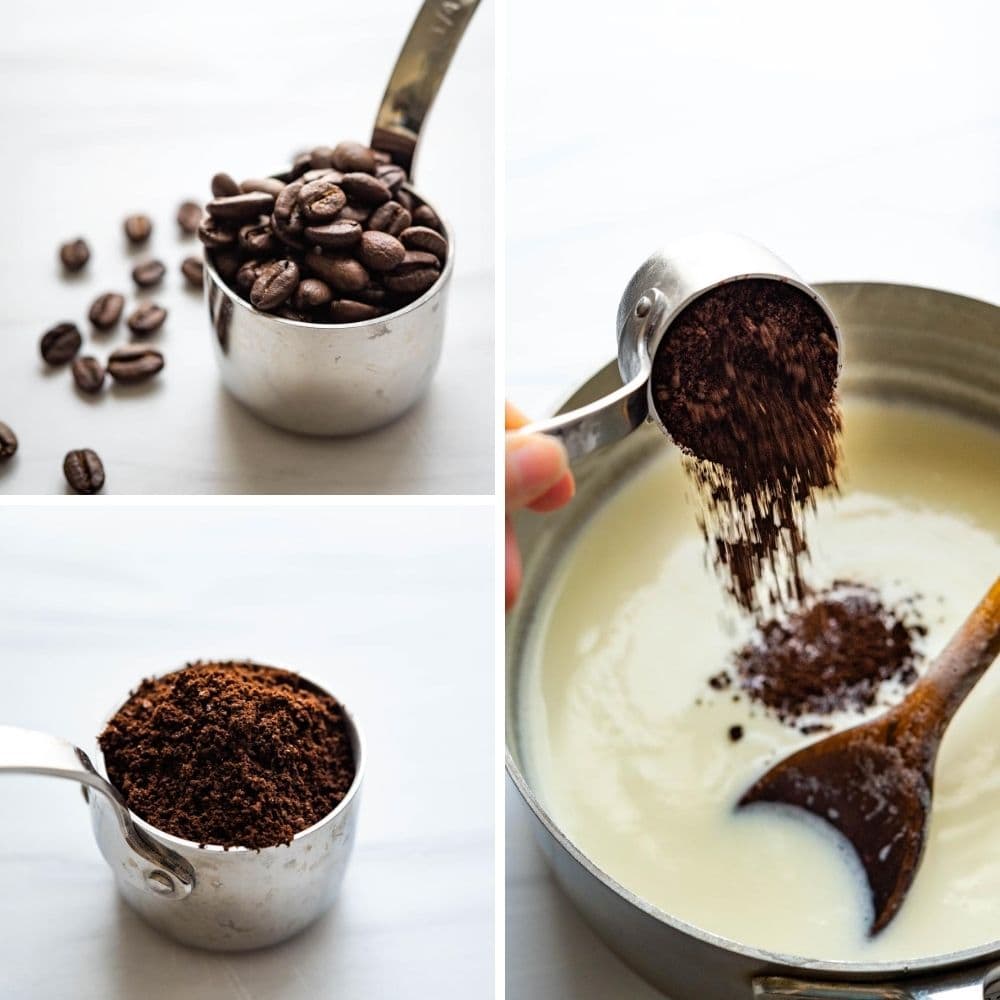
- Espresso Beans
- Kahlua
Rather than the typical custard usually found in homemade ice creams, this method (made famous by Jeni of Jeni’s Splendid Ice Cream) is an easier, foolproof way to make ultra creamy, luscious ice creams at home without having to fuss with tempering eggs or making custard at all.
Method for Espresso Kahlua ice cream
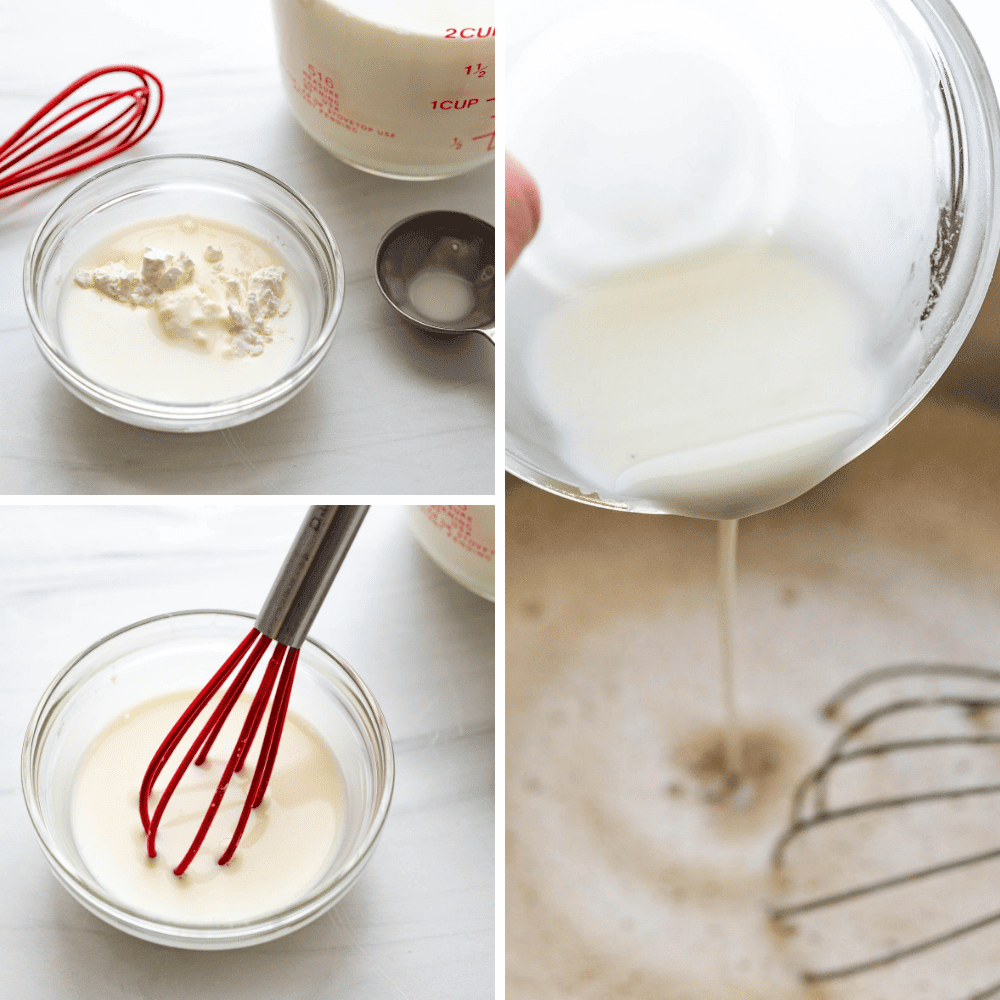
- Mix a little milk and cornstarch together to make a slurry.
- Beat a little cream cheese and sea salt together in a large bowl until well blended and creamy.
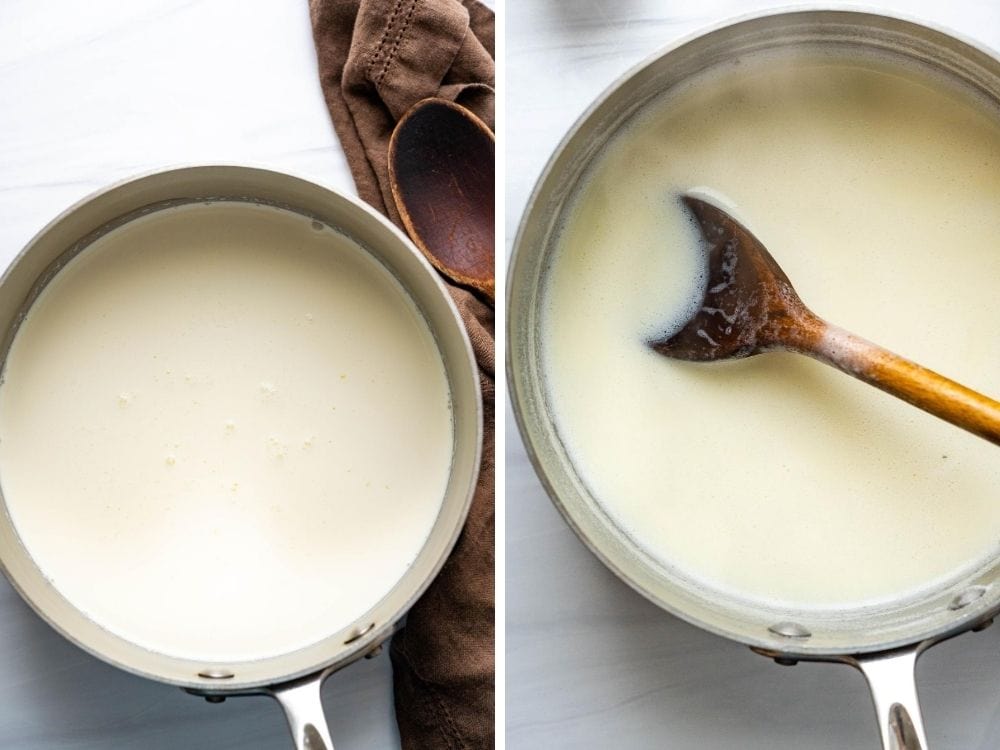
- Heat milk, cream, corn syrup and sugar to a boil and let it cook for 4 minutes.
- Add the coffee grounds to the hot cream mixture and let it steep.
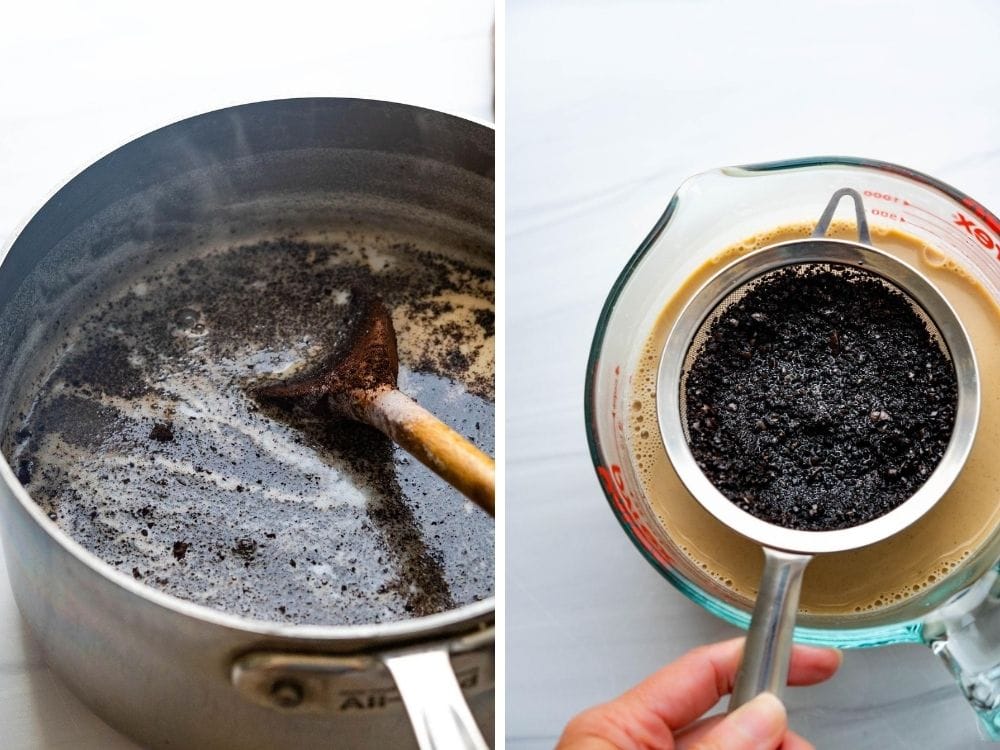
- Strain out the grounds and bring it back to a boil.
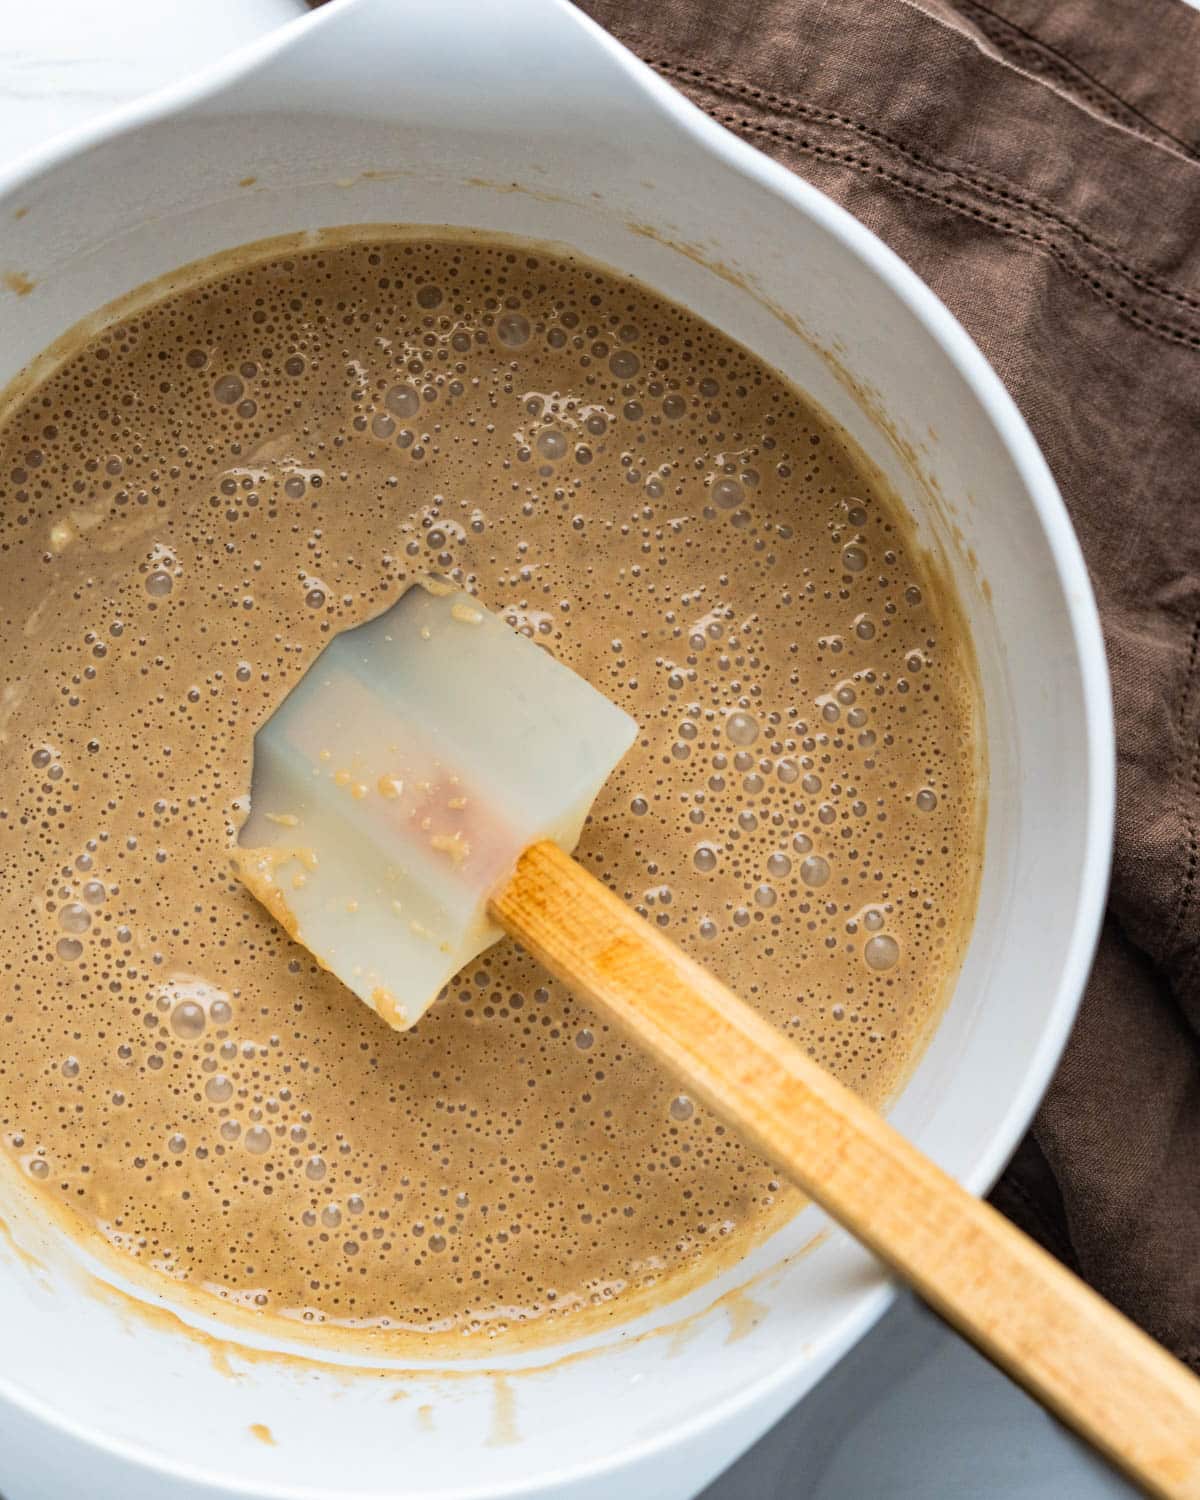
- Add the cornstarch slurry and cook stirring constantly for one minute or until the mixture thickens.
- Pour some of the hot cream mixture into the bowl with the cream cheese and beat until smooth. Continue to add more cream and beat until blended.
- Stir in the Kahlúa.
So what’s happening here?
- Corn syrup – is comprised of glucose, which attracts moisture (something that plain granulated sugar doesn’t do). It helps to prevent ice crystals and gives elasticity (Jeni’s words, not mine) to the ice cream.
- Cornstarch – is a natural thickener that also doesn’t crystallize in frozen ice cream.
- Whole milk and heavy cream – add flavor and mouth feel to real ice cream, but they also absorb and deliver the other flavors in a homogenized way. Milk and cream have fats in them that make the ice cream firmer as it freezes. The churning and freezing process infuses air into the mixture and suspends tiny air bubbles in the ice cream, which helps slow the melting point giving the espresso ice cream the perfect texture for optimum enjoyment.
- Cream cheese – helps to bind the ingredients and adds body to the ice cream.
Infusing the ice cream base with espresso
Many coffee ice cream recipes call for instant coffee powder, but this one actually infuses the milk and cream mixture with real espresso. It doesn’t take long to steep and good ground espresso translates to a deeply rich espresso ice cream.
pro tip
I recommend grinding your own espresso beans just before infusing the milk mixture for the best, most intense flavor. Just like spices, over time, pre ground coffee beans will lose some flavor and taste stale and flat. Avoid that by grinding your own beans for a really deep coffee flavor in the ice cream.
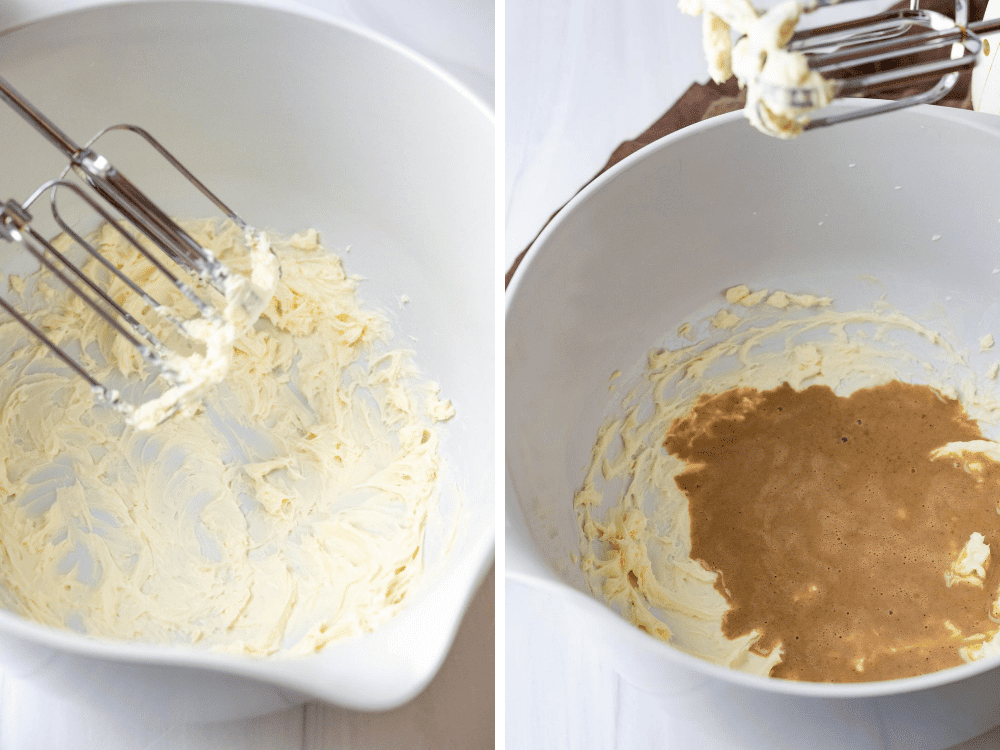
Use a hand mixer to blend a little of the hot espresso cream into the cream cheese. (You want to add a little at a time, so that it combines smoothly. You could also use a whisk and just add 1/4 cup of the espresso cream blend to the cream cheese. Don’t add more liquid until the first bit is completely mixed with no lumps.
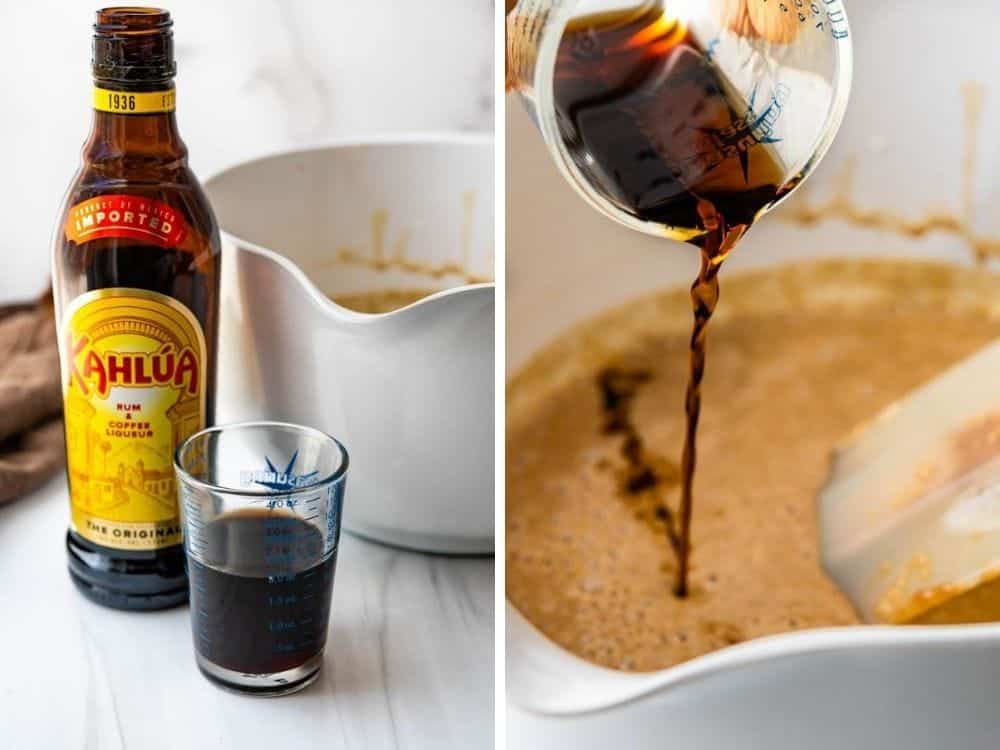
Adding Kahlúa to espresso ice cream base
The punctuation mark to this homemade coffee ice cream is adding a little Kahlúa or other coffee liqueur. It doesn’t take much (only 1/4 cup) to enhance the deep coffee flavor of the espresso beans. But that’s not all the Kahlúa does.
Because alcohol doesn’t freeze, it also prevents the ice cream from getting too hard in the freezer.
Since we’re not using a commercial grade churn that pumps a lot of air into the ice cream and makes it easier to scoop, a few tablespoons of alcohol will do what a home churn can’t. Prevent the ice cream from freezing to a solid, impenetrable block.
Instead, this coffee Kahlúa ice cream will scoop much more easily, right from the freezer. Trust me on this. It works.
Chill time for the espresso ice cream base
Before churning, the ice cream mixture needs to be very cold.
Not room temperature.
Not cool.
COLD.
Cover the homemade coffee ice cream mixture and refrigerate for at least 3-4 hours or overnight. (I usually go with the overnight method and break up the process into two days).
This is also a good time to make sure that your ice cream maker is ready to go. I have a Cuisinart canister ice cream maker that requires freezing the canister for 24 hours before churning the ice cream. If your ice cream maker is a similar style, make sure to put the canister in the freezer so you’re ready to churn the next day.
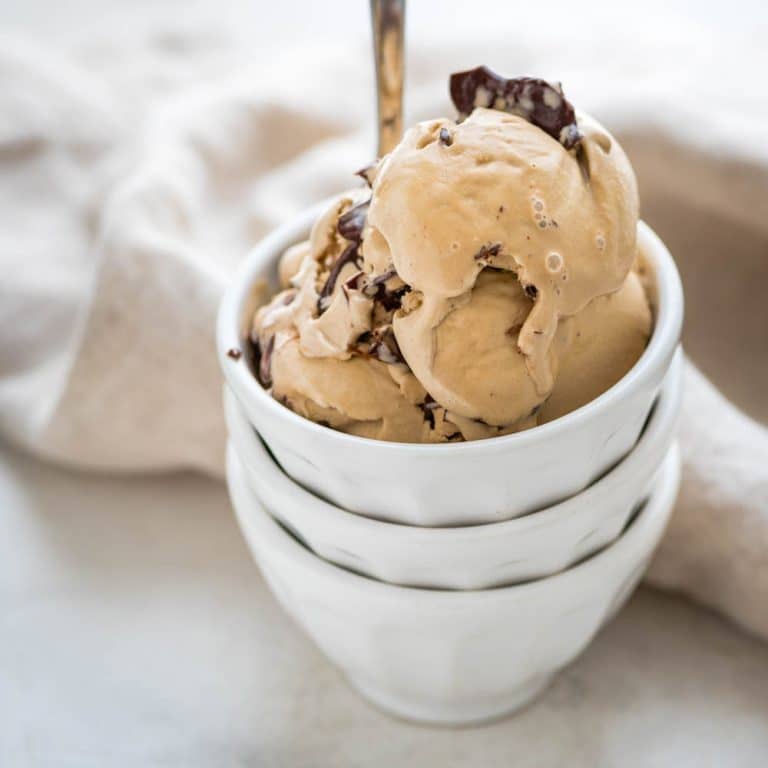
To take this recipe to the next level, it’s all about the mix-ins and for me, there’s nothing that accentuates the flavor of coffee more than dark chocolate.
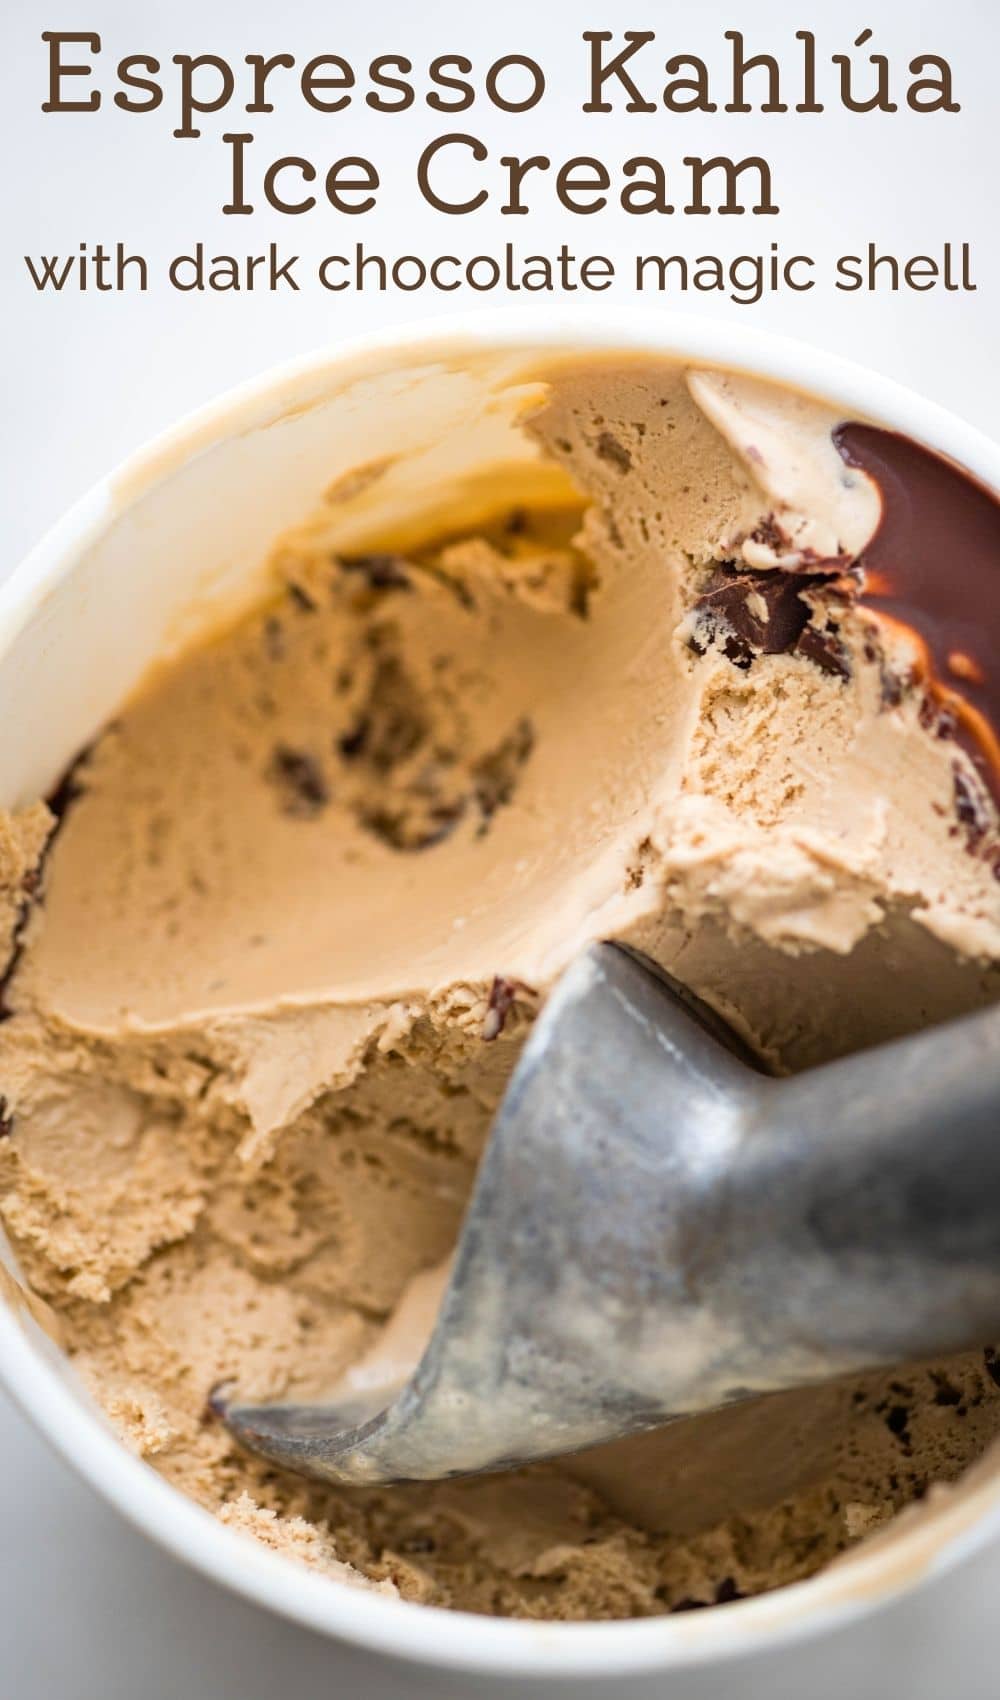
A dark chocolate magic shell that’s swirled throughout the ice cream gives a wonderful crunchy texture and melts into a deeply chocolatey flavor on your tongue.
Making magic shell crackles for the homemade ice cream
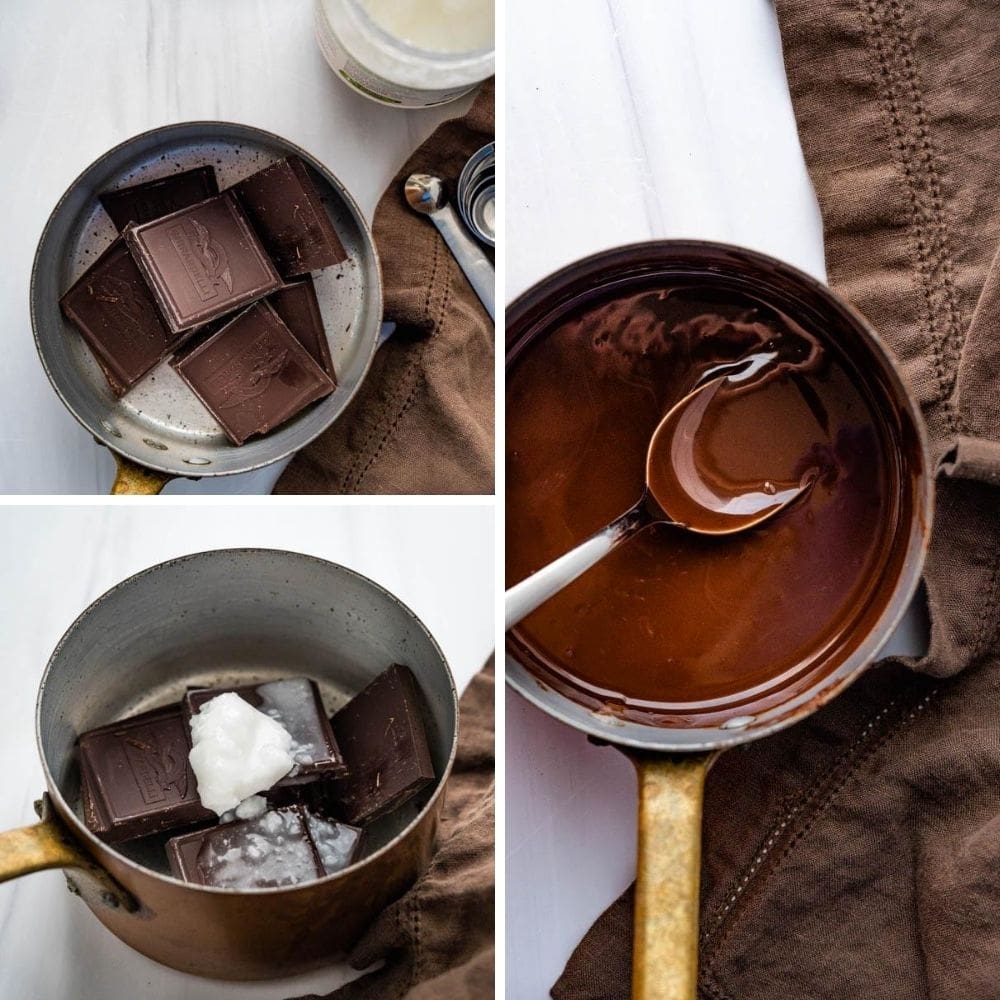
Making magic shell is easy, by simply melting good dark chocolate with coconut oil. The coconut oil is naturally solid when chilled, but melts at body temperature, which is what makes it ideal for ice cream.
You can melt pieces of chocolate and coconut oil in a pan over low heat (stirring regularly) or use an even simpler method by zapping it in a microwaveable bowl in 20 second increments. Stir after each nuke until the chocolate is completely melted.
Let the melted chocolate cool to room temperature before using with ice cream.
I usually make it just before I put the coffee Kahlúa ice cream on to churn. That way, the magic shell has cooled off before you start the layering and swirling process.
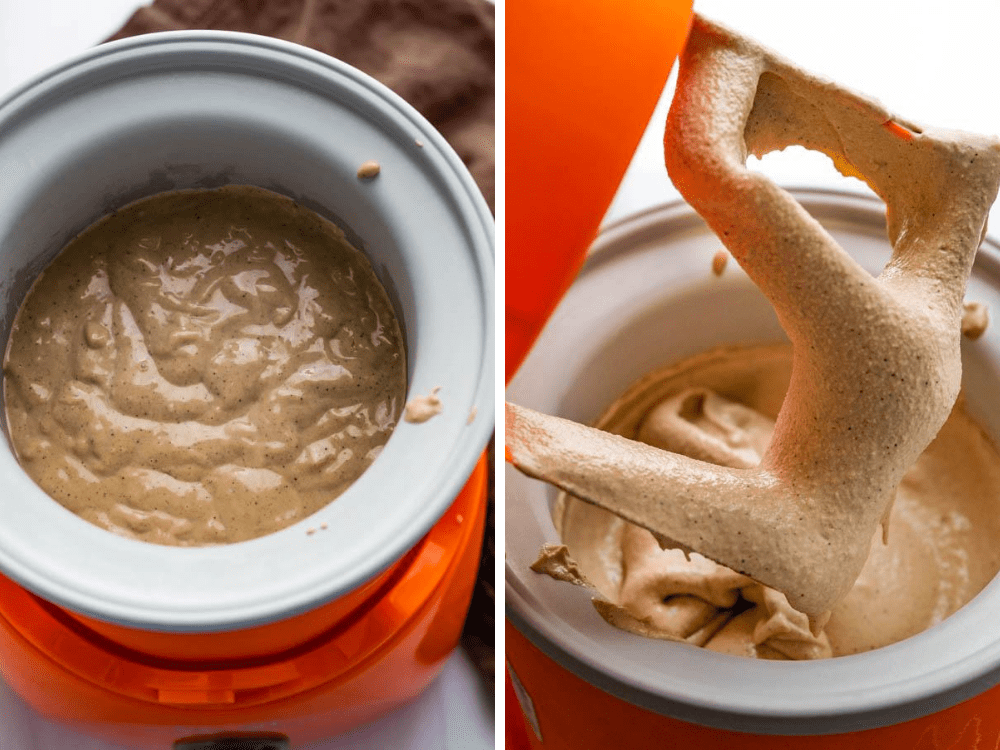
Churning espresso ice cream
Follow the manufacturers instructions for churning the ice cream. Most models can churn a perfect batch in 20-25 minutes.
As it nears the finish point, the ice cream will start to pull away from the sides of the churn and get very thick and creamy, resembling soft serve.
You need to have everything ready and work quickly when layering the ice cream and magic shell.
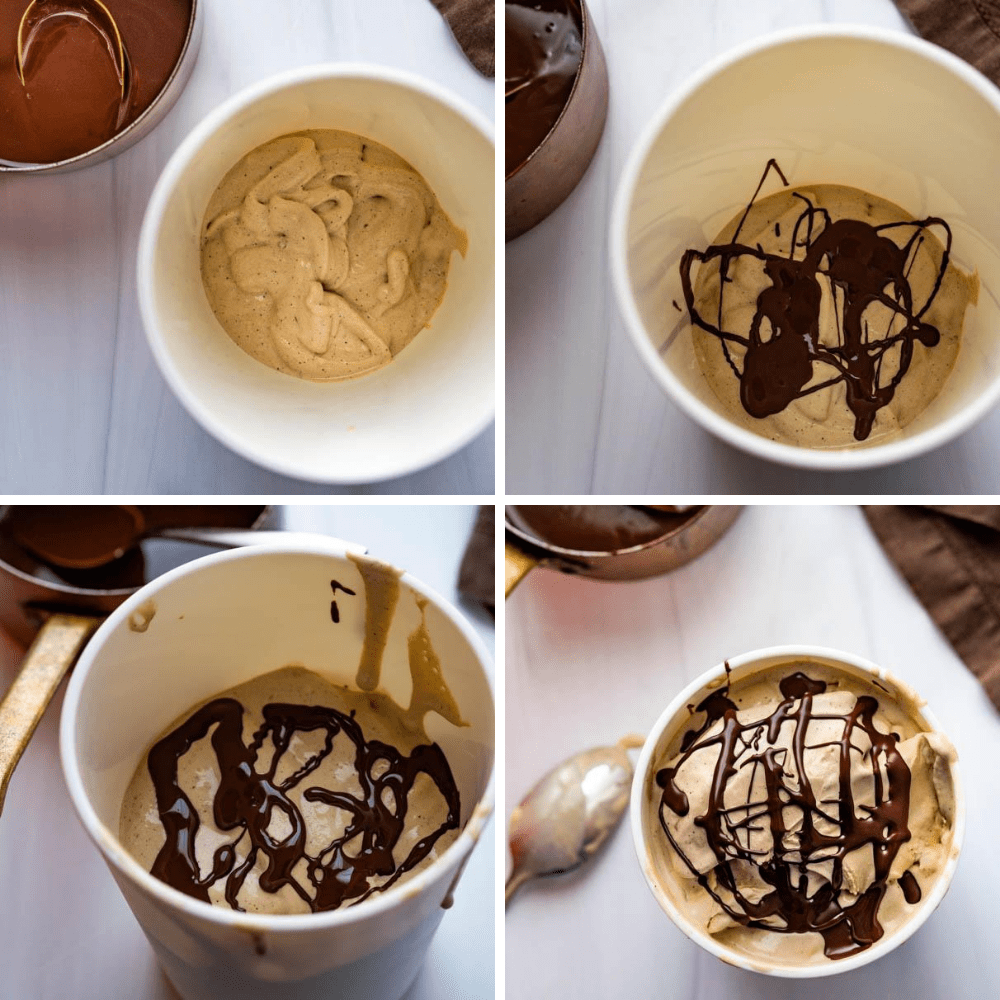
Layering magic shell with homemade coffee ice cream
- Transfer a large scoop of the ice cream to a storage container and drizzle on some magic shell.
- Top with more ice cream and more swirls of dark chocolate coating.
- Continue layering in this manner until all of the ice cream is used. Finish with a final drizzle of magic shell.
- Transfer the ice cream to the freezer for at least 4 hours to harden.
Other methods for using dark chocolate magic shell in ice cream:
- If you’d like finer bits of dark chocolate throughout the Kahlúa ice cream, churn the ice cream until it’s almost done. About 5 minutes before its finished, drizzle the magic shell through the lid opening while the churn is running. The magic shell will freeze, but also break up into little, bitty flecks and specks throughout the espresso ice cream.
- Of course, you could just save the magic shell for serving and drizzle it over a bowl of ready-to-eat ice cream for that classic, crunchy candy coating.
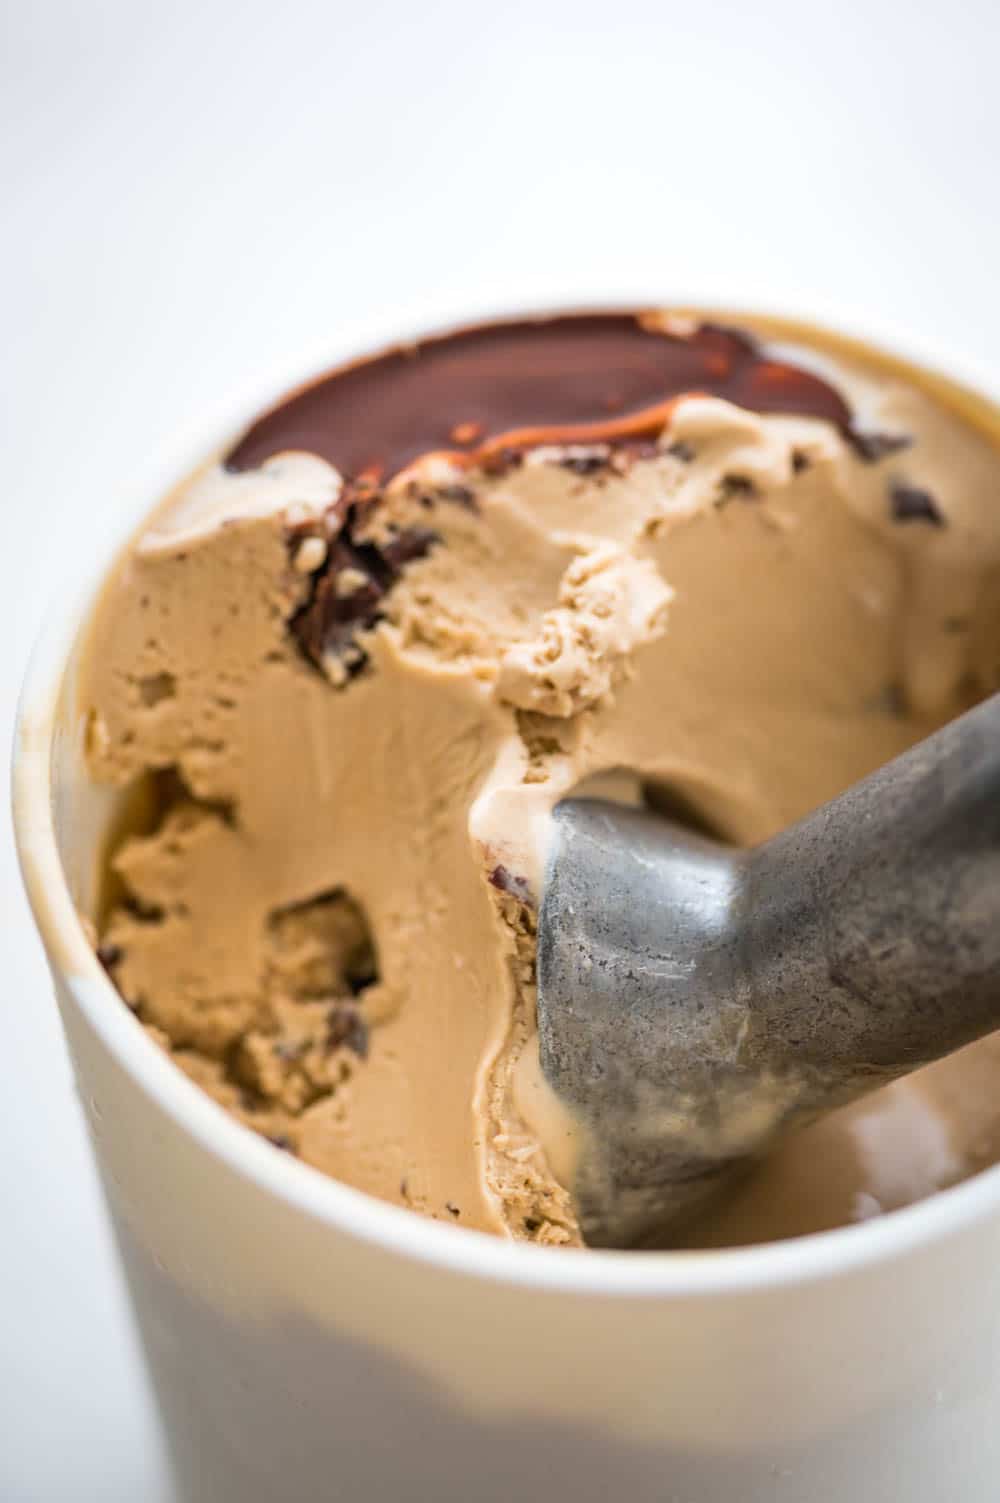
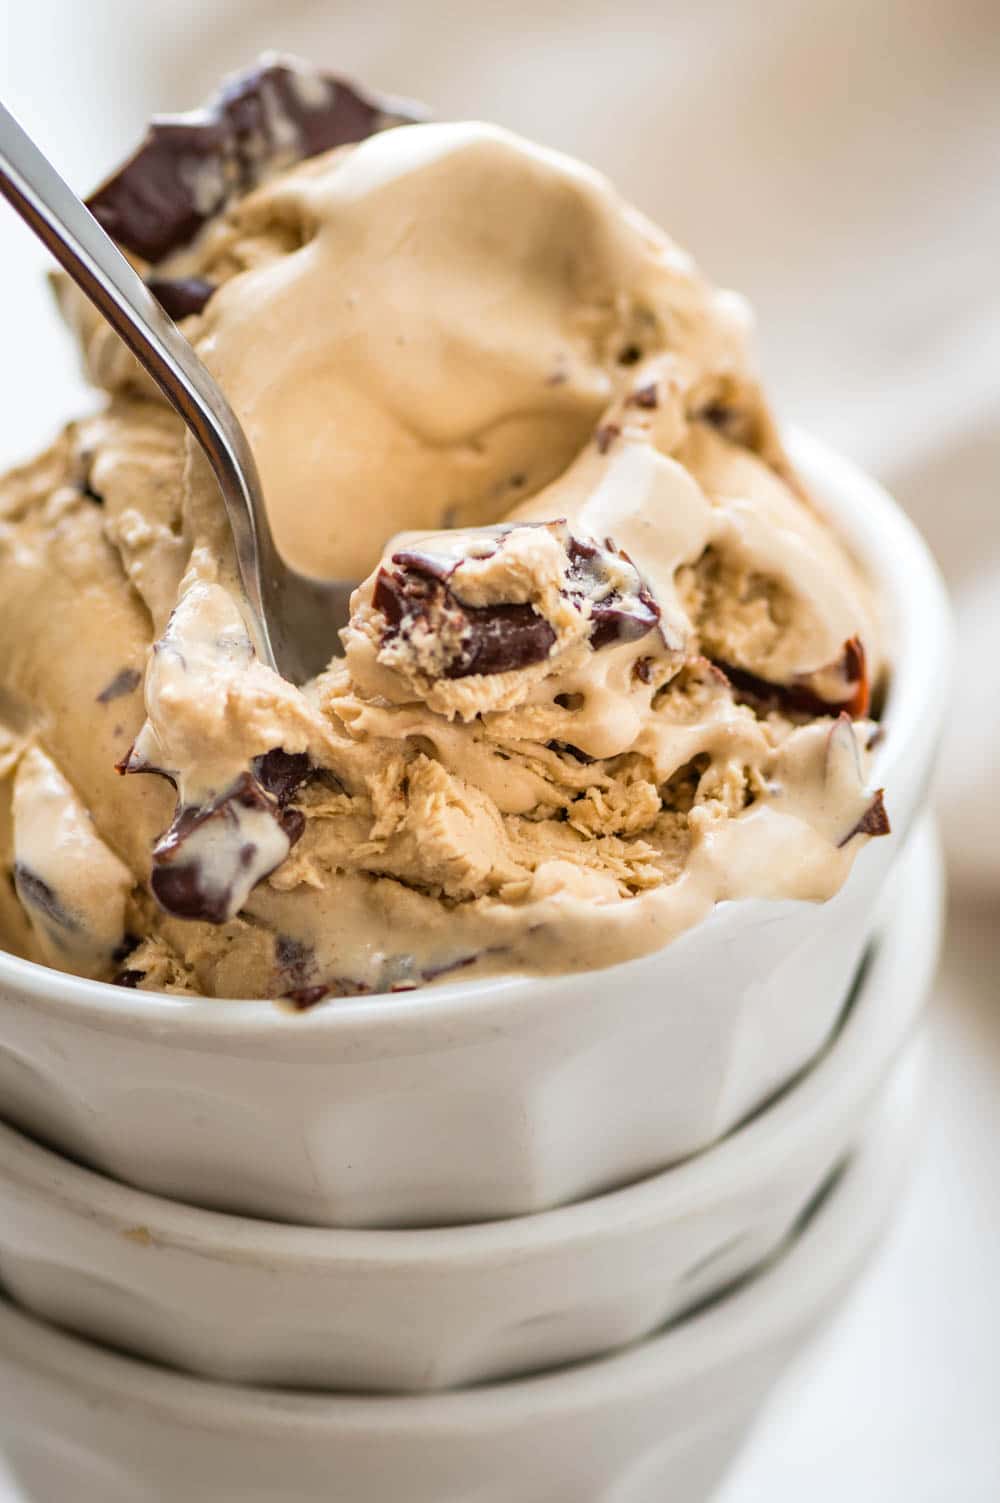
This recipe makes a full quart of blissfully creamy, never grainy espresso ice cream. The coffee flavor is reinforced with Kahlúa and much easier to scoop thanks to the wonders of alcohol. Those crunchy nuggets of dark chocolate swirl melt on the tongue and make the most luscious combination with the coffee ice cream.
You are in for a REAL TREAT with this one. My tasters didn’t stop until the whole container was gone, so although it makes 8 half cup servings — it really is tough to control yourself once you’ve had a bite!
Espresso Ice Cream with Dark Chocolate Swirls
SPECIAL EQUIPMENT:
- ultra fine mesh sieve or cheesecloth
INGREDIENTS:
FOR THE ICE CREAM
- 2 ½ cups whole milk
- 5 teaspoons cornstarch
- 3 tablespoons cream cheese
- ⅛ teaspoon fine sea salt
- 1 ½ cups heavy cream
- ½ cup sugar
- 3 tablespoons corn syrup
- ¼ cup dark roast espresso beans coarsely ground
- ¼ cup Kahlúa
FOR THE MAGIC SHELL
- 4 ounces good quality dark chocolate like Lindt, Scharffenberger or Valrhona
- 2 ½ tablespoons coconut oil
DIRECTIONS:
- In a small prep bowl, add the cornstarch and 2 tablespoons of the milk, stir to combine and set aside.
- Place the cream cheese and sea salt in a large bowl and using a hand mixer beat until smooth. Set aside.
- In a large, heavy bottomed saucepan (3-4 quarts), combine the rest of the milk, heavy cream, sugar and corn syrup. Bring to a boil over medium high heat, stirring occasionally with a wooden spoon. Reduce heat to a low boil and continue to cook for 4 minutes, stirring occasionally.
- Remove from the heat and add the coffee grounds. Let the coffee steep in the cream mixture for 5 minutes.
- Place a fine mesh sieve (or line a regular sieve with a cheesecloth) over a medium bowl and pour the coffee mixture through the sieve to strain out the grounds.
- Wash and dry the saucepan and add the strained coffee mixture back to the pan.
- Whisk the cornstarch slurry into the coffee mixture. Return the pan to the stovetop and bring to a boil, whisking constantly for 1 minute or until it thickens.
- Ladle about 1/2 cup of the coffee mixture into the cream cheese and beat, scraping down the sides with a rubber spatula until mixture is smooth. Add the remainder of the coffee mixture to the cream cheese and beat to combine.
- Stir in the kahlúa. Cover and refrigerate at least 4 hours or overnight.
FOR THE MAGIC SHELL:
stovetop method:
- Break the chocolate into pieces and transfer to a small saucepan. Add the coconut oil and heat over low heat, stirring occasionally until the chocolate is completely melted and smooth. Set aside to cool to room temperature before layering with the espresso ice cream.
microwave method:
- Break the chocolate into chunks ina small bowl and add the coconut oil. Place the bowl in the microwave and use 15 second bursts to melt the chocolate, stirring after each one until the mixture is smooth. Set aside to come to room temperature before layering with the ice cream.
CHURN:
- Transfer the ice cream base to your ice cream maker and churn according to the manufacturer's instructions.
ASSEMBLE THE ICE CREAM:
- Use a one quart ice cream container or a loaf pan. Pour about 1/4 of the churned ice cream into the bottom of the container. Drizzle 1/4 of the magic shell over the ice cream. Continue alternating between ice cream and magic shell, finishing with magic shell. Place the ice cream into the freezer and freeze for at least 4 hours or overnight to set.
- Scoop and enjoy!
NUTRITION:
Fantastic! New favorite!
WOW! Great ice cream. Loved it and will make it all the time.
I didn’t have espresso so used decaf coffee. Still great.
Need to get some for next time
Everyone has to try this recipe.
Thank you for sharing this wonderful recipe.