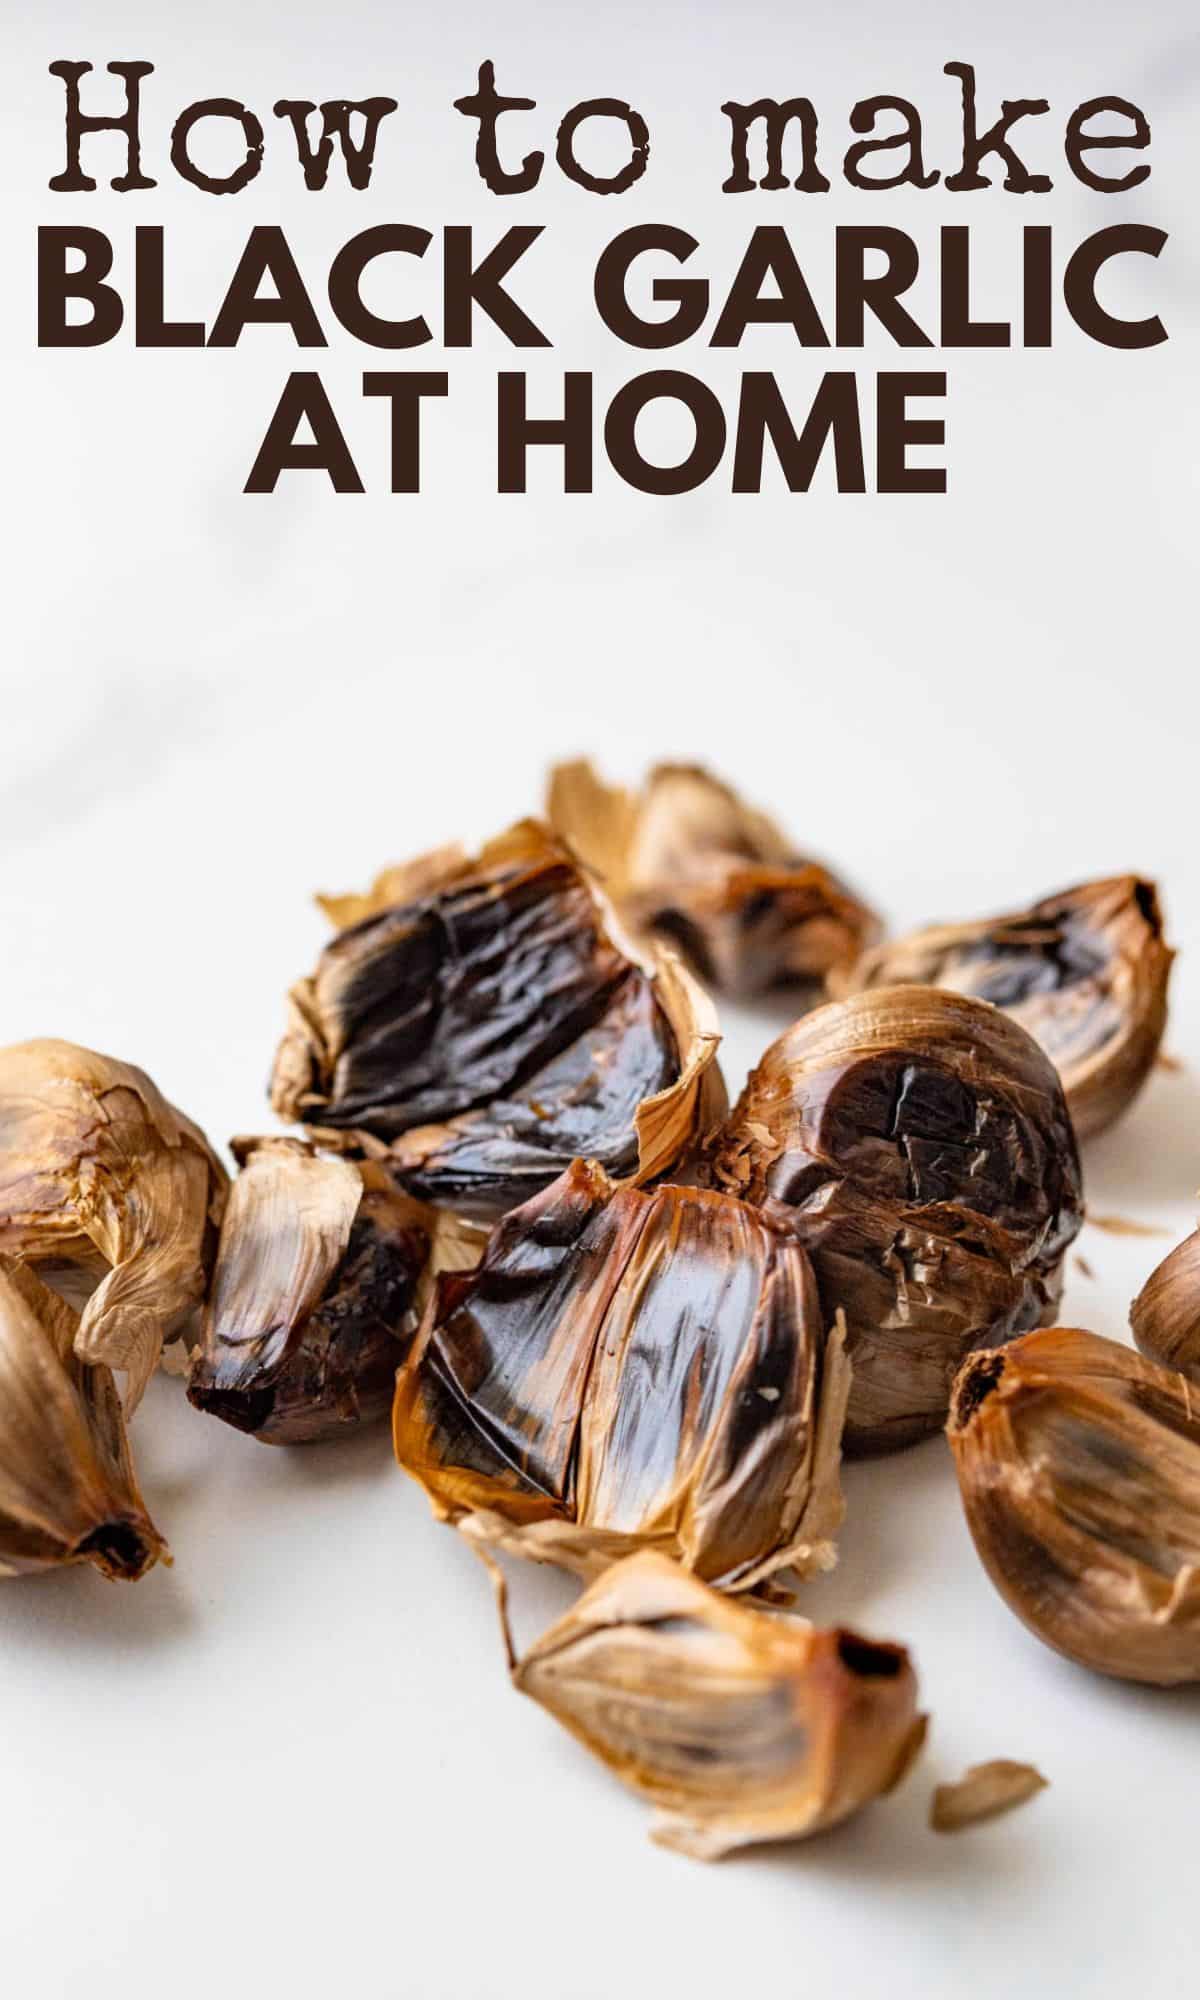
Black Garlic: What It Is, How to Make It + Recipes
Inside: Black garlic isn’t fermented — it’s something more interesting. Learn what it actually is, how to make it at home with common kitchen equipment, and the best ways to cook with it.
Black garlic isn’t a unique variety of allium. It’s regular garlic that’s transformed over time through consistently warm, humid conditions. The result is a soft, mellow, funky, rich, and, yes, black-colored garlic that enhances anything you add. In this post, I’ll show you how to make black garlic at home in the Instant Pot, give instructions for making it in a slow cooker, rice cooker, or food fermenter and give you a few ideas on what to do with this complex and coveted ingredient.
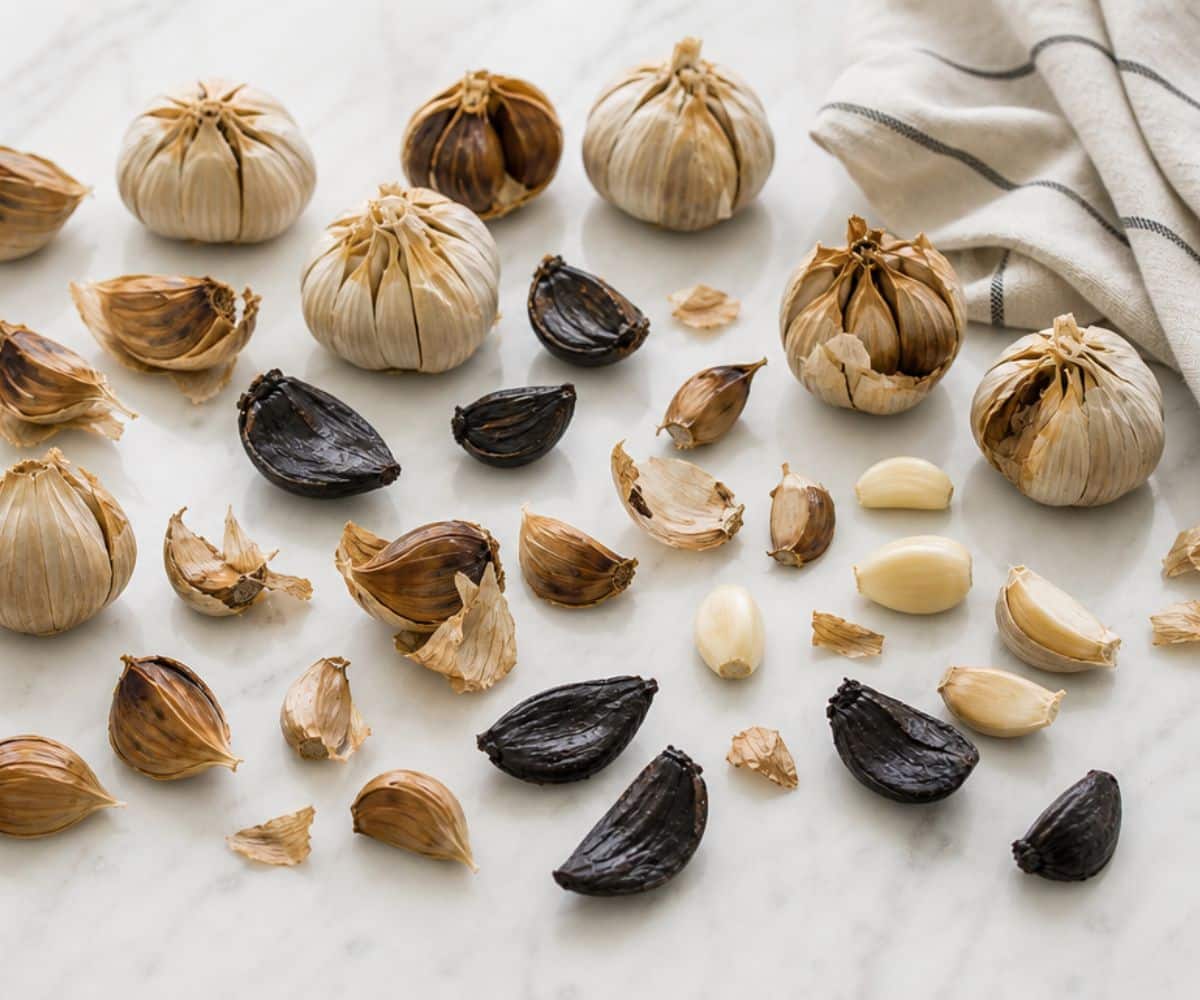
Black garlic
If you’ve never cooked with black garlic, you’re in for a revelation. These soft, dark cloves have transformed from sharp, pungent allium into something mellow, funky, and deeply savory — with a tangy molasses vibe that’s completely addictive. It’s a flavor you’ll notice, but can’t quite put your finger on.
What is black garlic?
Black garlic is regular garlic that’s been held in a warm, humid environment for several weeks, triggering a chemical reaction between the naturally occurring amino acids and sugars in the clove.
Here’s the part that surprises most people: black garlic is not fermented. It undergoes a Maillard reaction — the same browning process that gives a seared steak its crust or bread its golden color. The result is a soft, sticky, spreadable clove that’s earthy, tangy, and rich — nothing like the raw garlic it started as.
Watch the video to see how simple it is.
I did a video to show you how I made this using my Instant Pot. (Not shown in the video are the multiple times I checked to see how my garlic was progressing).
What does black garlic taste like?
The sharpness and sting of raw garlic are completely gone. What’s left is sweet, tangy, and umami-rich — with notes that people compare to tamarind, balsamic vinegar, or soy sauce. It’s complex without being aggressive, which makes it an incredible secret ingredient. It deepens flavors without announcing itself.
Where did black garlic originate?
Black garlic is believed to have originated in Korea, where it’s been used for centuries. It spread throughout Asia — particularly Japan and China — long before it became a fixture in Western restaurant kitchens and gourmet food shops. Today it’s having a moment everywhere from Michelin-starred menus to home cooks’ Instant Pots.
What you’ll need to make black garlic at home:
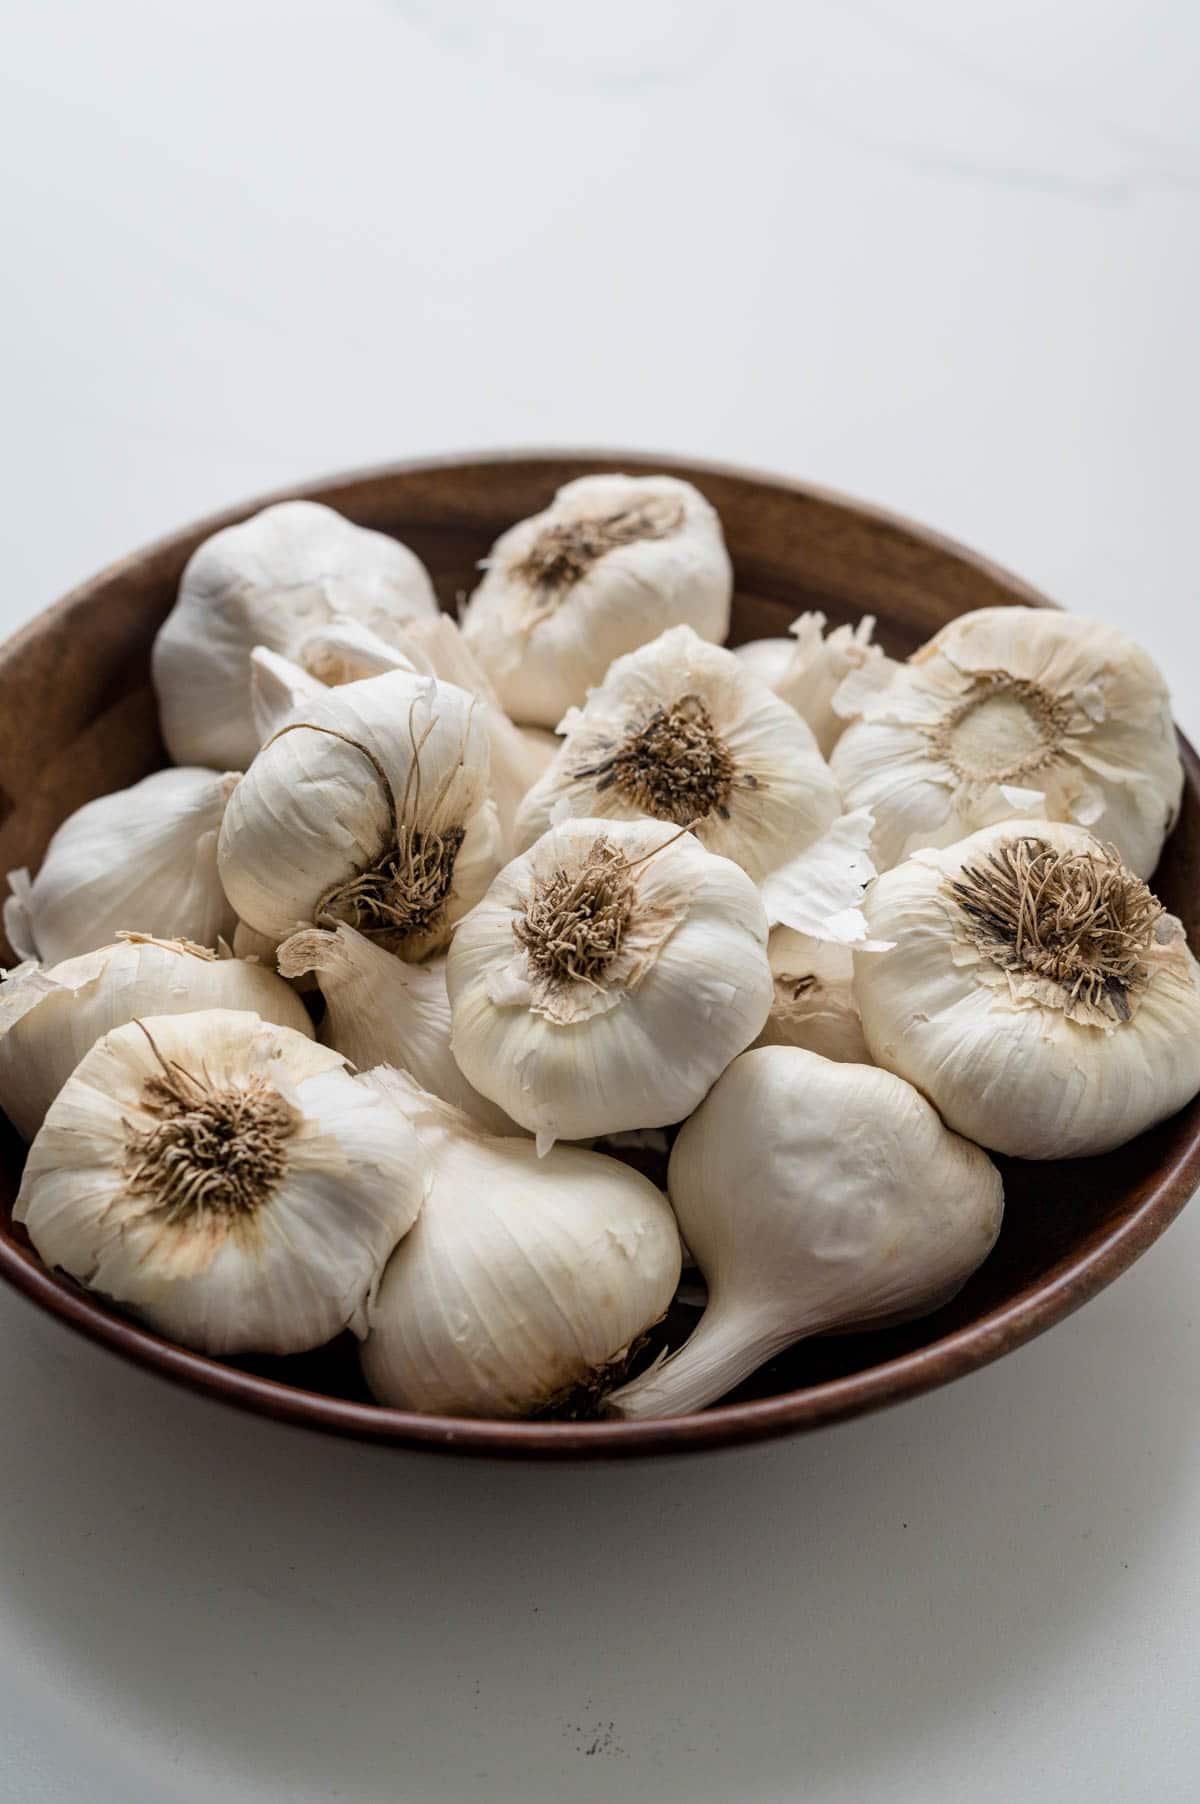
- Whole heads of fresh garlic–because this process takes a while, I recommend making a big batch.
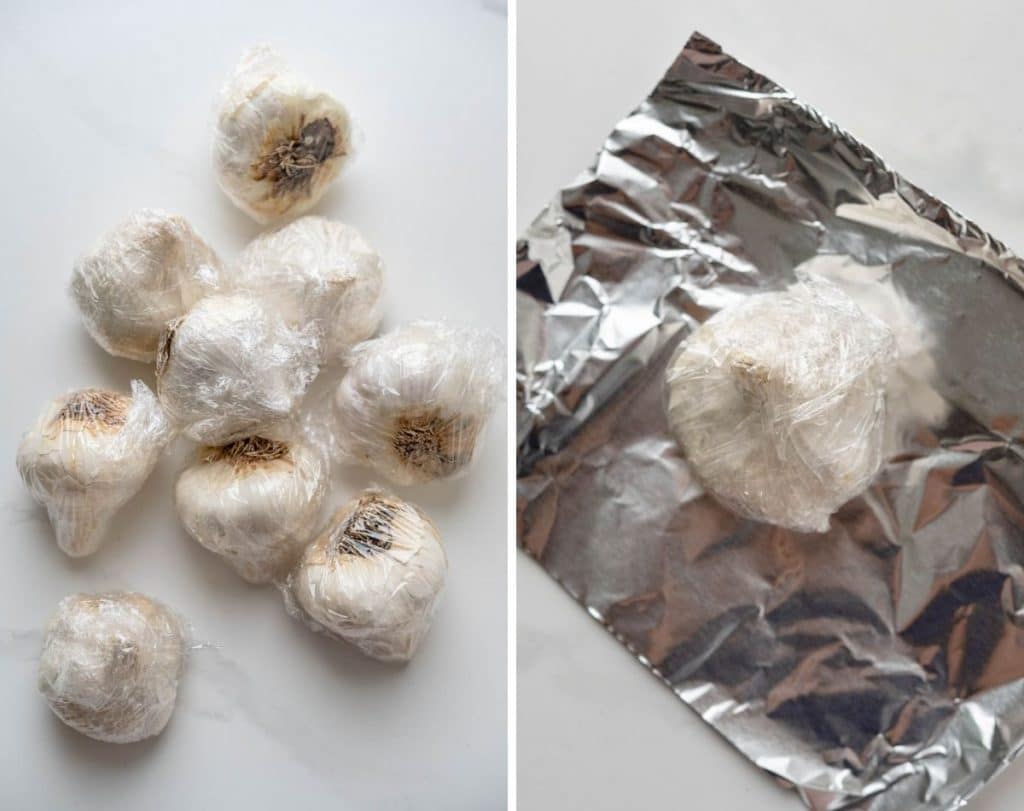
- Plastic wrap–use your favorite cellophane, it’s important because the garlic heads need to be wrapped well to trap the humidity and provide the correct environment for the metamorphosis.
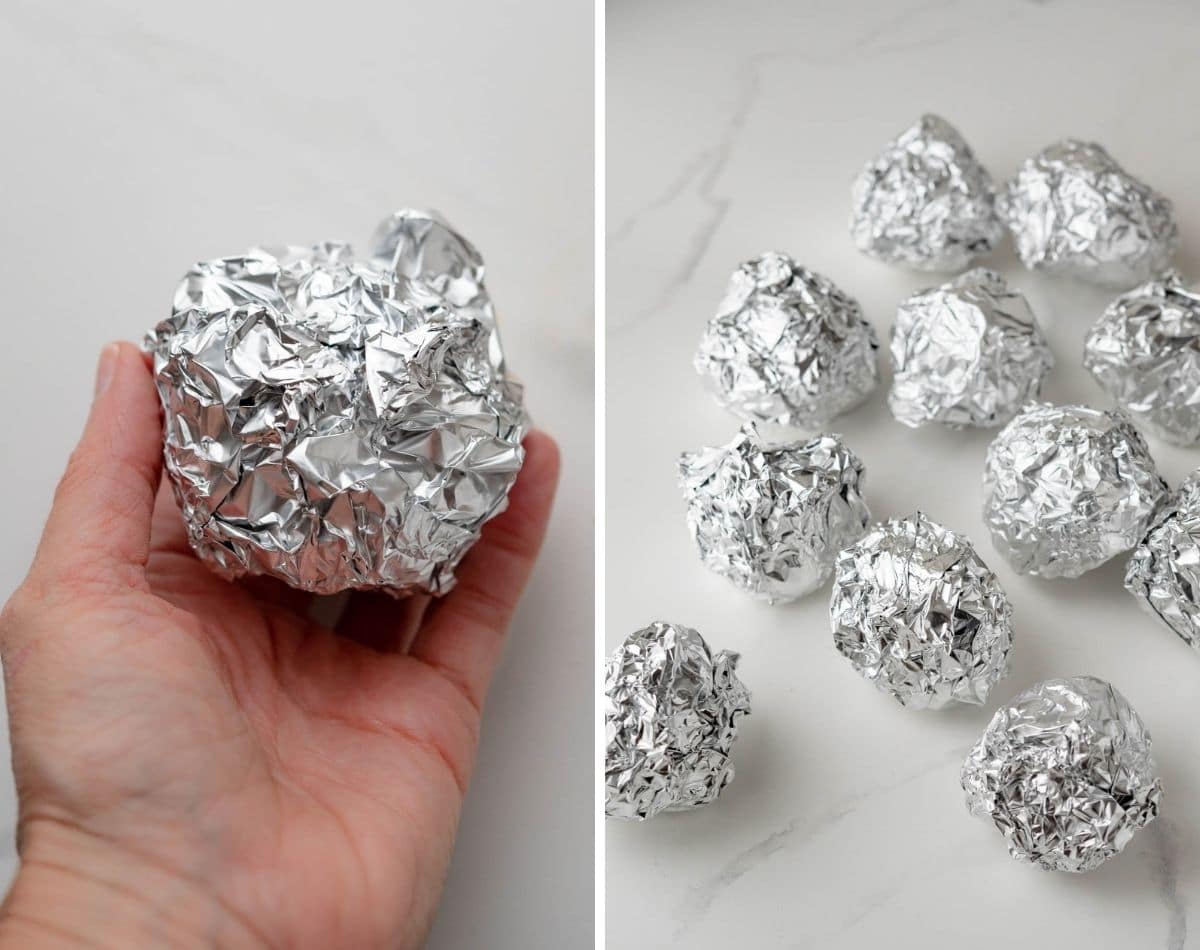
- Tin foil–each bulb gets a double layer of foil to promote the correct atmosphere.
- The right equipment. Use your choice of:
- An Instant Pot or
- Slow Cooker or
- Rice Cooker
- Food Fermenter.
- The proper space for processing–Garlic can be smelly and the first few weeks can be particularly intense. Look for an area of the house that you can close off, a garage, or covered outdoor space (my pick).
- Patience. This isn’t a quick process and can take anywhere from 3 weeks to 2 months.
I used an Instant Pot (not so instant for this recipe) for this demonstration, but you’ll have equal success with any other equipment mentioned.
How to Set Up Your Black Garlic Station
Set up your Instant Pot, slow cooker, rice cooker, or food fermenter in a well-ventilated space — a covered outdoor area, garage, or a room you can close off from the rest of the house. Trust me on this one.
The garlic aroma during the first two weeks is powerful. I set my Instant Pot in a spare bedroom, cracked the window, and closed the door — and the smell still drifted down the hall. That room became known as “the garlic room” and required some serious airing out (and Febreze) before it returned to normal.
If you’re sensitive to strong odors, outside or a well-ventilated garage is your best bet.
Making it is easy; it’s just a matter of time and patience.
Because it’s such a long process, I recommend making a big batch so you’ve got plenty for yourself and to give as gifts to all your foodie friends and relatives.
I made 16 heads for this batch. You can do more or less, depending on how much you need, but if I’m fermenting one head, it makes sense to make a big batch. The aromas are just as potent with one as they are with many.
How to Make Black Garlic in the Instant Pot
- Wrap each bulb of garlic tightly in plastic wrap — you want a snug fit to trap humidity.
- Wrap each plastic-wrapped bulb in two layers of tin foil.
- Place a rack in the bottom of the Instant Pot to elevate the garlic off the surface.
- Add the wrapped bulbs and secure the lid with the vent closed.
- Set to “Keep Warm” and set the timer to 99:59 (99 hours and 59 minutes — the maximum setting).
- Mark your calendar three weeks out — that’s when you’ll start checking progress.
How to Make Black Garlic in a Slow Cooker or Rice Cooker
The method is identical — wrap each bulb in plastic wrap and two layers of foil, place a rack on the bottom so the garlic isn’t sitting directly on the surface, and set to “warm.” Start checking for doneness around the four-week mark.
Pro tip: A food fermenter can cut the processing time nearly in half. They’re a bigger upfront investment but pull double duty for making yogurt, sweet rice, and other fermented foods.
How to know when black garlic is done
Use one bulb as your “official tester” throughout the process — unwrap it, check it, and rewrap it each time so the rest of your batch stays undisturbed.
Here’s what to expect at each stage:
- 3-4 weeks: Light caramel color, still quite firm. Not done — rewrap and give it another week.
- 5-6 weeks: Deeper brown, starting to soften. Getting closer but keep going.
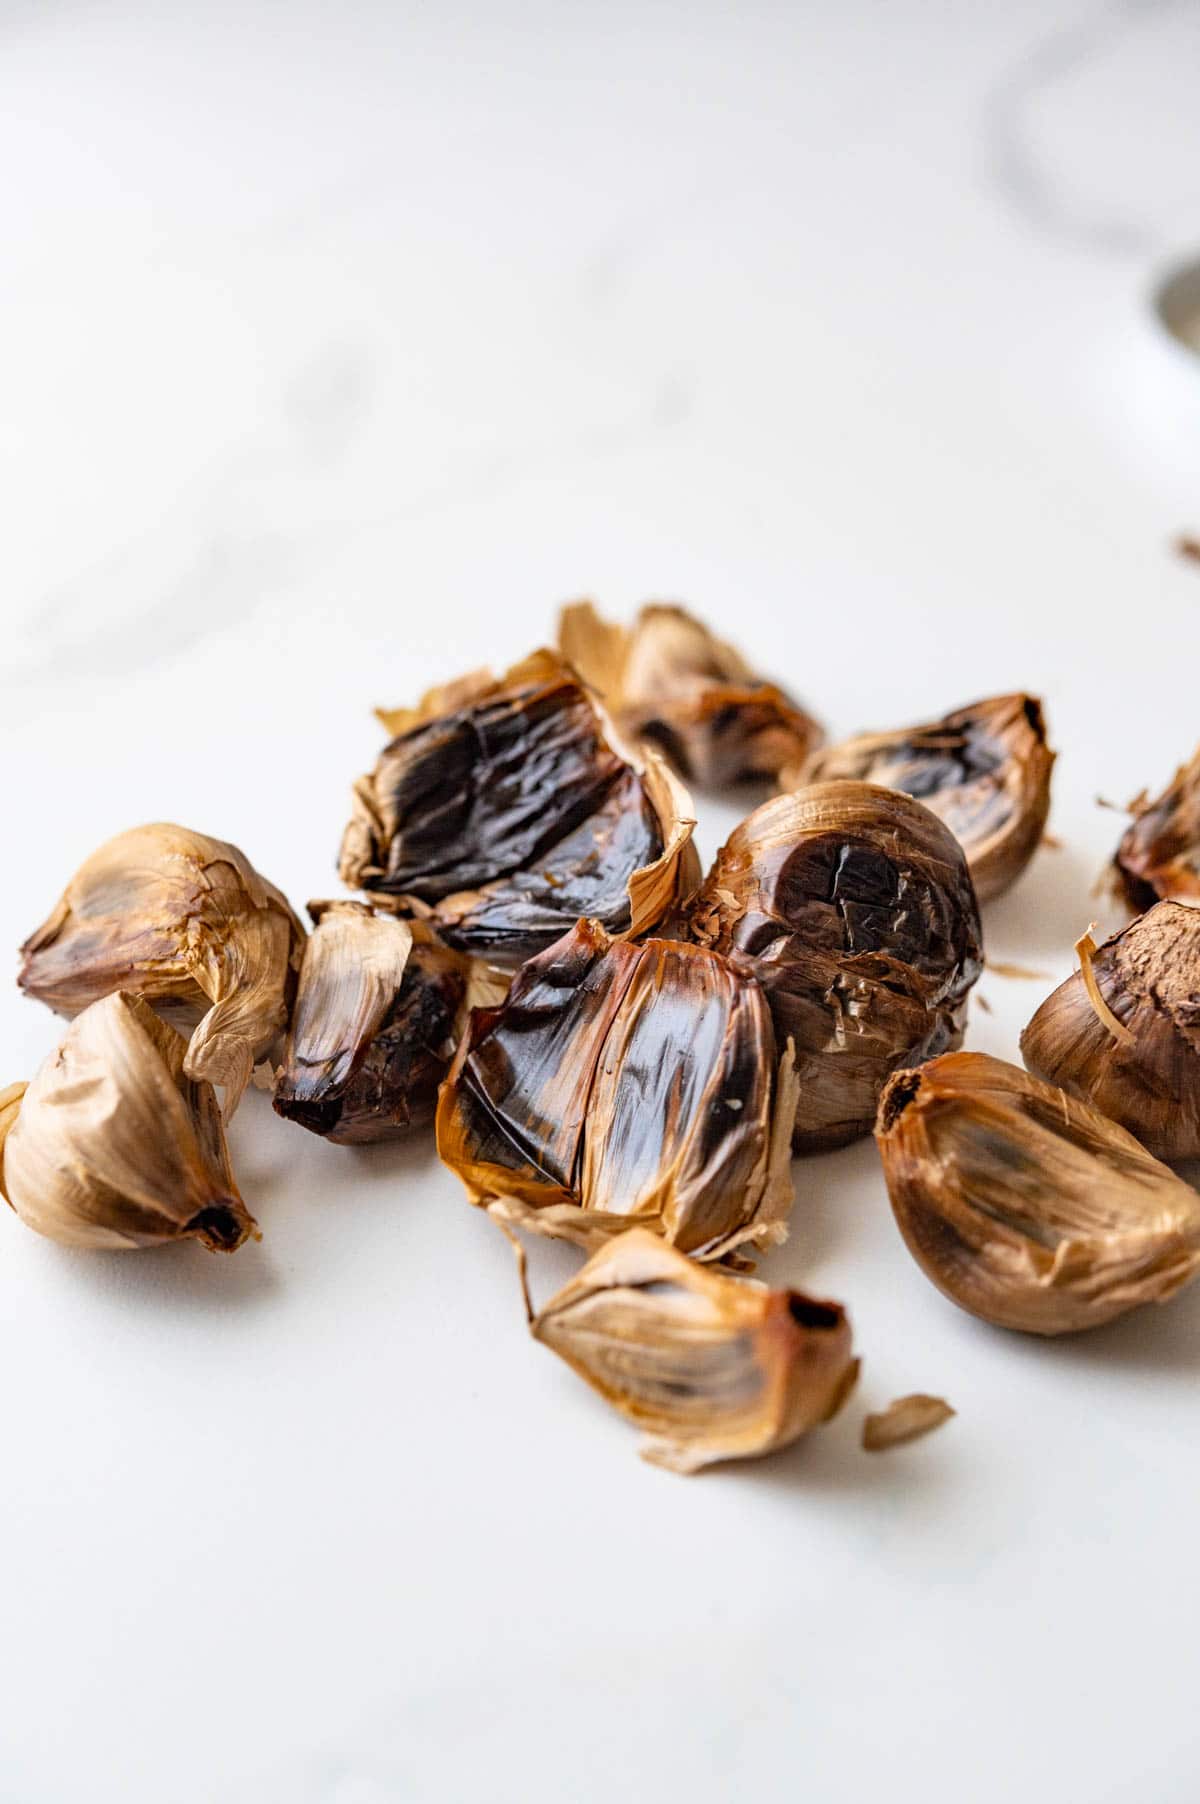
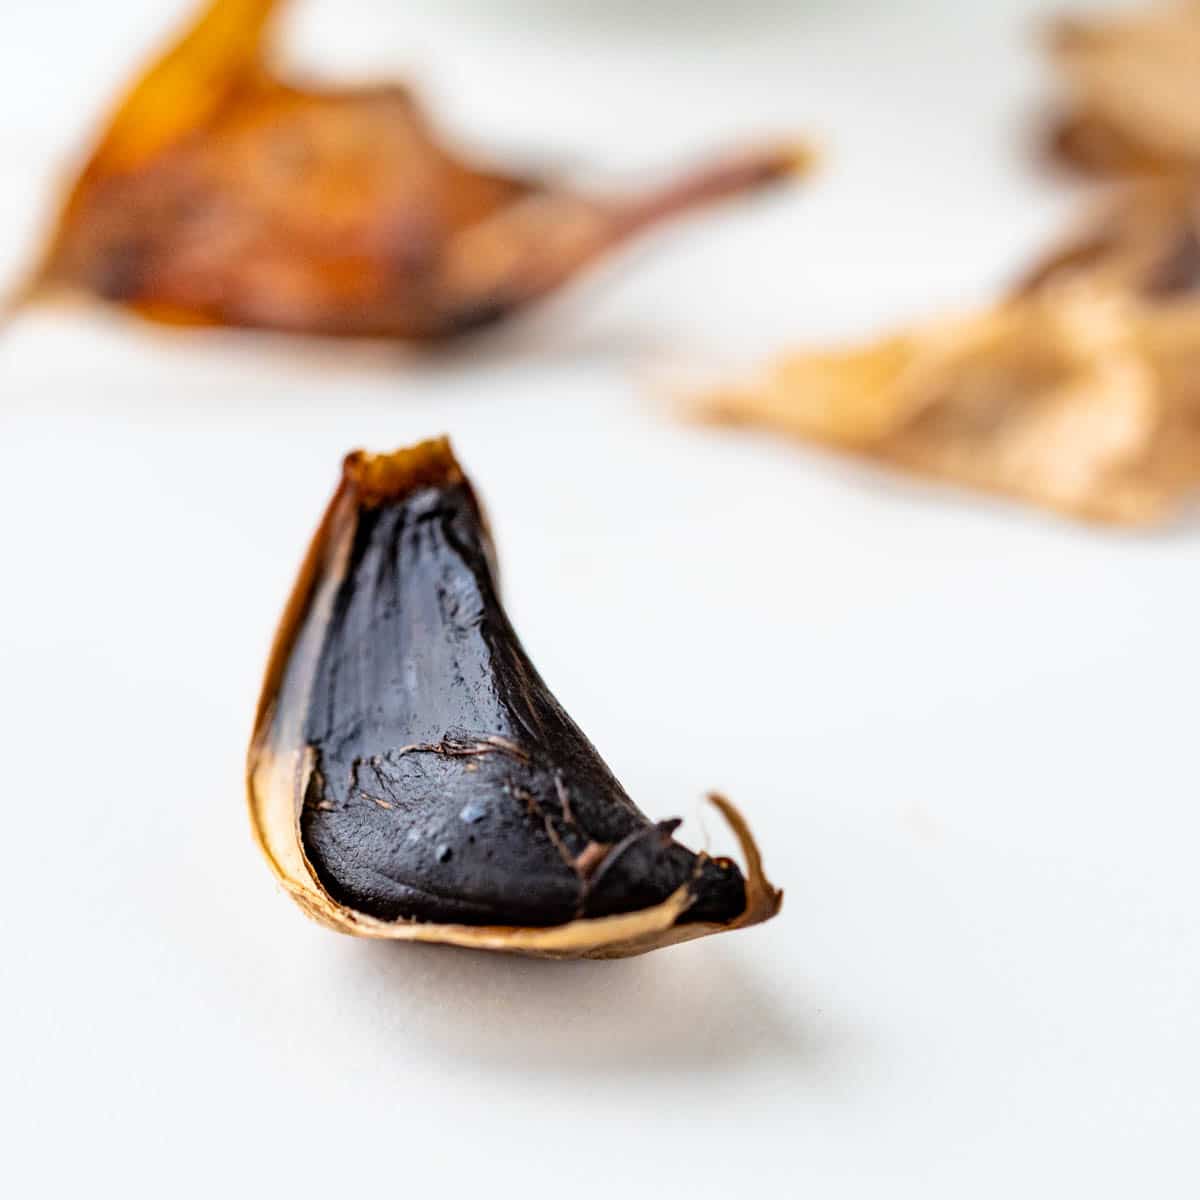
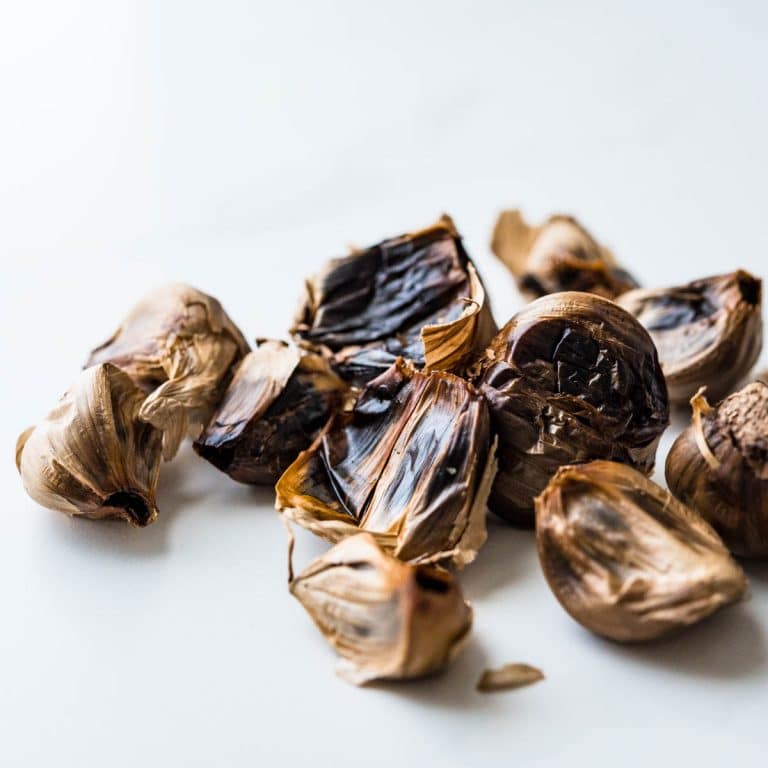
- 7-9 weeks: Dark brown to black, soft, sticky, and spreadable. This is your target.
To check for doneness, unwrap your tester bulb and pull off one clove. Remove the papery skin — the clove should be very dark, soft enough to mash easily with a fork, and slightly sticky to the touch.
Pro tip: You can keep going past the point of fully black. The longer it processes, the more concentrated and complex the flavor gets. If you want an intensely rich, deeply funky result, give it the full 9-10 weeks.
The photo below shows what it should look like when done.
Is it safe to make black garlic at home?
Yes — with one important condition: temperature control.
Black garlic requires a consistently warm environment of at least 57°C (135°F) throughout the entire process. This is non-negotiable. Food safety expert Dr. Brian Nummer, Ph.D. explains why:
“Foodborne illness bacteria will begin to grow at temperatures just under 57°C (135°F), including Clostridium perfringens and Clostridium botulinum. The toxin produced by C. botulinum is the most potent and deadly toxin known to man. For that reason, a temperature datalogger is recommended.”
The good news: the “Keep Warm” setting on most Instant Pots, slow cookers, and rice cookers maintains a temperature well above that threshold. If you’re using one of these appliances and following the instructions here, you’re in good shape.
If you’re uncomfortable with the process or working with equipment you’re not confident in, skip the DIY and pick up black garlic from a reputable source — the flavor is worth it either way.
FAQ’s
No — and this is the most common misconception. Instead it undergoes a Maillard reaction, which is a heat-driven browning process, not fermentation. There are no cultures, bacteria, or brine involved. The transformation happens through sustained heat and humidity over several weeks.
Nothing like raw garlic. The sharpness and pungency are completely gone, replaced by a sweet, tangy, umami-rich flavor with notes of tamarind, balsamic vinegar, and molasses. It’s complex and mellow at the same time.
Anywhere from 3 to 9 weeks depending on your equipment and how deep you want the flavor. Start checking at the 3-4 week mark and go from there.
Yes — a slow cooker, rice cooker, or dedicated food fermenter all work equally well. The method is the same regardless of equipment; the Instant Pot is just the most common option for home cooks.
Yes. Black garlic has been shown to help regulate blood sugar, triglycerides, and cholesterol. It contains antioxidants that may reduce the growth of certain cancer cells and block free radical development. Its anti-inflammatory properties support brain health and may help protect against conditions like Alzheimer’s and Parkinson’s disease. It’s also been linked to improved immune function and liver health.
The uses are nearly endless. Mash it into butter for steaks, stir it into pasta, make black garlic vinaigrette or use it for marinades, spread it on toast, or use it anywhere you’d want a deep, savory background note. A little goes a long way.
Store in a glass jar or paper bag in a cool, dark spot like a pantry. It keeps well at room temperature and doesn’t require refrigeration.
Up to 2-3 months at room temperature, 10-12 months in the refrigerator, or a year or more in the freezer well-wrapped.
Yes — wrap individual cloves or whole heads tightly and freeze for up to a year. Thaw in the refrigerator overnight before using.
How to use black garlic
Start by peeling off the papery skin — the cloves underneath are soft enough to mash easily with a fork or the back of a spoon. From there, the possibilities are pretty much endless.
A few of my favorite ways to use it:
- Black garlic butter: Mash equal parts black garlic and good quality butter into a paste. Top a grilled steak with a generous spoonful and a bit of chopped parsley. Your guests will ask “what is that flavor?” all night.
- Pasta and risotto: Stir a few mashed cloves into the finished dish for a deep, savory background note that’s hard to put your finger on but impossible to ignore.
- Dressings and marinades: Blend into vinaigrettes or marinades for beef, lamb, pork, or chicken. It adds complexity without overpowering.
- Toast and bread: Spread it straight from the clove like a soft, funky, umami-rich alternative to roasted garlic.
- Stir fries and sautéed vegetables: Toss a clove or two into the pan — it deepens the whole dish without the sharpness of raw garlic.
- Burgers and meatballs: Mix mashed black garlic directly into the meat before cooking. Trust me on this one.
Since you’re making a big batch, set some aside for gifting. A jar of homemade black garlic is one of those hostess gifts that makes people feel like they’ve received something genuinely special.
I gave a jar to my Mom, who was so excited she immediately lifted the lid to take a deep whiff of that funky, pungent aroma. She was already planning her first use before she’d even left my kitchen.
Tag me on Instagram @garlicandzest when you make it — I love seeing your creations!

What to make with your black garlic:
- Creamy Black Garlic Vinaigrette–the fastest way to get black garlic onto your table. Drizzle it on salads, grain bowls, or roasted vegetables.
- Easy Garlic Confit– if you loved making black garlic, this is your next project. Same low-and-slow patience, incredible results.
More garlic-forward recipes you’ll want in your rotation:
How To Make Black Garlic
SPECIAL EQUIPMENT:
- Instant Pot
- plastic wrap
- tin foil
INGREDIENTS:
- 16 heads garlic
DIRECTIONS:
- Tear 16 pieces of foil (about 6" wide) from a roll of tin foil. Stack the foil and use a pair of scissors to cut the foil in half horizontally. Set aside.
- Cut pieces of plastic wrap (about 5" wide and large enough to wrap an individual head of garlic). Wrap 16 heads garlic individually in a tight wrapping of cellophane.
- Cut a sheet of foil into 32 five-inch squares. Wrap a head of garlic in one piece of foil to cover completely and then wrap them in another piece, so it's a double-layer of foil (this will ensure the proper environment for the allium).
- Place a rack in the bottom of the Instant Pot and add the wrapped garlic heads.
- Secure the lid with the vent closed. Set the Instant Pot to "Keep Warm" and set the timer for 99 hours. (Note: you'll have to continue to set the timer every 4 days until the garlic is done–don't take any long trips).
- Let the garlic undergo its slow transformation in the warm environment for 3-10 weeks, checking for doneness every 3 weeks and resetting the timer as necessary.
- Once it's blackened and soft enough to mash with a fork, remove the foil and plastic wrap and store the black garlic in airtight containers at room temperature.
RECIPE VIDEO:
NOTES:
NUTRITION:
Pin It For Later!
I can’t imagine eating cloves of garlic that have been wrapped in plastic and aluminum foil and heated. Both of those wraps are toxic. There’s gotta be a better way to do this.
I understand where you’re coming from. The plastic wrap is the best method for keeping the garlic at the proper humidity level, and since it’s a very low heat, basically just keeping it warm for a few months, so I was less concerned. There are probably more issues with putting plastic over a dish of leftovers and sticking it into the microwave.
Aluminum foil is generally safe when heated (again, at a low heat). If you’re really concerned, consider a food fermenter or a food fermenter or buy commercially available brands.
Can you make black garlic in a warming oven? Mine has a slow cook option. I have a heavy metal garlic cooker that I use in the regular oven to bake elephant garlic. I wonder if I could use that and a warming oven on either high or low slow cook. I need to verify the temperature settings.
I’ve never used a warming oven for this, so I can’t be sure. Theoretically, it might work, but the odor from the garlic would be prohibitively stinky completely permeating your kitchen and likely the whole house for at least two weeks.
So, basically the same method but with different equipment. I’ve heard you can make it with wax without any equipment.
Thanks for interesting artikkel.
Do you have any idea of maximum temperatur, thinking of trying the pressure cooker, whit water inside, idea is that no wrapping would be needed cause the high level of moist inside the cooker, but I guess the temperatur be difficult to control, coming to high the feds will be cooked I guess 😉 and the fermenting prosess never happens, just a silly question from at total amateur.
You checked the garlic at 4 weeks and then once a week for another 5-6 weeks so the total time was 9-10 weeks correct?
Yes!
What model / version of instant pot can the warming function be programmed to 99 hours?
I am on my third different version of the Duo model and they only allow up to 10 hours. I called Instant Pot customer care and they could not answer me. Their recommendation was to use the slow cooker function at low temperature setting to be able to program to 99 hours. However the slow cooker function low temperature is too hot for this process. The warm function has the correct temperature on low of 145F.
Mine is model #IP-DUO60V3
Hello Ted,
145°F should actually be fine. Just read this academic article (https://pubmed.ncbi.nlm.nih.gov/26212875/) that suggested that 70°C (158°F) is the optimal temperature for black garlic formation. Just did a batch of 30 heads and I would agree with their assessment. Really delicious and only took 1 month’s time! Really as long as you keep your temp above 56°C you’re good. That’s the temperature at which the bacteria responsible for Botulism dies 😉
Happy cooking!
-Shawnee
Do you leave the pressure valve on the instant on the on or off position?
You’ll definitely want the pressure valve on — the aromas are strong enough that way, it would be way too stinky if you let it air!
you use fresh garlic bulbs are they fresh from farmers market or could I just use garlic from Walmart store as it is cheaper
You can use garlic from the store.
I’m worried about the plastic. There is lots of evidence that heating food in plastic means that you will be eating the microplastic that is released. Even without heating, plastic releases micro plastics. I’ve read recipes without plastic, but they say don’t let the heads of garlic touch each other. That means you can’t do many heads at a time.
I’d love to know how it was made before rice cookers, slow cookers etc and before plastic and foil. I’ve researched, but can’t find any information. Do you happen to know?
Looking into this.
This is exactly what I wanted to know. Plastic and aluminum foil are toxic.
People had to be making this somehow before they were all these fancy kitchen gadgets. I don’t own any of them and I have no intentions of buying any of them.
There has to be a traditional way of doing it, making this.
How do you store it once your done? I noticed a picture with the garlic in glass jars. How long will it last in a jar? Store in cool dark place? Refrigerator?
I store in the pantry in a glass jar for up to 6 months… It may be good beyond that point as well… just haven’t gotten that far yet.
Hi! I just started a batch a couple days ago but my recipe didn’t say to wrap them? Do I need to?
My thought is that wrapping them in plastic and then in foil will help maintain the humidity level and help in the fermenting process. That’s not to say it couldn’t work if you didn’t wrap them — maybe someone else has a different method that works for them.
When garlic goes back down on price I will try doing black garlic..
Hi excited to continue with my black garlic journey. I’m starting to find out I must ferment at a longer process time for the results to get the whole bulb, opposed to the cloves which is a shorter process time . My question is I have a lot of frozen garlic Can I put the frozen garlic directly in the fermenting machine keep at 57c I believe and of course its longer time period for the results I’m trying to achieve , which is a whole bulb fermented not the cloves very frustrating to peel cloves then dealing with the whole bulbs .
your thoughts ? thank you so much for any advice in advance.
Stephen Ruiz
I’ve never used frozen garlic, but I don’t see why you couldn’t ferment it with your method of choice.
You do realize without following
food safety guidelines, proper procedures and using the correct equipment, making black garlic at home can be dangerous? Temperature must be maintained, monitored and ph levels have to be correct or it can produce botulism and other toxins…
This is what food safety expert, Dr. Brian Nummer PhD has to say about making black garlic-
“The “fermentation” temperature MUST be at 57°C (135°F) or above. Failing to maintain this temperature control could lead to foodborne illness. Foodborne illness bacteria will begin to grow at temperatures just under 57°C (135°F) including Clostridium perfringens and Clostridium botulinum. The toxin produced by C. botulinum is the most potent and deadly toxin known to man. For that reason a temperature datalogger is recommended.”
“The black garlic fermentation is quite different than a traditional vegetable fermentation like sauerkraut (cabbage) or pickles (cucumbers). Both cabbage and cucumbers have natural (biota) lactic acid bacteria that rapidly ferment the vegetable sugars in a salt brine at ambient temperatures. This rapid fermentation inhibits the growth of pathogens like C. botulinum. Once the brine reaches an acidity pH of 4.6 or less, C. botulinum cannot grow. The black garlic fermentation may or may not result in an acid fermentation.”
It’s not as easy as you think, even if you made one batch on your “Insta Pot” and did not have any issues. People could get sick encouraging this. Leave it up to the professionals.
I’m sorry but I have a problem going with the guidelines of food and safety. Because our food is not safe at all. They’ve let more toxins into our food than any other country. Some of the countries won’t even take our food. They have depleted our food of most of its minerals and vitamins due to them buying up all the land and making a profit for themselves. They don’t let the land rest. Therefore, all of its vitamins have been depleted out of the soil. And then they spray all kinds of dangerous chemicals on the plants to keep the bugs out. So if you want to go by food and safety, have at it. But most of us want to live healthy.
Cannot wait to try this! Gold!