Cream Cheese Pastry (for sweet & savory recipes)
Inside: The quick and easy shortcut for making cream cheese pastry from scratch for flaky quiches, tarts and pie crusts–and I share the top mistakes to avoid for achieving a cream cheese pie crust that delivers bakery-quality results.
Want an easy pie crust without shortening? This simple cream cheese pastry dough is made in minutes with a food processor. The recipe uses butter and cream cheese for a rich, flaky homemade pie crust that’s perfect for many recipes. I use this cream cheese pie crust for quiche and mini shells for appetizers or bite-sized desserts.

This recipe came from the King Arthur Flour Baker’s Companion Cookbook {affiliate link}. It’s a tome I go to regularly because the recipes are reliable and tasty. And they’ve got my back when I’m looking for a basic but foolproof baking recipe (because baking is a science).
Homemade cream cheese pie crust
I regularly use this cream cheese pastry dough because it yields a tender, flaky pie crust that’s perfect for everything from mini pie shells for my favorite bite-sized lemon tarts to full-sized savory Ham Mushroom and Leek Quiche and mini appetizers, like this mushroom tart recipe.
You’ll love this cream cheese pastry dough because it comes together in seconds using a food processor (or you can use a pastry blender and do it by hand, if you prefer the old-school approach).
Ingredients:

- Butter–Use cold butter for this recipe.
- Cream Cheese–Be sure it’s very cold. You can use whichever brand you prefer – Philadelphia cream cheese works well, but store brands are also acceptable.
- Sugar–for just a touch of sweet.
- Salt–Use regular iodized salt, not kosher salt.
- All-purpose flour–I recommend unbleached flour. My favorite is from King Arthur. I store my flour in a resealable plastic container (it’s easier to fluff and scoop rather than doing it from a bag of flour, and it prevents weevils or other unwanted critters from getting into it).
I love this method of making pie crusts in a food processor. The ingredients come together in seconds, and the work is minimal. The dough is a bit sticky at first, so it’s important to refrigerate it before rolling it out.
How to make pie crust in a food processor
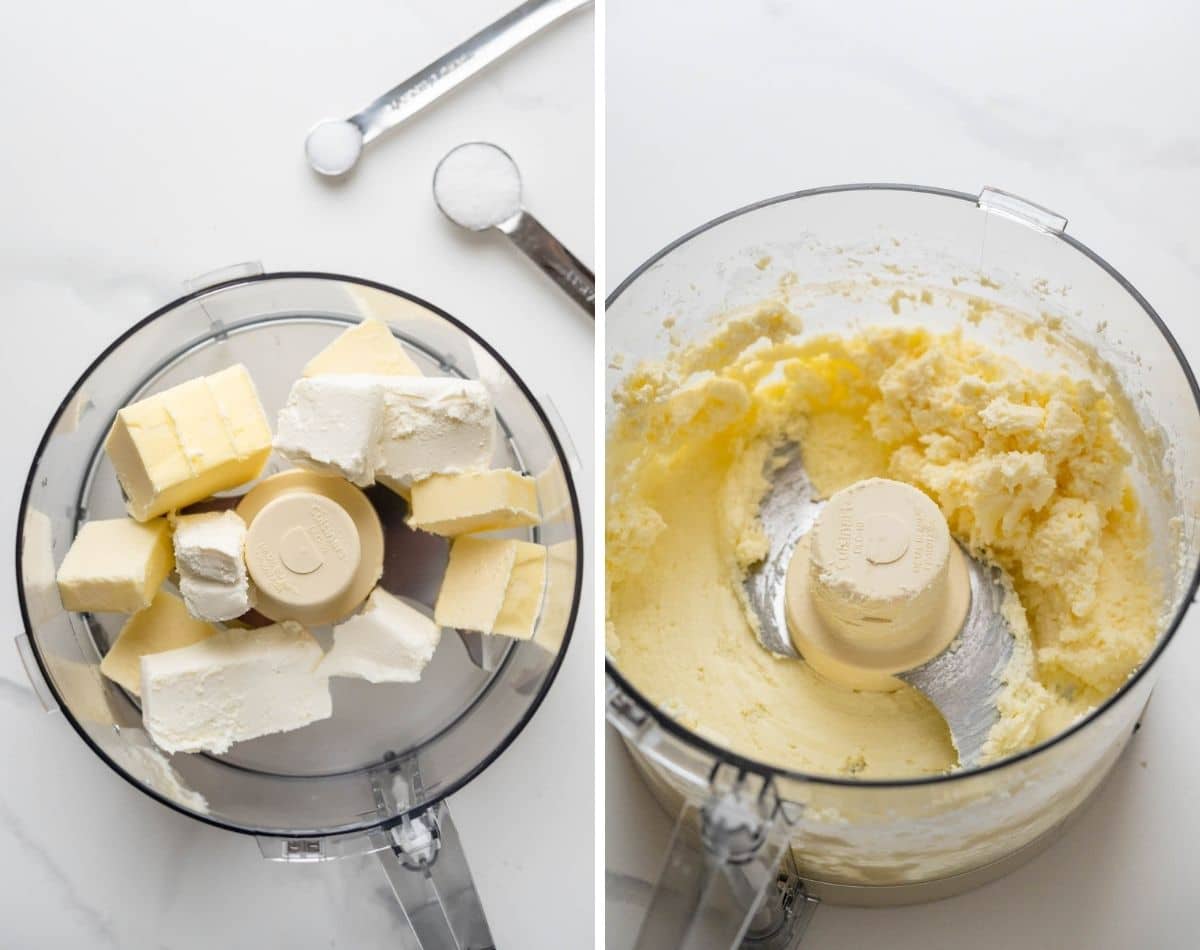
- Add the butter and cream cheese to the food processor, then add the sugar and salt.
- Blend until the mixture is very smooth (you may need to scrape down the sides of the food processor once or twice).
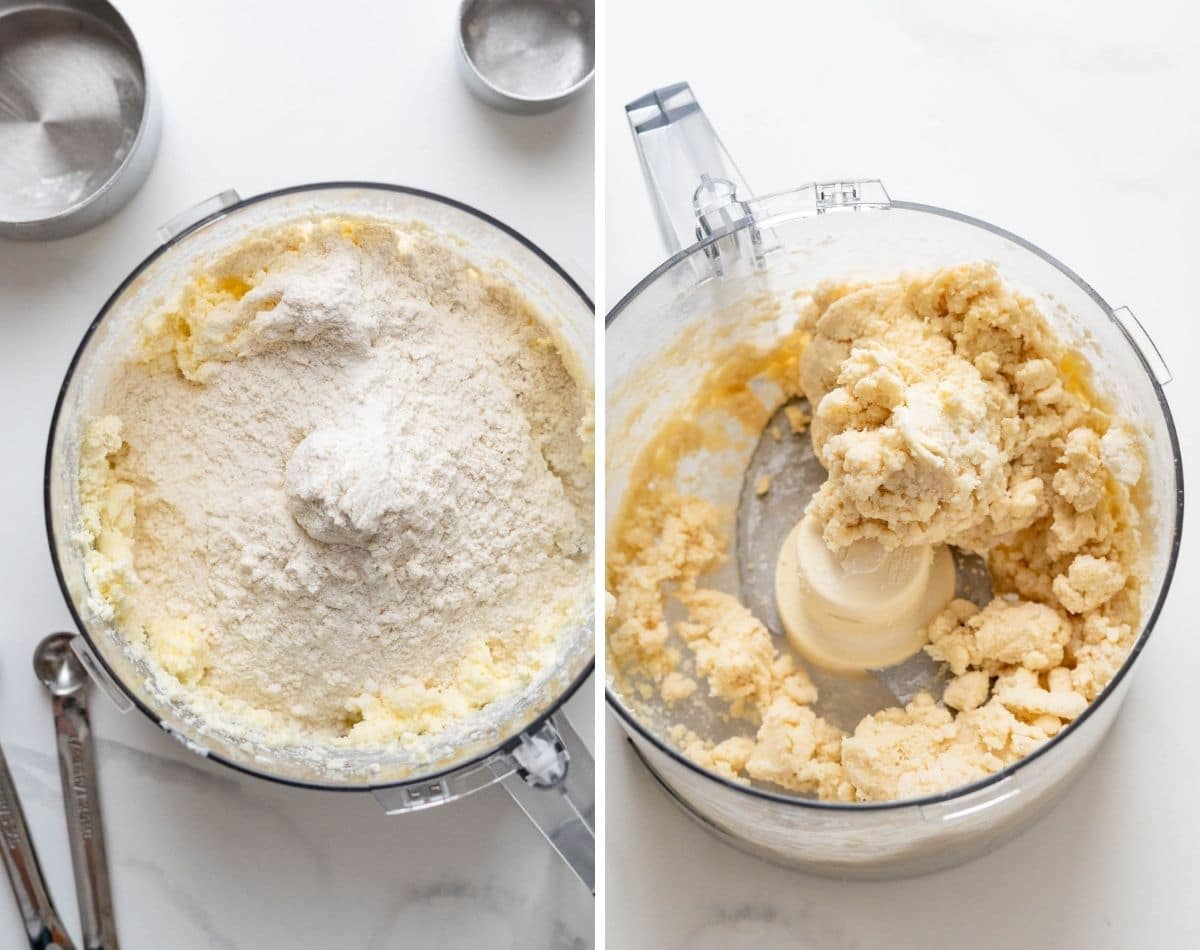
- Add the flour and pulse in short bursts until the dough forms a loose ball.
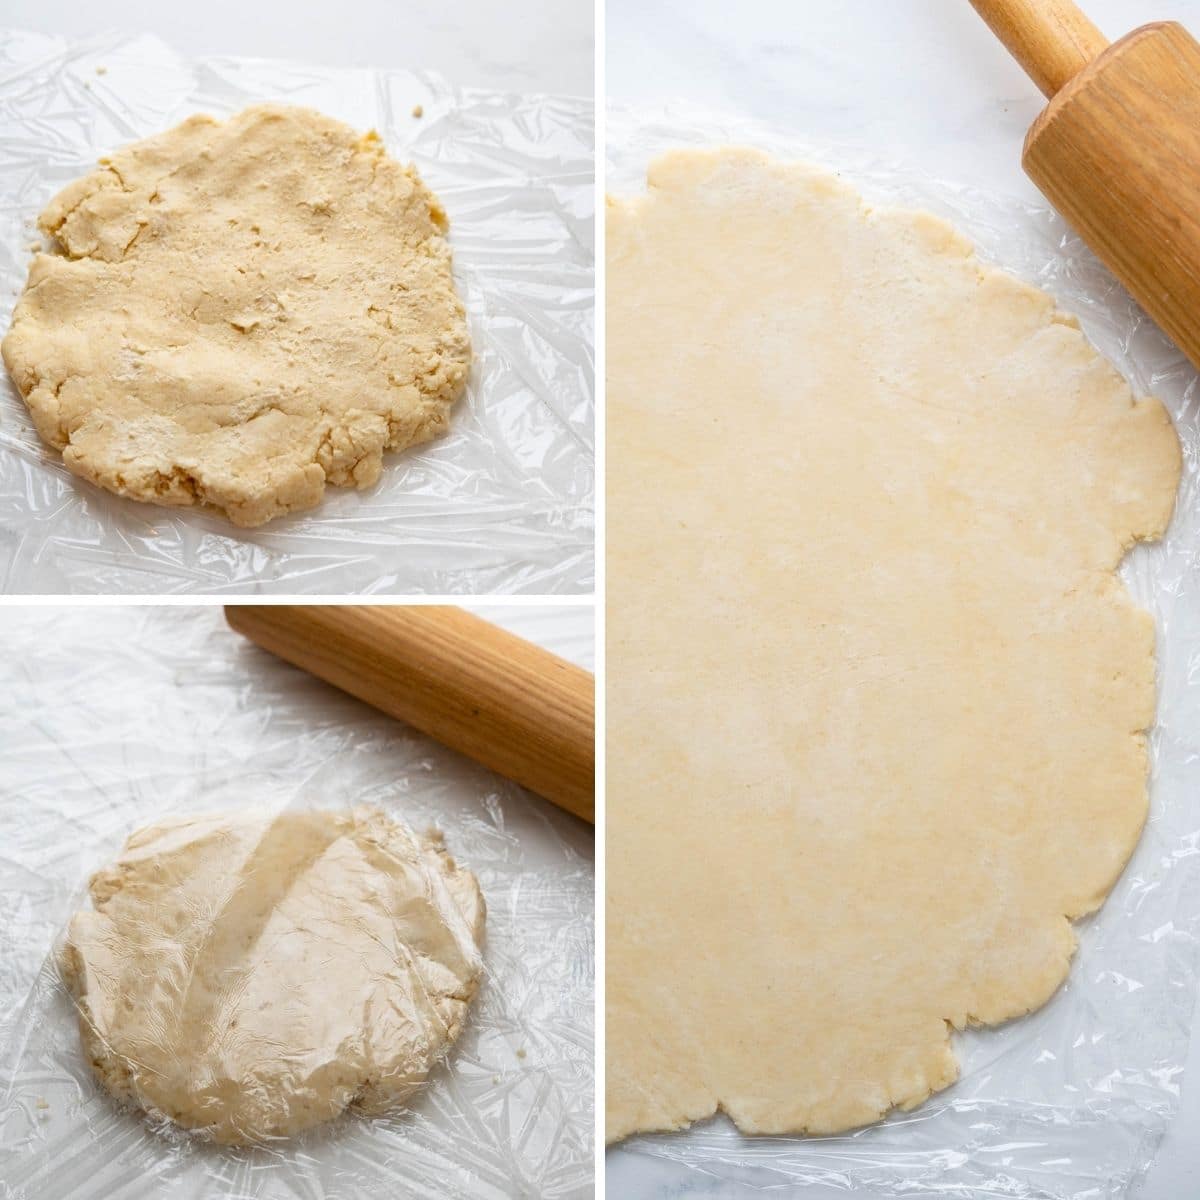
- Transfer the dough to a large piece of plastic wrap.
- Form the dough into a ball, then flatten it into a disc.
- Wrap the dough with plastic wrap and refrigerate for 30 minutes before rolling it out.
How to make pie crust without a food processor
- Cut the cold butter and cold cream cheese into ¼-inch pieces and transfer them to a mixing bowl.
- Add the flour, sugar and salt.
- Use a pastry cutter to cut and blend the ingredients together until they resemble small peas. You should be able to pinch the dough and the pieces will stick together.
- Form the dough into a ball and transfer it to a piece of plastic wrap.
- Flatten the dough into a disc about 1″ thick.
- Wrap the cream cheese pastry in plastic wrap and refrigerate for 30 minutes.
Pro-Tips:
- When measuring flour, aerate it first by gently stirring and whisking to add lightness. Then dip a spoon into the flour and transfer it to the measuring cup. Never dip a measuring cup into flour because it will compact it and you’ll get more than the recipe calls for, making for a heavy, tough dough.
- Don’t bake pie pastry directly on the oven rack; instead, rest the pie plate or tart shell on a baking sheet to catch any leaks (either from the filling or crust).
- For the best results when par-baking line the pastry with parchment paper and use 2-3 sets of pie weights or 2-3 pounds of dried beans to completely fill the shell and prevent shrinkage and puffing.
How to combat dough sticking to the counter top:
- Generously flour both the work surface, the top of the cream cheese pastry and the rolling pin so the pie dough doesn’t stick.
- You can use a chilled marble board to roll the dough on. (Chilled marble will hold the cold temperature and make it easier to roll out the pastry).
- If you don’t have a marble board, you can lay frozen icy packs on your work surface for 10-15 minutes to chill the counter (works best with stone, granite or quartz countertops). Be sure to dry any condensation on the work surface and then flour the work surface and proceed with the dough.
- If you want to add less flour, use my go-to method: Sandwiching the dough between two pieces of plastic wrap and rolling it out. You’ll want to lift the plastic and flip the dough around a few times while rolling, but this method is easy, and you don’t have a mess to clean up on your countertop.
Common mistakes to avoid
- Warm Ingredients – Make sure your ingredients are cold to start — especially if you live in a warm climate or a particularly humid day.
- Over-processing the pie crust in the food processor – You want to process the cold butter and cream cheese until smooth without warming the dough. Additionally, when adding the flour, use very short pulses to combine the dough mixture (less than one second). This won’t be an issue if you make cream cheese pie crust by hand.
- The cream cheese pastry dough shouldn’t be too wet or too dry. We’re going for Goldilocks territory here — just right. If it is too wet, the dough will be sticky and difficult to roll out. If it’s too dry, the dough will be crumbly. It should feel moist or tacky to the touch. If it’s too wet, add a skosh more flour; if it is too dry, add a little ice water (by the teaspoon).
- Chill and rest the dough – Refrigerating the cream cheese pie crust for 30 minutes will chill the dough enough to make it firm and easier to roll.
- Dough sticking to the countertop and rolling pin – There are many reasons why this can occur, from the dough being too wet (see above) to the ambient air being too warm or humid.

FAQs
According to the Noble Pig, Chilling the dough allows the gluten strands to relax, making the cream cheese pie dough easier to roll and preventing shrinking while it bakes.
For larger tarts or pie crust, roll the dough to about ⅛” to ¼” thick. (I use a ruler for this, but they also make rolling pins that will guide you to the perfect thickness for whatever you’re doing.
For mini tartlets, aim for a slightly thinner crust. Otherwise, the crust-to-filling ratio can be off. I recommend slightly under ⅛” thick.
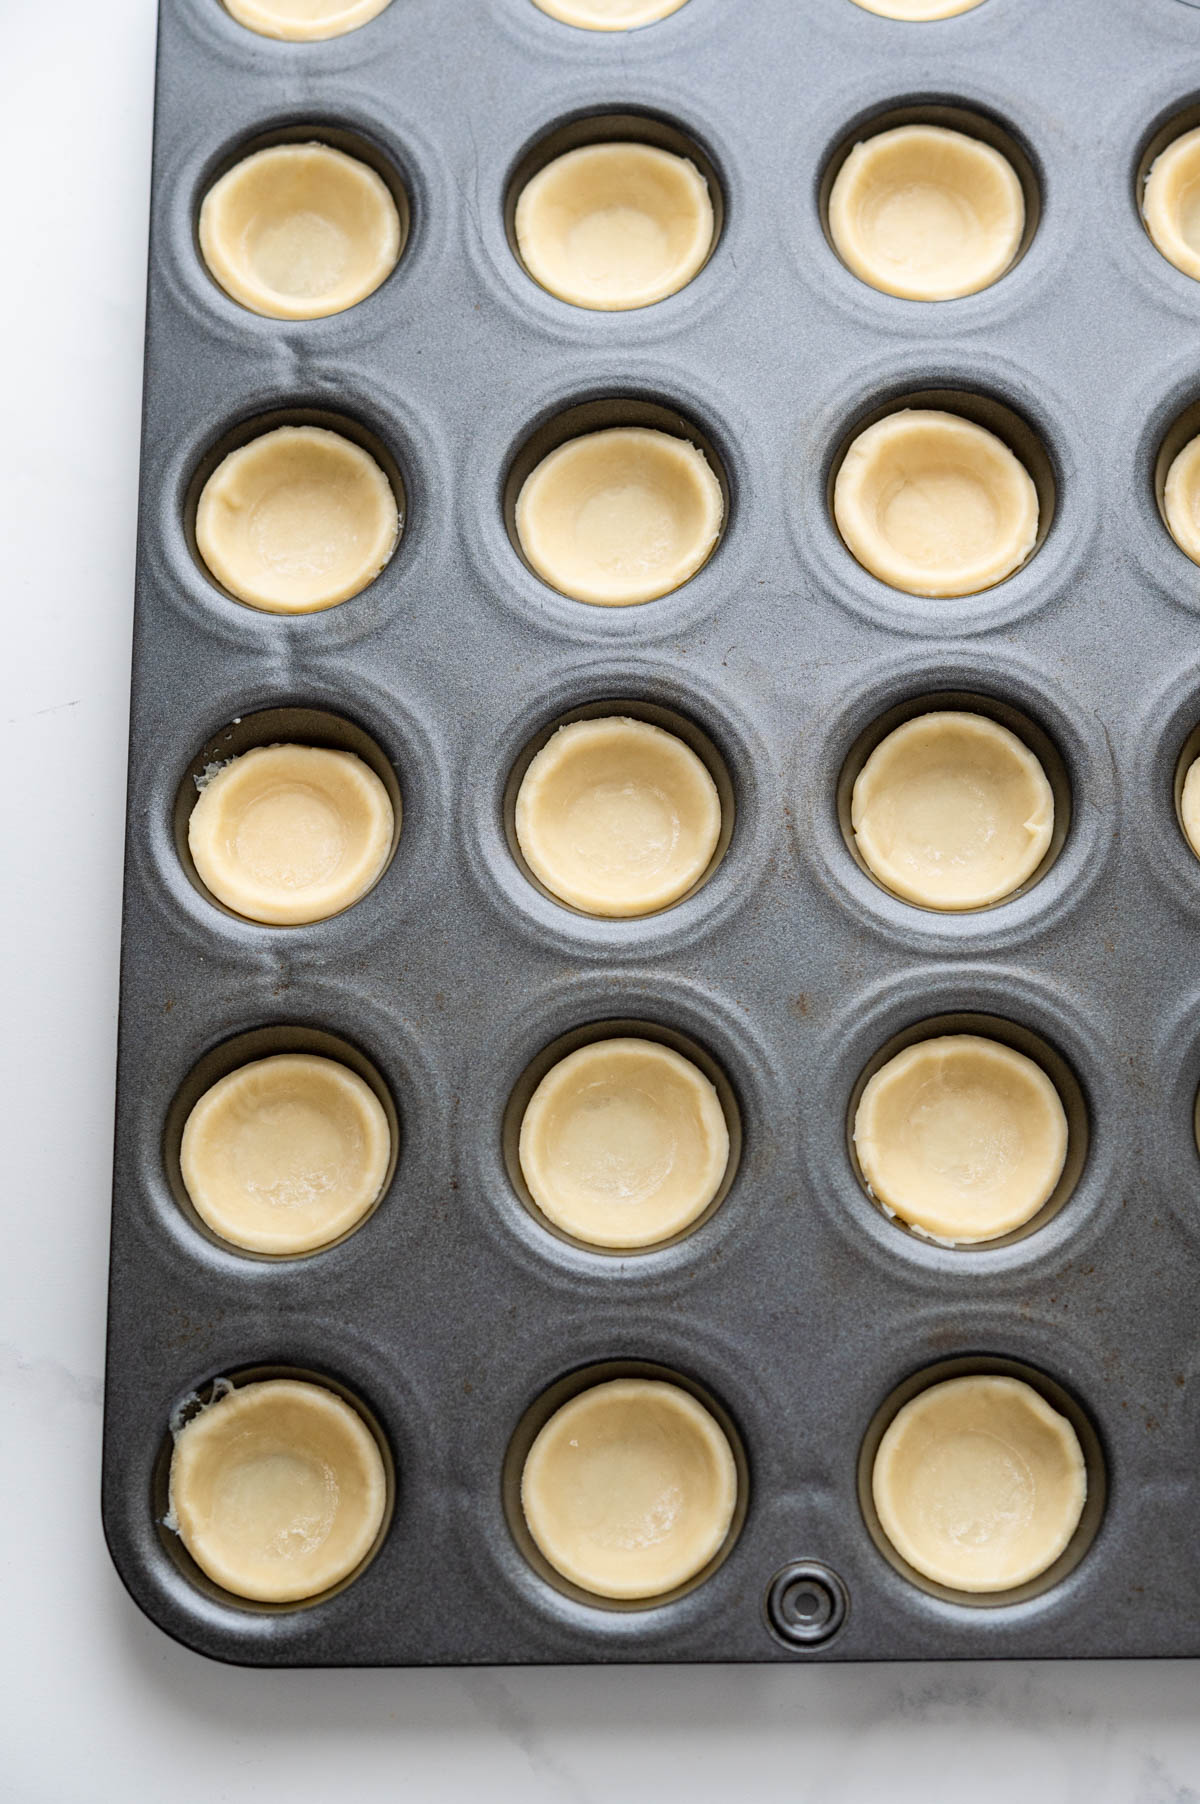
How to make mini pie shells
Making mini pie shells or tartlets is easy with the right equipment. To make it easier to manage, I like to cut the cream cheese pastry into four equal rounds of dough, flatten them into discs and wrap them individually.
This allows you to work with one crust at a time while keeping the rest of the pastry rounds cold in the refrigerator.
Tools for making tartlet shells
- Rolling pin that measures dough thickness
- Mini muffin tin–For mini pie shells use mini muffin tins to create the shell.
- Mini biscuit cutter–to cut the dough into rounds, use a biscuit cutter about ½ to 1″ wider than the diameter of the muffin well.
- Dough tamper–available online, the tamper has a flat base that snugly fits the mini muffin tin with rounded sides to press the dough firmly to the base and sides to hold the form.
Method
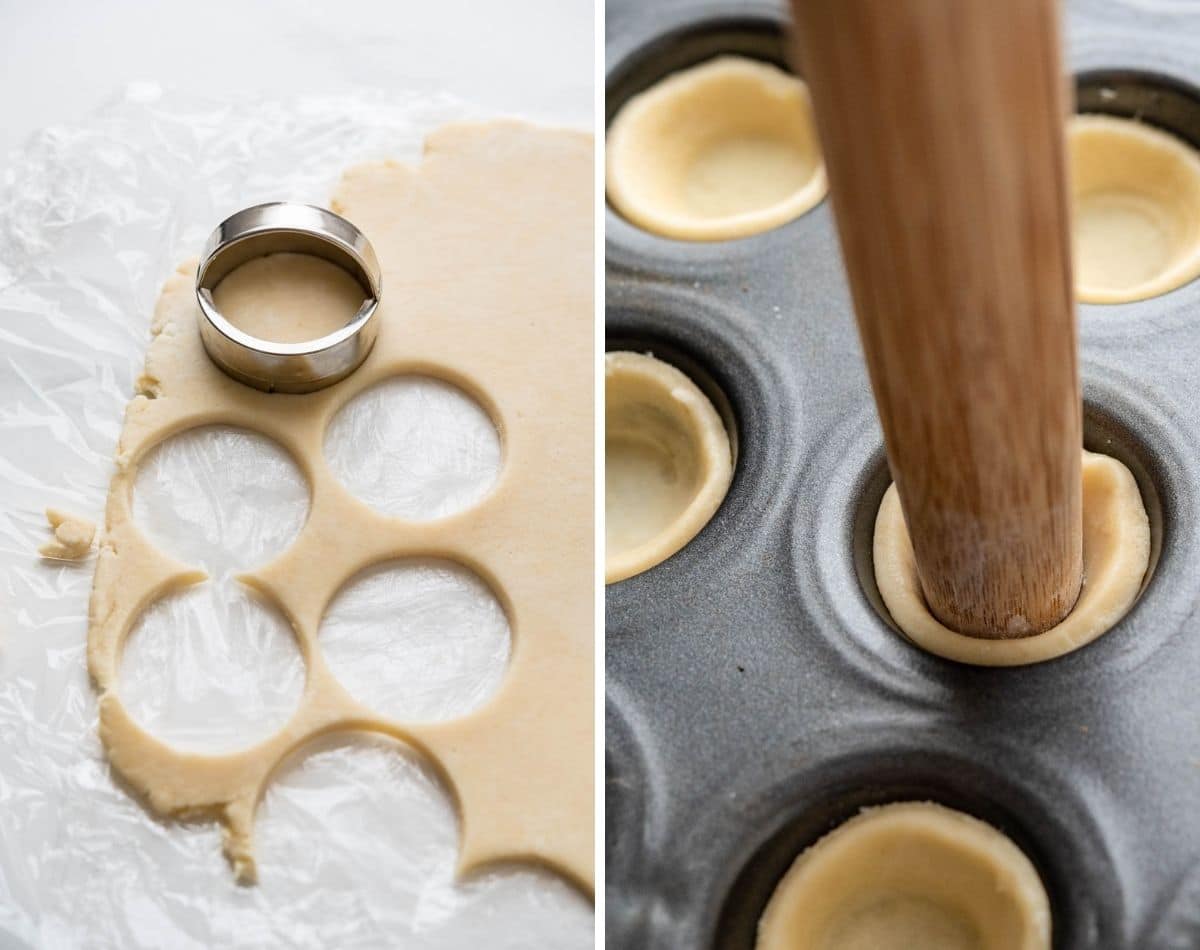
- Cut out rounds with the biscuit cutter.
- Transfer to the muffin tin.
- Bake for 9-10 minutes.
- Use a dough tamper or the flat end of a cocktail muddler to press the tart shell to the bottom of the pan.
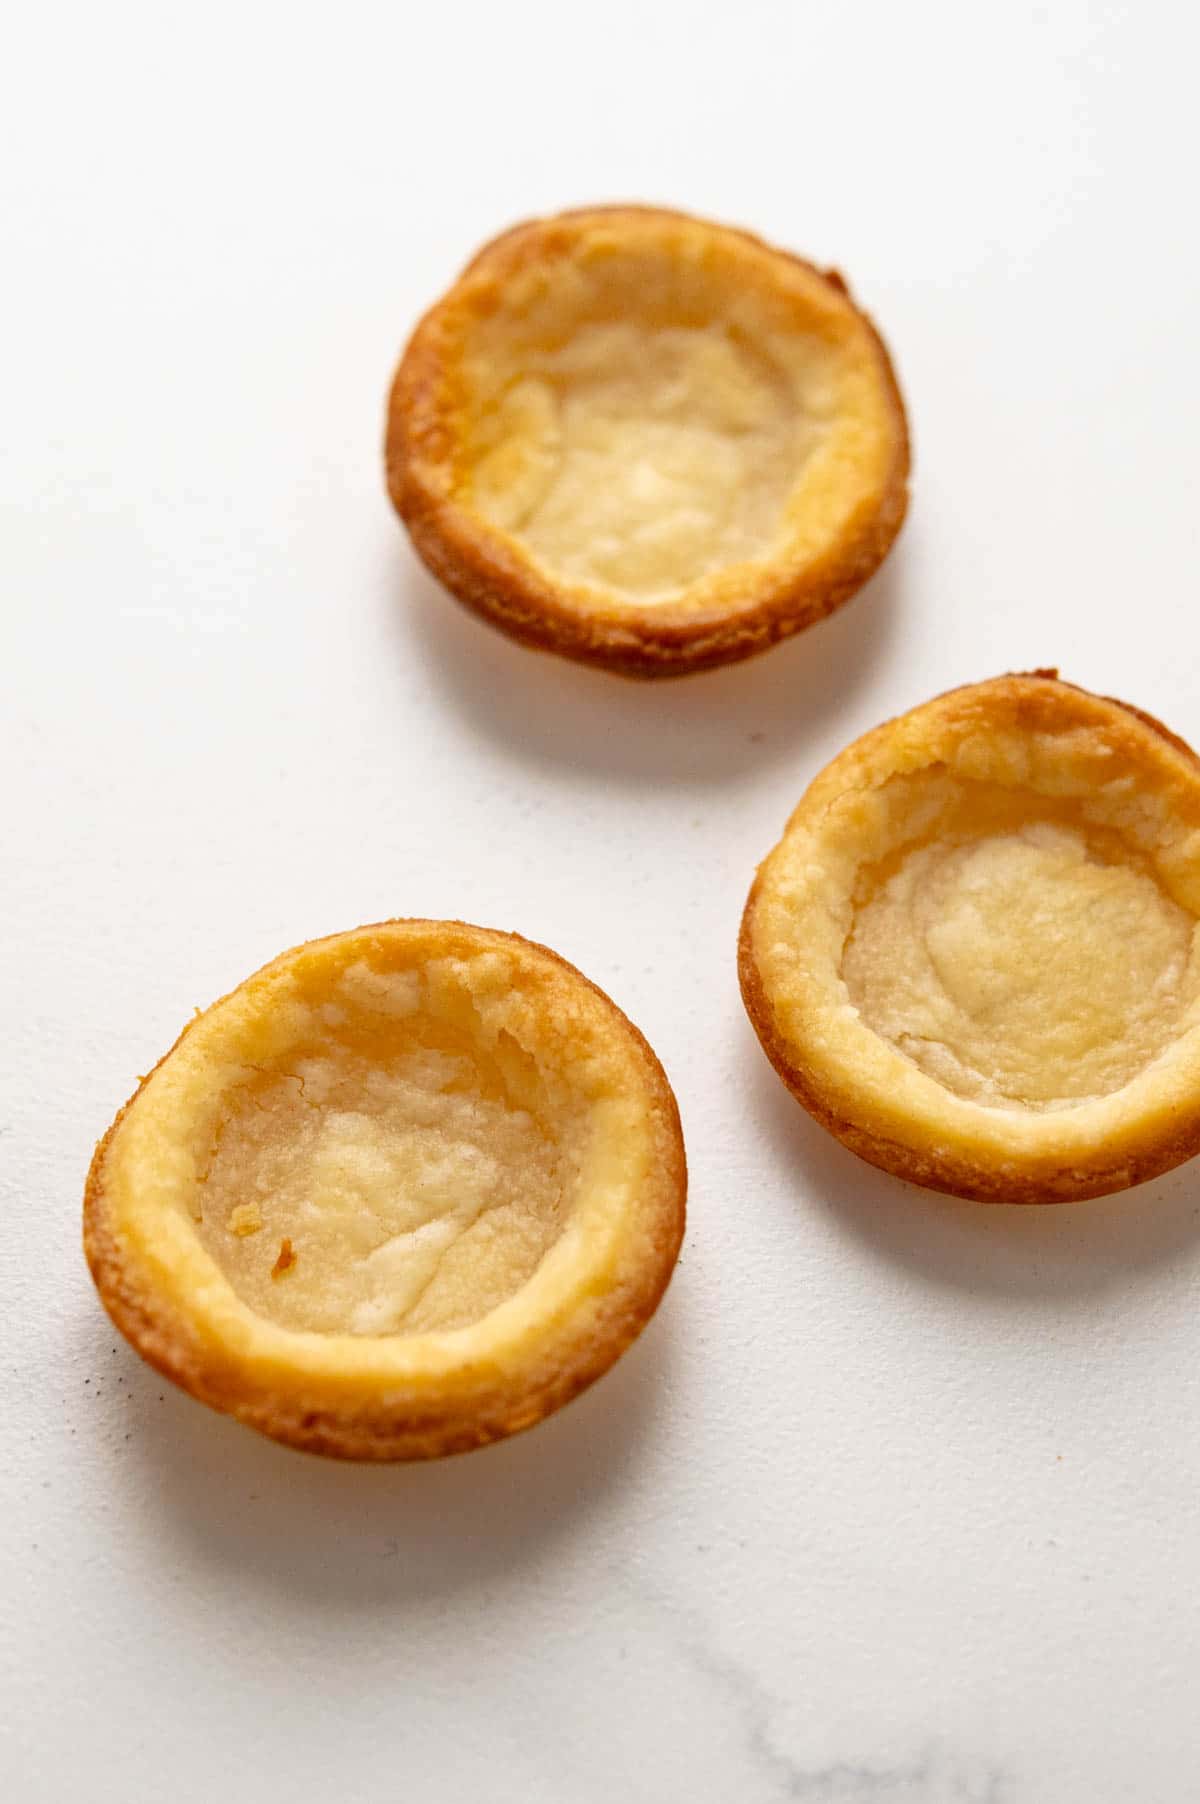
- The dough will puff when baking, so after the shells are baked, use the tamper again to press them back into form. Because the mini pie shells are still warm, they can withstand pressure without cracking.
One recipe of this cream cheese pie crust will make about 48 mini tartlet shells (shown here) or one 9″ pie/tart crust.
FAQ’s
You can store the unbaked pastry dough for up to 3 days, well wrapped in the fridge. After that, it starts to get darker and oxidize.
Yes, it will store (well-wrapped) frozen for up to 4-6 weeks. Defrost and chill before rolling out according to the directions above.
Absolutely. This flaky all-purpose dough is excellent for both sweet and savory fillings.
Not if you have a filling that needs to be baked anyway, fill the uncooked pie or tartlets with the filling and bake as usual.
Make ahead:
- You can prepare the dough up to 3 days in advance and store it in the refrigerator. If the dough has been refrigerated for over 1 hour, let it rest on the countertop for 15 minutes before rolling it out. (It’ll be easier this way).
Storage:
- Store baked pie shells in an airtight container at room temperature for up to 2 days.
Freezing:
- You can store the cream cheese pastry unbaked in the freezer for up to 3 months. Wrap it well in plastic and freezer paper. Defrost overnight in the refrigerator before using.
What to make with cream cheese pastry

Cream Cheese Pastry Dough
SPECIAL EQUIPMENT:
- Food Processor
- Rolling Pin
- Mini Biscuit Cutter (if you're making mini tarts)
- Mini Tart Pans (for making mini tarts)
- Pie Plate or Tart Pan with Removable Bottom (for making full size pies/tarts)
INGREDIENTS:
- ½ cup cream cheese (Half of an 8 ounce block)
- ½ cup unsalted butter (1 stick, 8 tablespoons)
- 1 teaspoon sugar
- ¼ teaspoon salt
- 1¼ cups all purpose flour
DIRECTIONS:
- Cut ½ cup unsalted butter and ½ cup cream cheese into chunks and transfer to the bowl of a food processor. Add 1 teaspoon sugar and ¼ teaspoon salt and pulse to blend until the mixture is smooth and creamy.
- Add 1¼ cups all purpose flour to the butter mixture and pulse in short bursts until the dough starts to come together in a loose ball. (Don't over-process)
FOR FORMING AN INDIVIDUAL TART:
- Bring the dough together with your hands and roll into a ball. Pat into a 1" thick round disc and wrap in plastic wrap. Refrigerate for 30 minutes.
- Note: you can make the dough to this point and keep it refrigerated for up to 3 days. If you chill the dough for longer than one hour, let it rest at room temperature before rolling it out (it will be easier to roll if you let it rest first.)
TO ROLL OUT PASTRY FOR A SINGLE TART/PIE CRUST:
- Generously flour your work surface. Lightly flour the rolling pin and sprinkle a little flour on top of the cream cheese pastry.
- Start with the rolling pin in the center of the dough and roll out towards the edge. Rotate the dough, clockwise and continue to roll from the center to the edge. Do not roll the rolling pin back and forth – it can confuse the dough.
- Add more flour as needed, but try not to use too much.
- To transfer the dough to a pie plate or large tart, fold the pastry in half, then fold it again into a quarter. Pick up the dough and place it in the plate or tart pan and unfold it. Gently press the dough to the bottom and sides of the pan.
- Note: I've found that folks who live in a cool climate have no problem rolling out pastry, however those who live in the tropics (like me) don't have the luxury of cold counters and dry climates that make pastry dough more manageable. If you have that problem, or just have issues rolling out dough, try the plastic wrap method below.
Plastic wrap method for rolling dough:
- If you don't want to add excess flour (and have had trouble with the dough sticking to the counter top) use the plastic wrap "sandwiching method". Simply sandwich the disc of dough between two sheets of plastic wrap. The dough won't stick to the counter or your rolling pin and you can easily lift and reset the plastic wrap on the pastry as you continue to roll it out. Here's how:Place the dough on a large sheet of plastic wrap and lay another sheet over it, so the cream cheese pastry is sandwiched between them.Roll out the dough from the center to the edge, rotating clockwise after each pass with the rolling pin and lifting the plastic wrap and resettling it each time.Continue in this method until the dough is the right thickness (about 1/4 to 3/8" thick)To transfer to a pie plate, remove the top layer of plastic wrap and invert it to the pie plate. Remove the second layer of plastic and gently press the crust bottom and sides into the pie plate or tart shell. Form or trim the edges of the crust, fill and bake for 20-25 minutes.
FOR FORMING MINI TARTLETS:
- Divide the dough into 4 and form each into round discs about 1/2" thick. Wrap in plastic wrap and refrigerate for 20 minutes.
FOR MINI TARTLETS:
- (About 1½" in diameter and ½" deep, holds about 2 tablespoons per tartlet)Work with one disc of dough at a time. Roll each disc to about 1/8" thick, rolling from the center to the sides and turning ¼ turn after each rolling.
- Use a mini biscuit cutter (about 1½ to 2" wide to cut out the tartlets). Transfer the pastry rounds to a mini tart pan and use a tamper to gently press the pastry to the bottom and sides of the tartlet pans. Bake empty tartlet shells for 8-10 minutes or until light golden brown.
- To bake filled tartlet shells, add your filling (about 1¼ to 1½ teaspoonful) and bake for 10-12 minutes or until set.
- You can use this for larger tartlet pans, but you'll need to adjust the timing depending on how large the tartlets are.
RECIPE VIDEO:
NOTES:
- Place a piece of parchment paper over the crust, including the edges.
- Fill the crust with pie weights or dried beans.
- Spread them evenly and bake for 20-25 minutes or until the shell is set and lightly browned.
NUTRITION:
Save the pin for later!

I’ve been using this recipe for years to make baked empanadas, and the dough is perfect, forgiving, and delicious. Saludos. – Bambu
I would add some spinach puree to colour the dough in green. Anyway, can I replace the butter with heavy cream? Thanks.
I like the idea of spinach puree, but you need to be careful of adding too much liquid to the dough, which will change its texture. Additionally, cream isn’t a good substitute for butter as it is a liquid and the butter in the dough is actually a solid and quite cold in order to have a flaky pastry.
I always buy the packaged stuff but this was easy to work with and produced gorgeous and delicious mini tarts! Thanks, Lisa!