Refrigerator Rolls
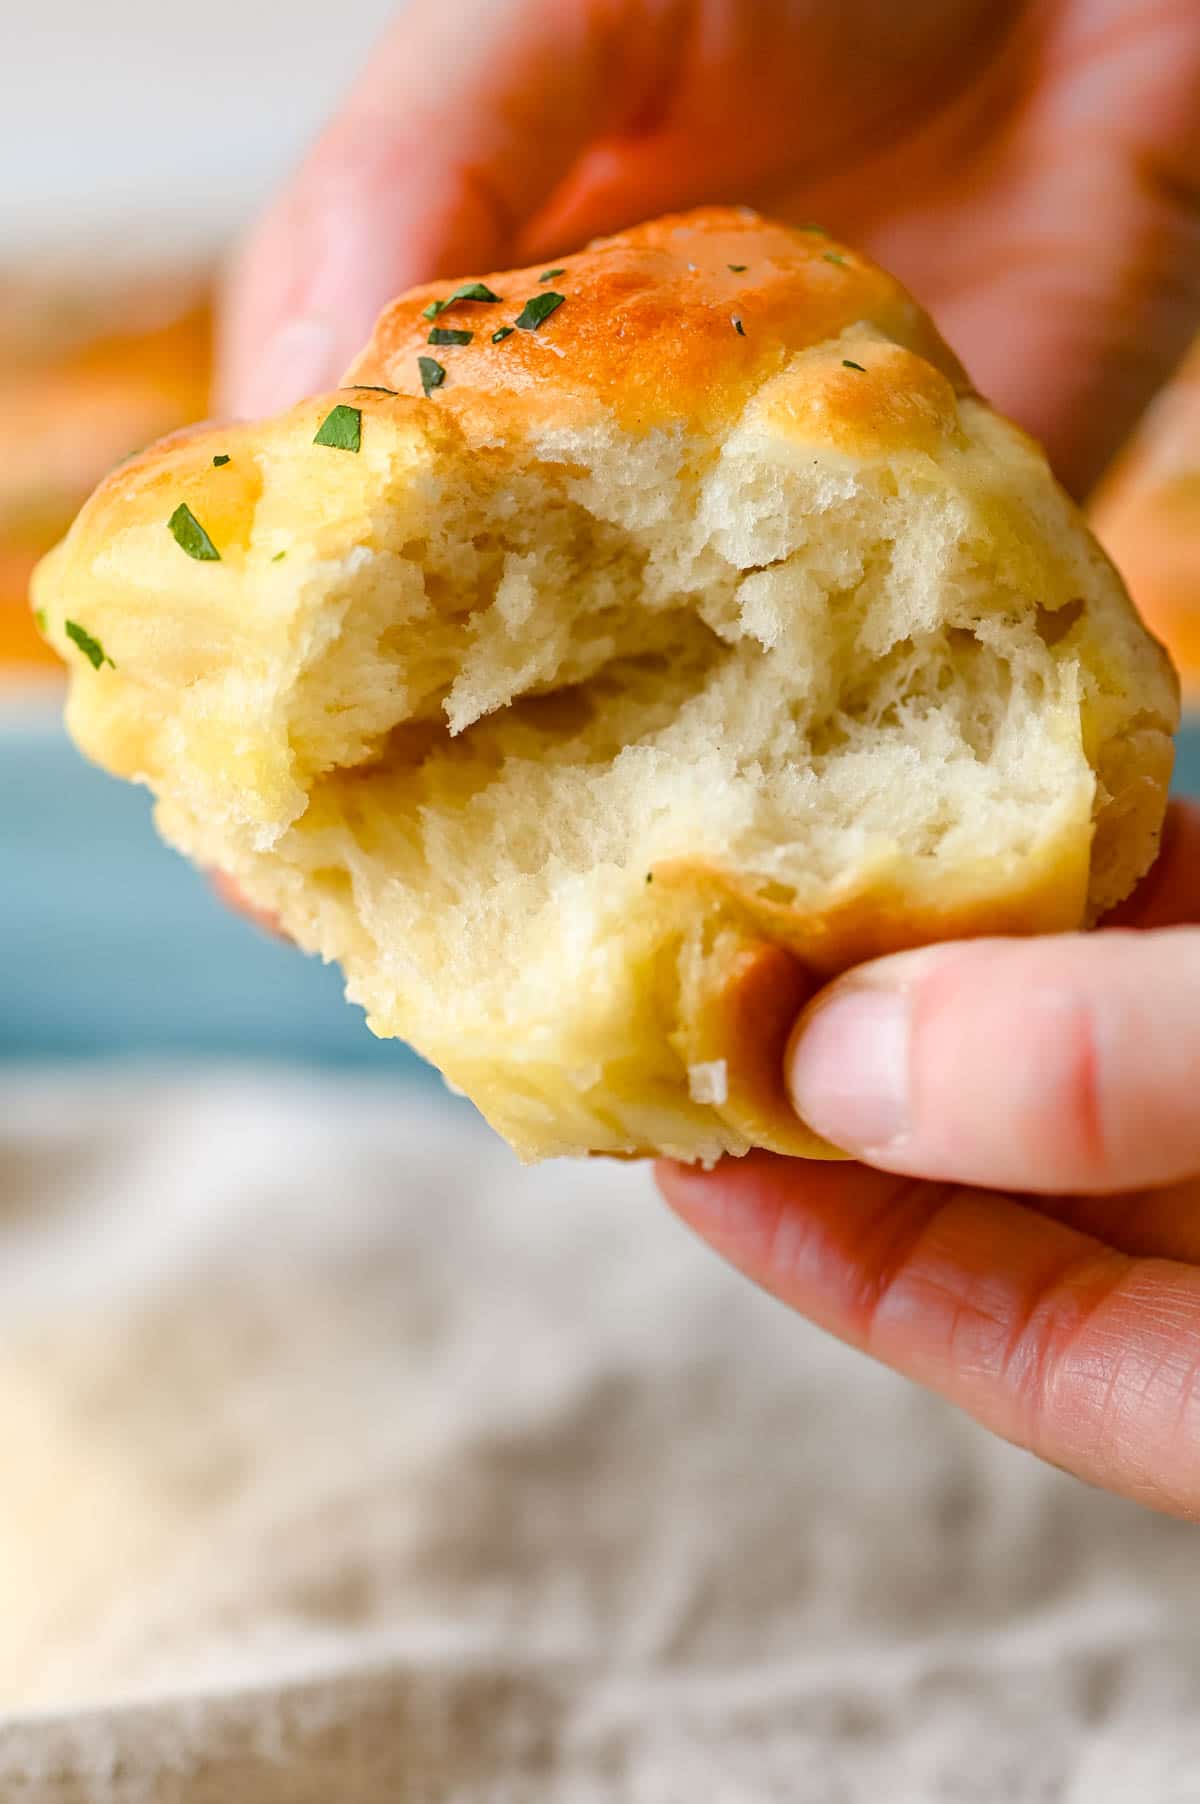
Refrigerator rolls are a simple, make ahead yeast rolls recipe that makes soft flaky, delicious homemade buns. We love this easy recipe because you can keep the dough in the refrigerator for several days until you’re ready to bake. So, it’s easy to make hot, yeasty butter rolls whenever you want them. Ideal for holidays and big gatherings.
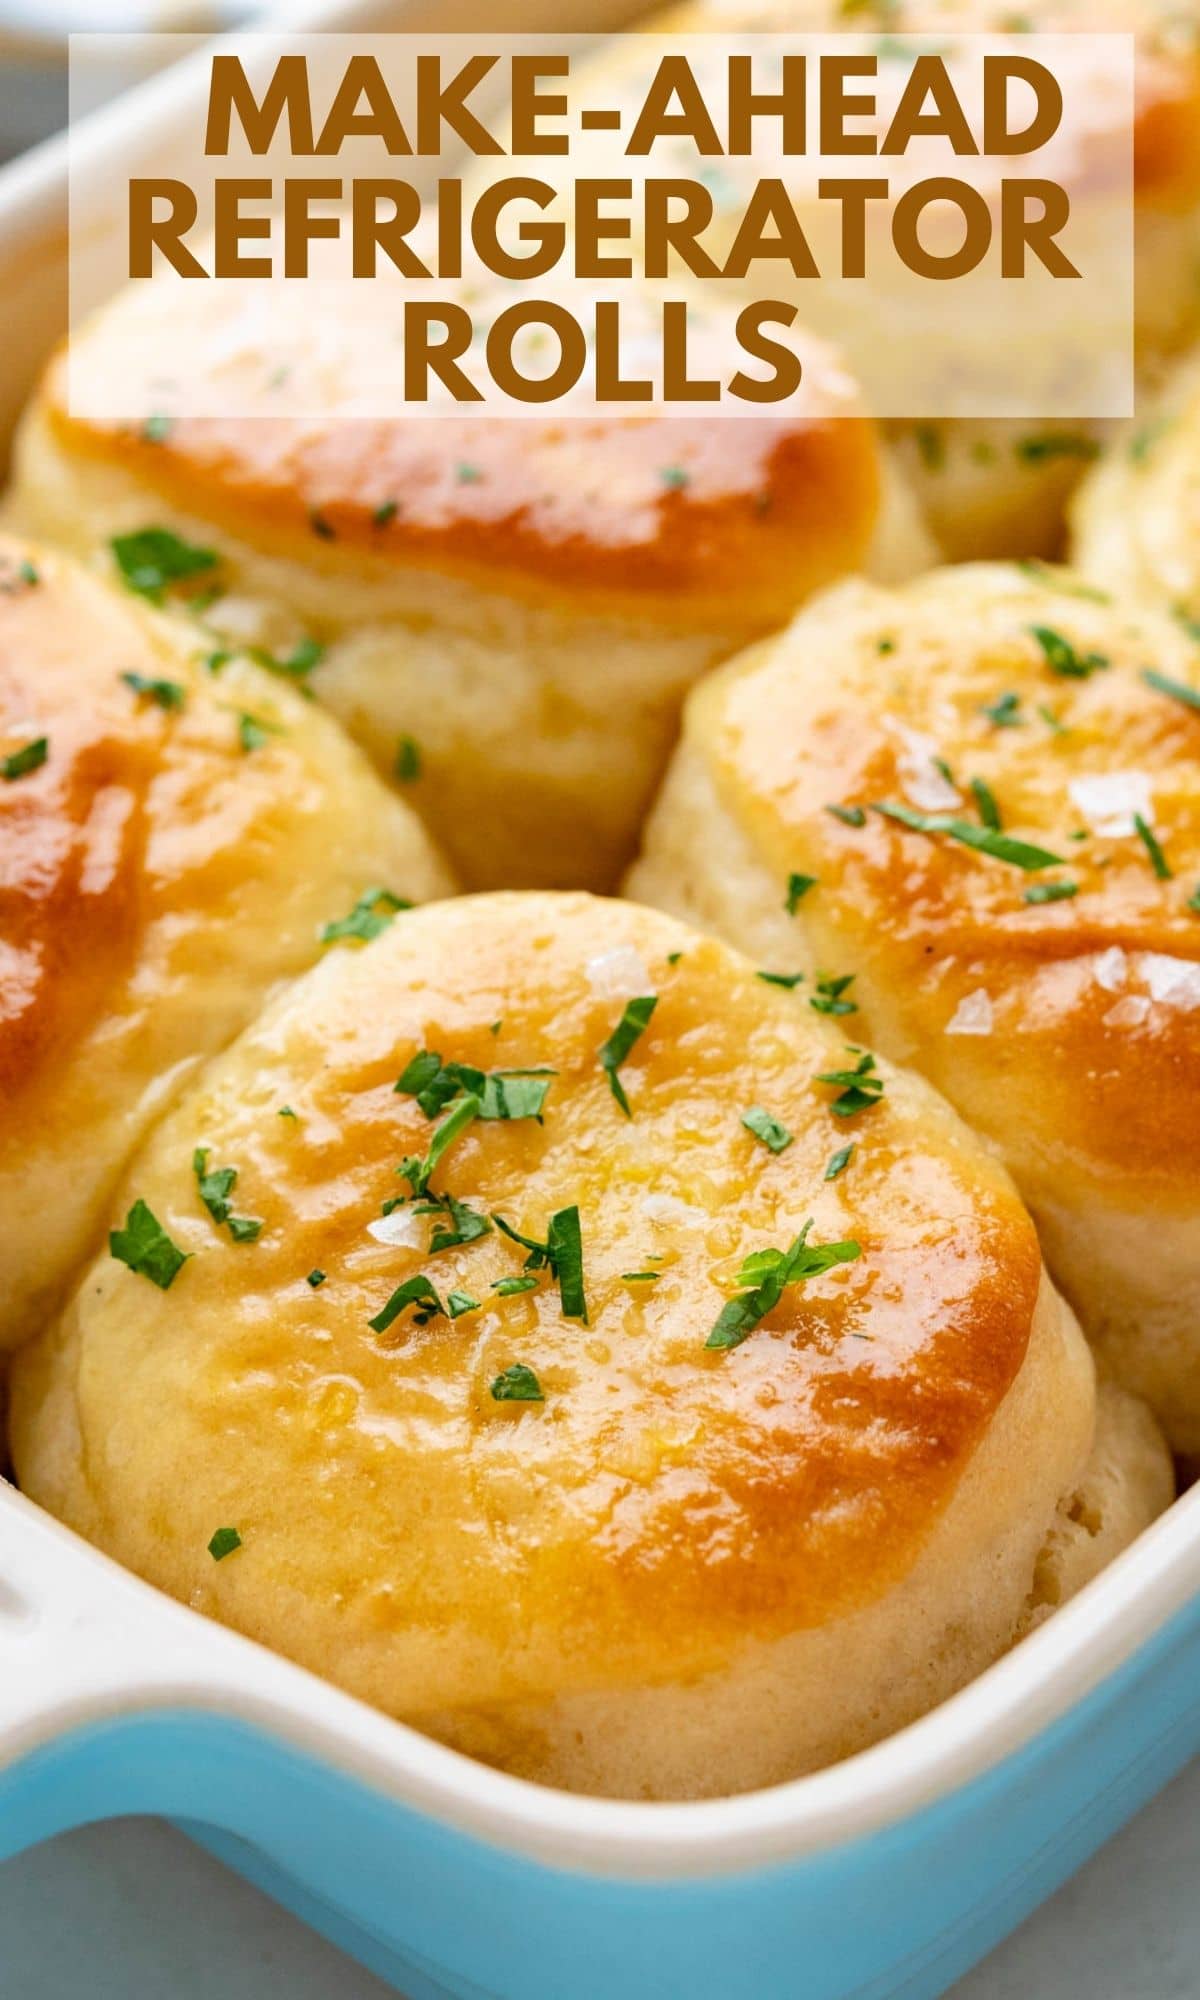
Refrigerator rolls are easy, versatile make ahead butter rolls for anytime.
No one can resist hot-from-the-oven buttery yeast rolls, right? The only thing is, they can be time-consuming to make. But what if you could do most of the work ahead of time and keep the dough refrigerated until you were ready to bake off the rolls?
You can. This refrigerator rolls recipe is a great make ahead yeast roll dough that you can use to make homemade butter rolls for a big crowd or a smaller gathering. Just roll out what you need and keep the rest of the dough refrigerated for another day.
How great is that?
This yeast rolls recipe is based on one I found in one of my favorite recipe books, The Foster’s Market Cookbook (affiliate link). Author Sara Foster, shared her Granny Foster’s Refrigerator Rolls and they’ve become my go-to yeast rolls recipe.
I’ve made a few slight changes like adding an egg wash to make the rolls shiny and lustrous, but the basic recipe is hers — and as long as you follow the steps, you’ll be rewarded with amazingly plush, butter rolls perfect for any occasion.
What you’ll need for homemade yeast rolls
- Warm Water
- 1 Package Active Dry Yeast
- Sugar
- Unsalted Butter
- Whole Milk
- Salt
- Egg Wash
- Flaky Sea Salt (for garnish, optional)
- Parsley (for garnish, optional)
What is yeast, exactly.
Yeast is an amazing ingredient, a leavener used in the process of fermentation and the magic behind these refrigerator rolls.
Yeast feeds on the natural sugars in flour and consequently expels carbon dioxide in the process. This is what makes yeast doughs rise. Carbon dioxide being the by-product of yeasts appetite for sugar.
The two types of yeast we commonly find in the grocery store are Instant and Active Dry Yeast. The difference between the two is simple.
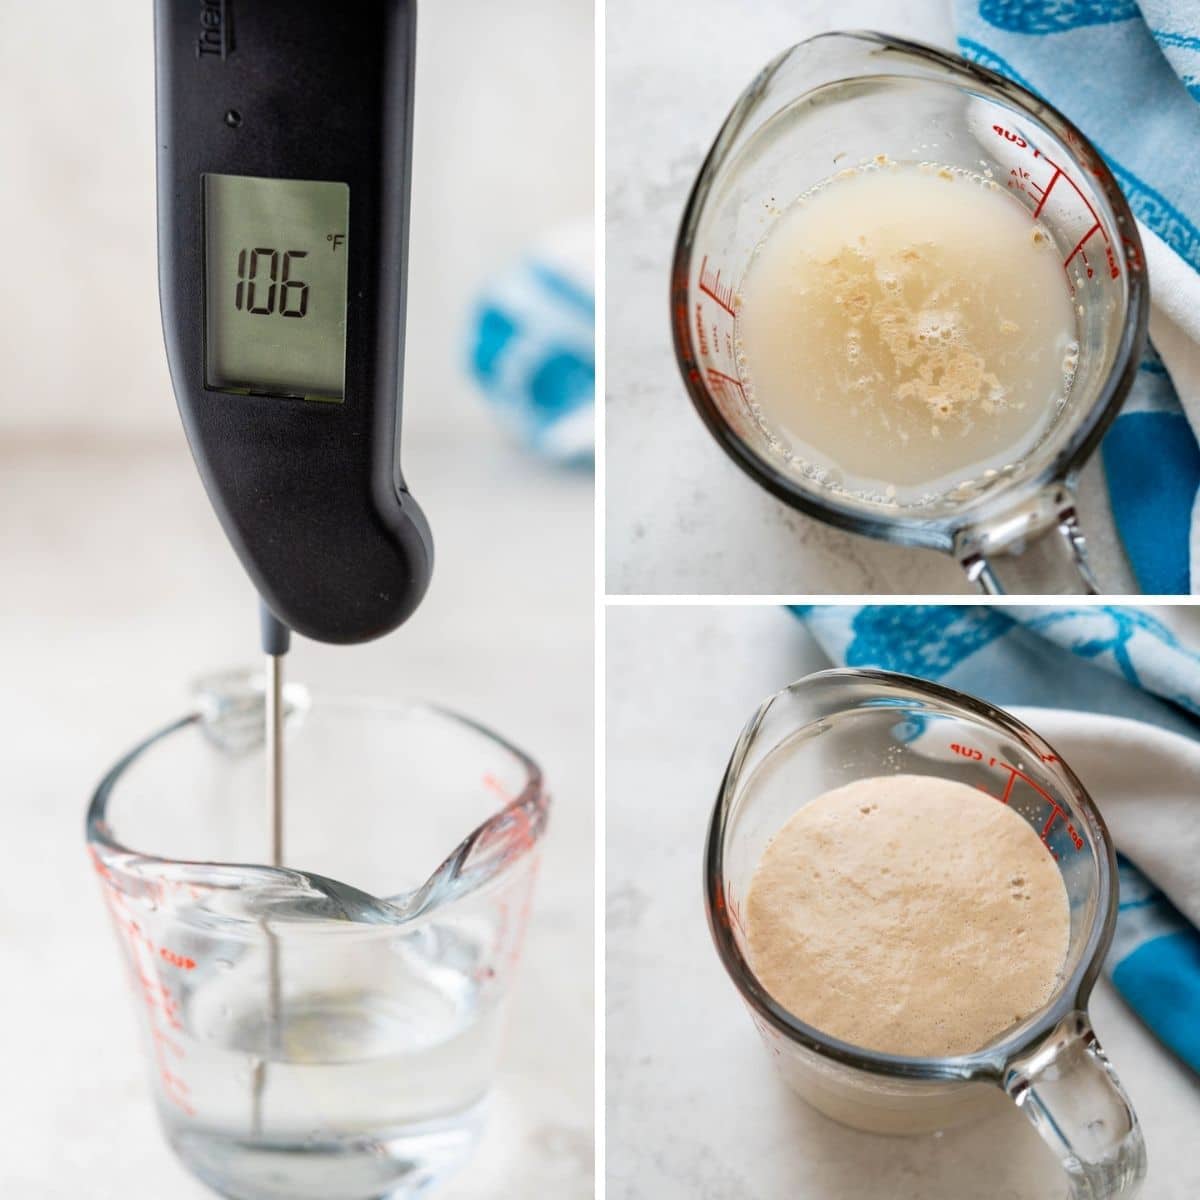
- Active Dry Yeast needs to be activated before using — that usually means blooming the yeast in warm water for a few minutes until it becomes foamy.
- Instant Yeast is ready to use straight from the package and can be mixed directly with dry ingredients. No blooming necessary.
For this recipe, use active dry yeast.
Active dry yeast thrives in a “Goldilocks” type of environment. Not too hot, not too cold — JUST RIGHT, which means 105°F to 115°F. Cooler than that and the yeast won’t activate, hotter and you’ll kill the yeast before it can start working.
Pro-Tips for working with yeast
- Store yeast in the freezer so it lasts longer than the expiration date on the package.
- Use a good instant read thermometer (I prefer Thermoworks Thermapen) to be assured that the wet ingredients (both the warm water for blooming the yeast as well as the sugar, butter and milk mixture) stay within the optimum temperature range for the yeast to activate the butter rolls.
What I love about this yeast rolls recipe is that you can simply mix them by hand in a large bowl. No stand mixers or dough hooks. Just a wooden spoon and a little elbow grease.
How to make dough for butter rolls
- Bloom the yeast in warm water with a little sugar.
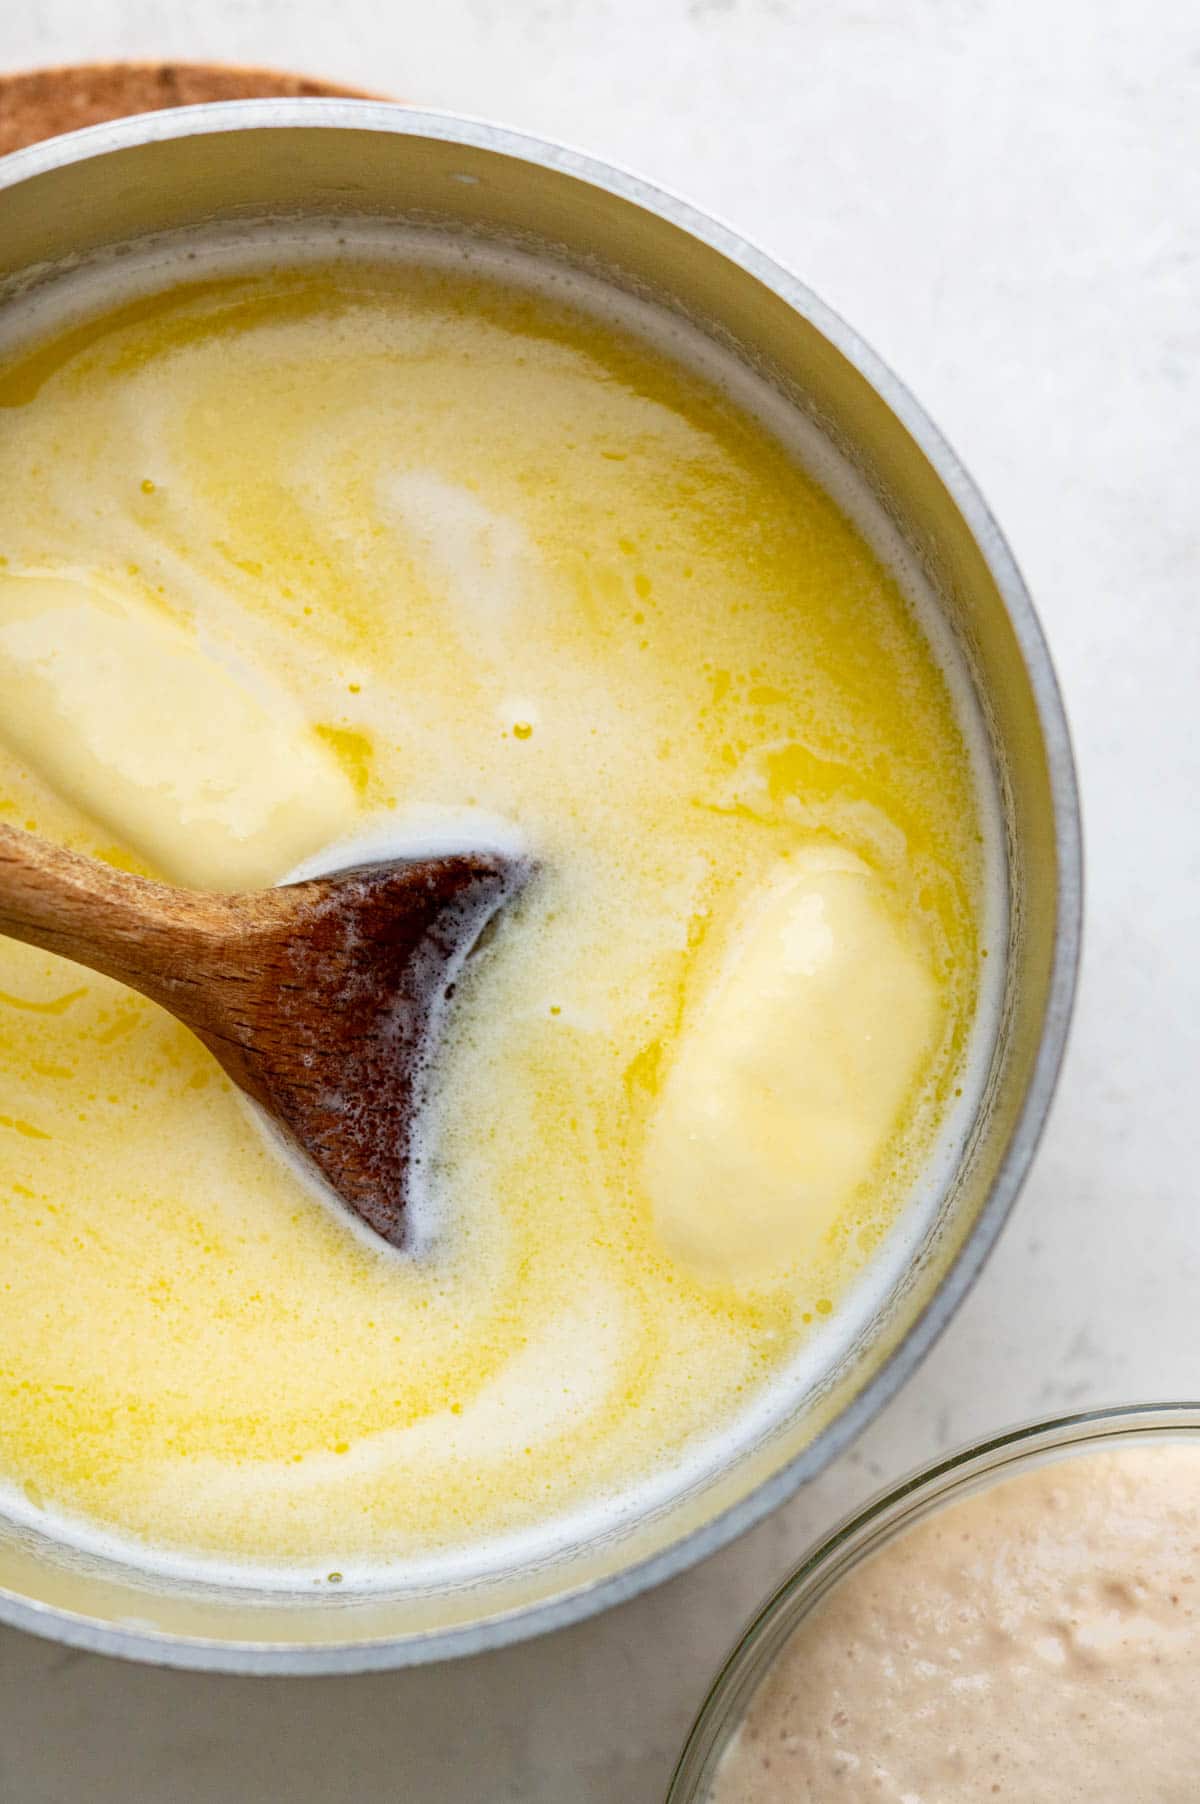
- Combine butter, milk, sugar and salt into a saucepan and heat over VERY LOW heat, stirring constantly just until the sugar is dissolved.
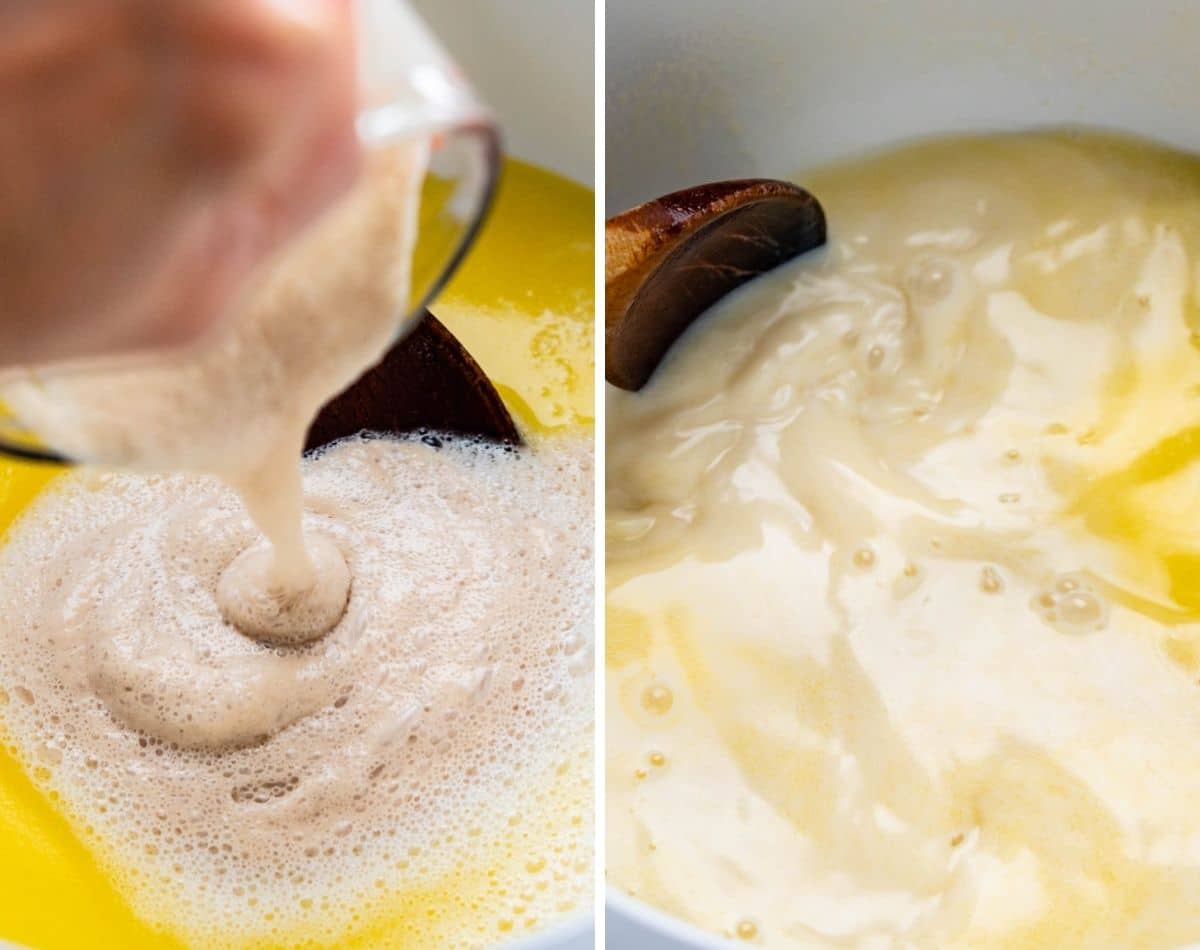
- Add yeast to warm milk mixture.
- PRO-TIP: When combining the sugar, milk and butter with the foamy yeast — it’s important that the temperature of the milk mixture stays in that “just right” range of 105°F to 115°F. Make sure you heat the mixture only until the sugar is dissolved (the butter doesn’t have to be fully melted – and actually helps to keep it in the “safe” range).
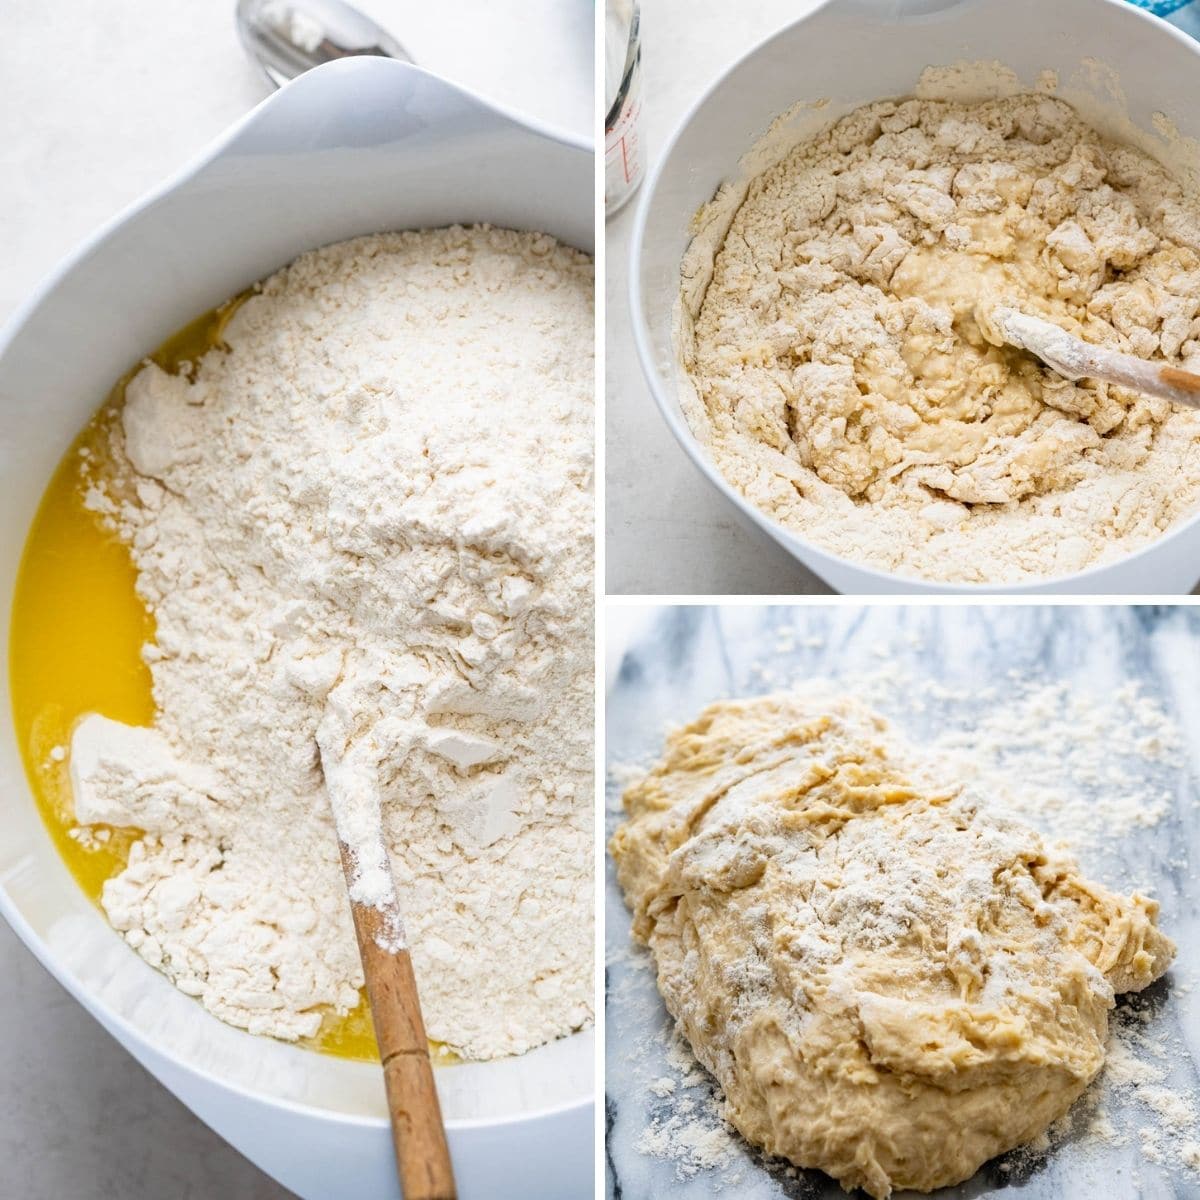
- Add flour and mix with a wooden spoon to mix into a shaggy dough.
- Turn the dough out onto a lightly floured work surface and knead 5-8 times until the dough comes together.
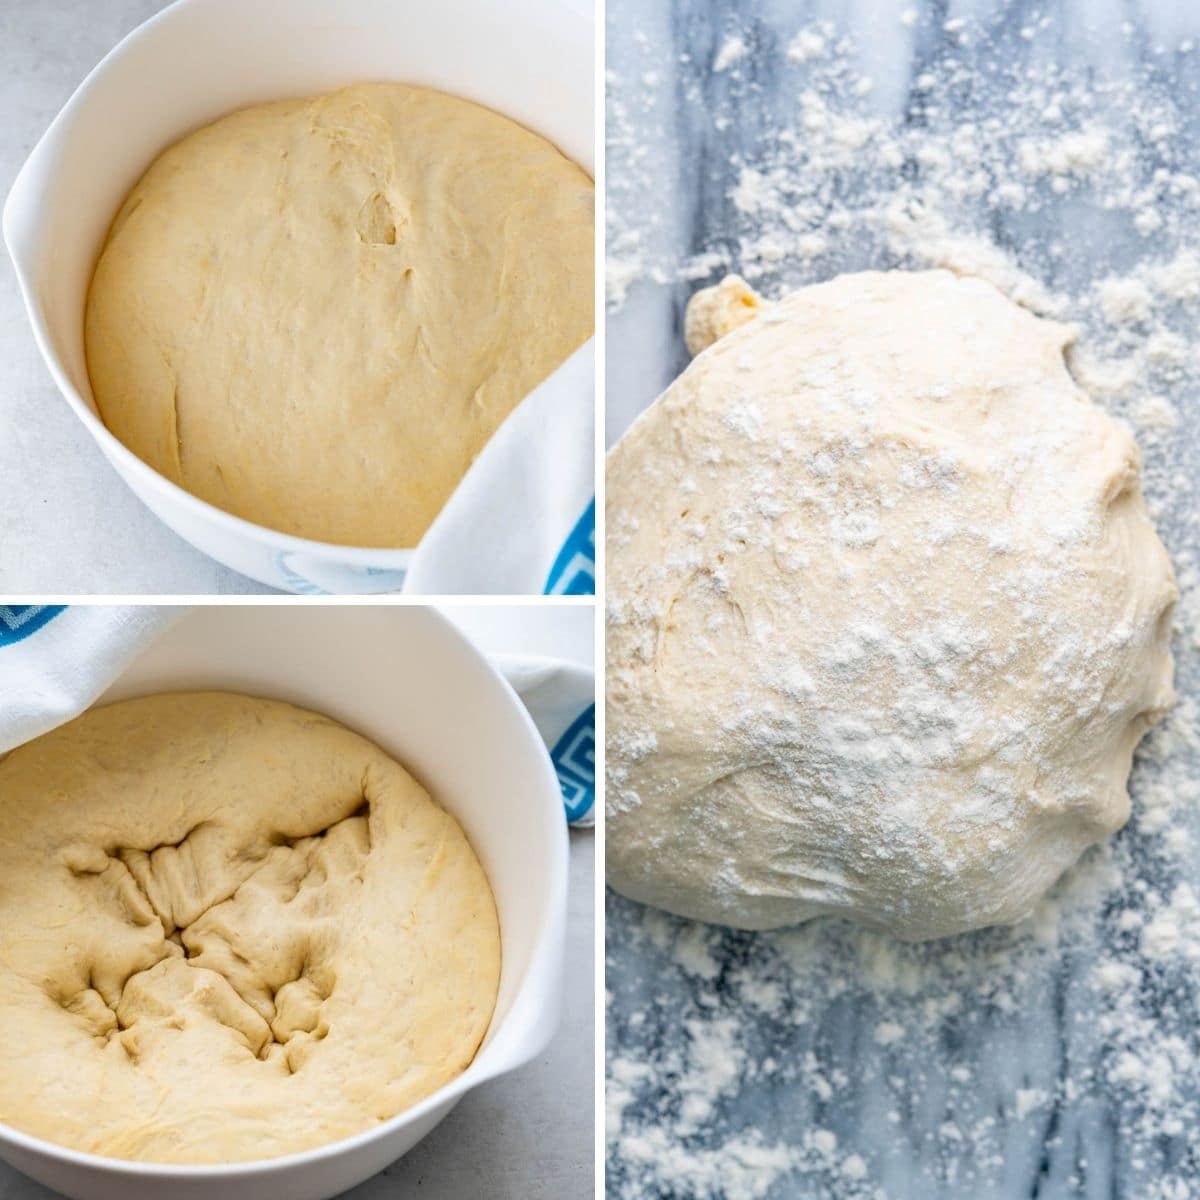
- Transfer the yeast roll dough to a lightly oiled bowl and cover with a clean dish towel.
- Place the bowl in a draft free spot and let rise until doubled in size.
- Punch down the dough and divide into two equal balls of dough. (You can make the dough up to this point and keep the dough for the rolls refrigerated until you’re ready to roll and cut the butter rolls for baking).
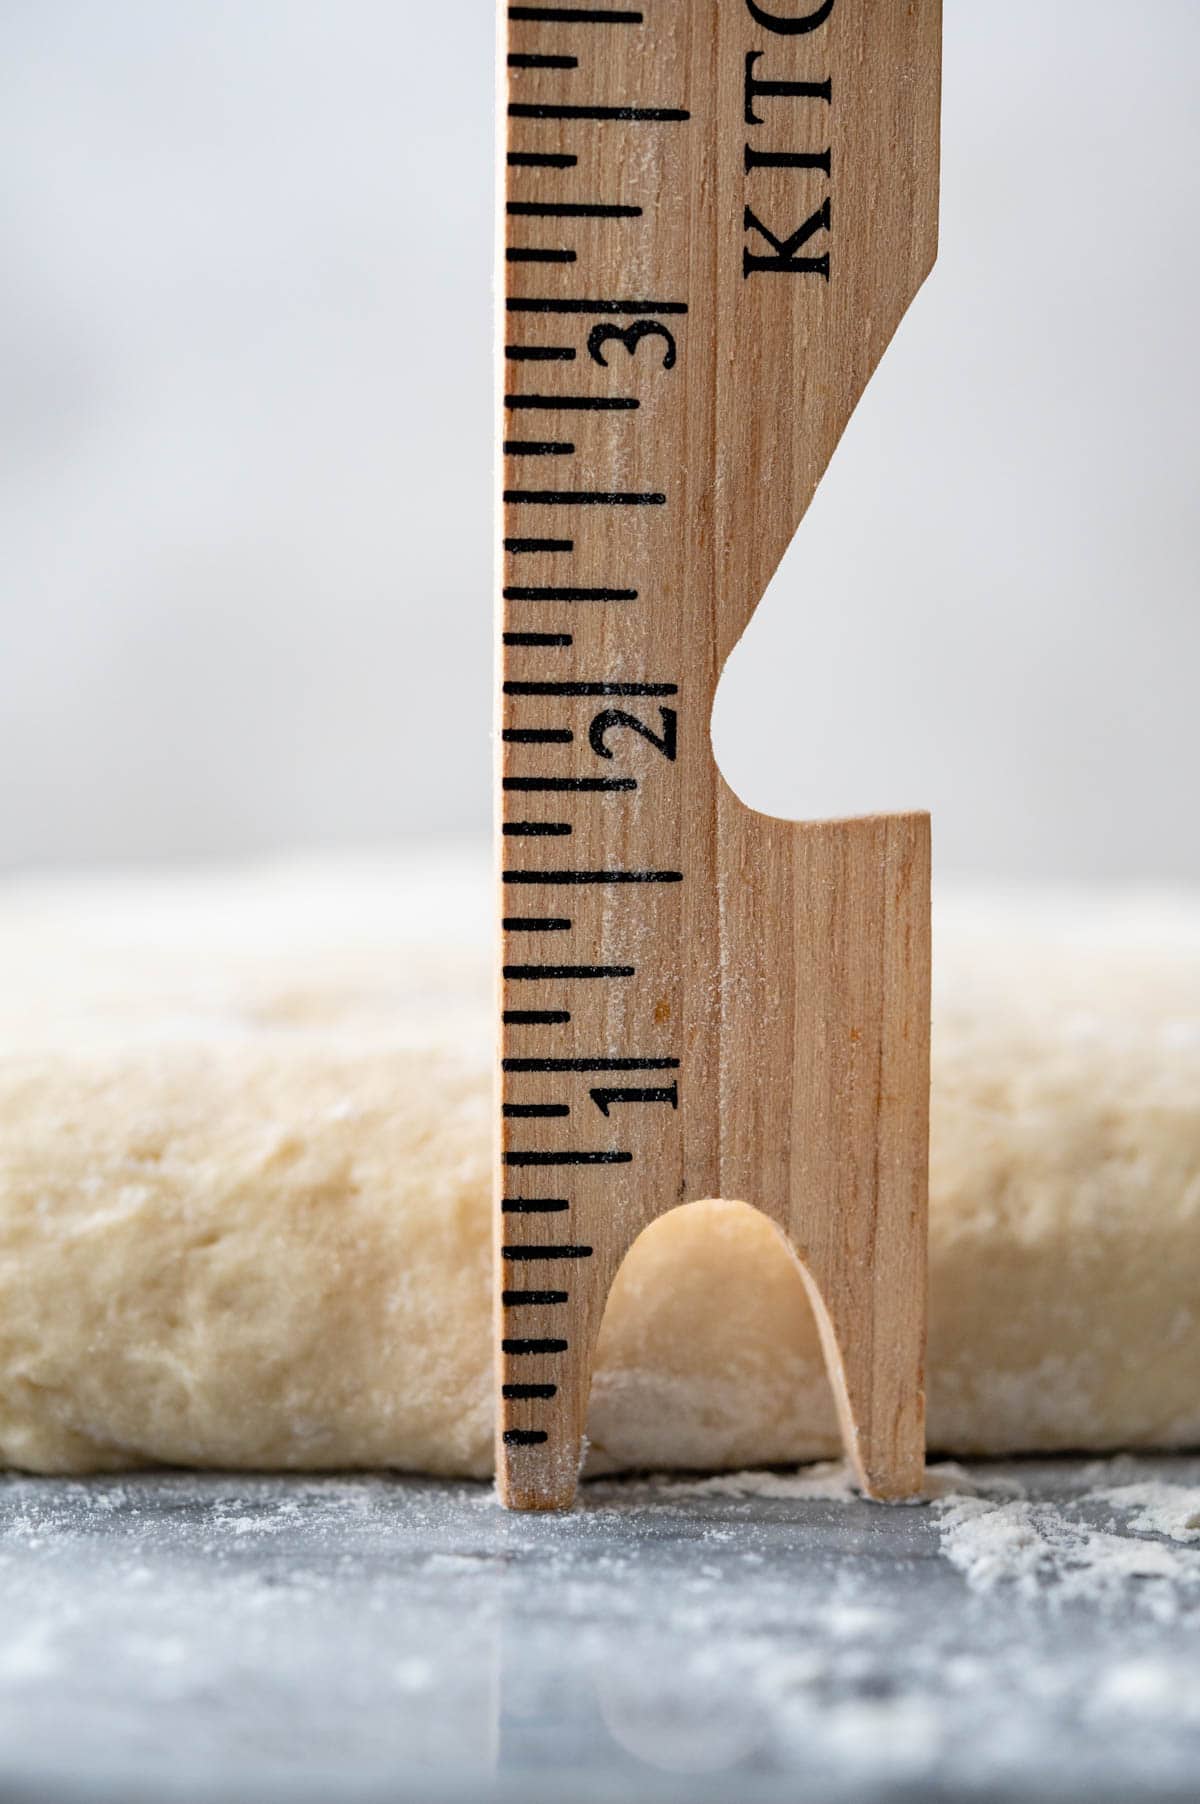
- Roll the yeast dough out on a lightly floured surface until it’s ¾” to 1″ thick.
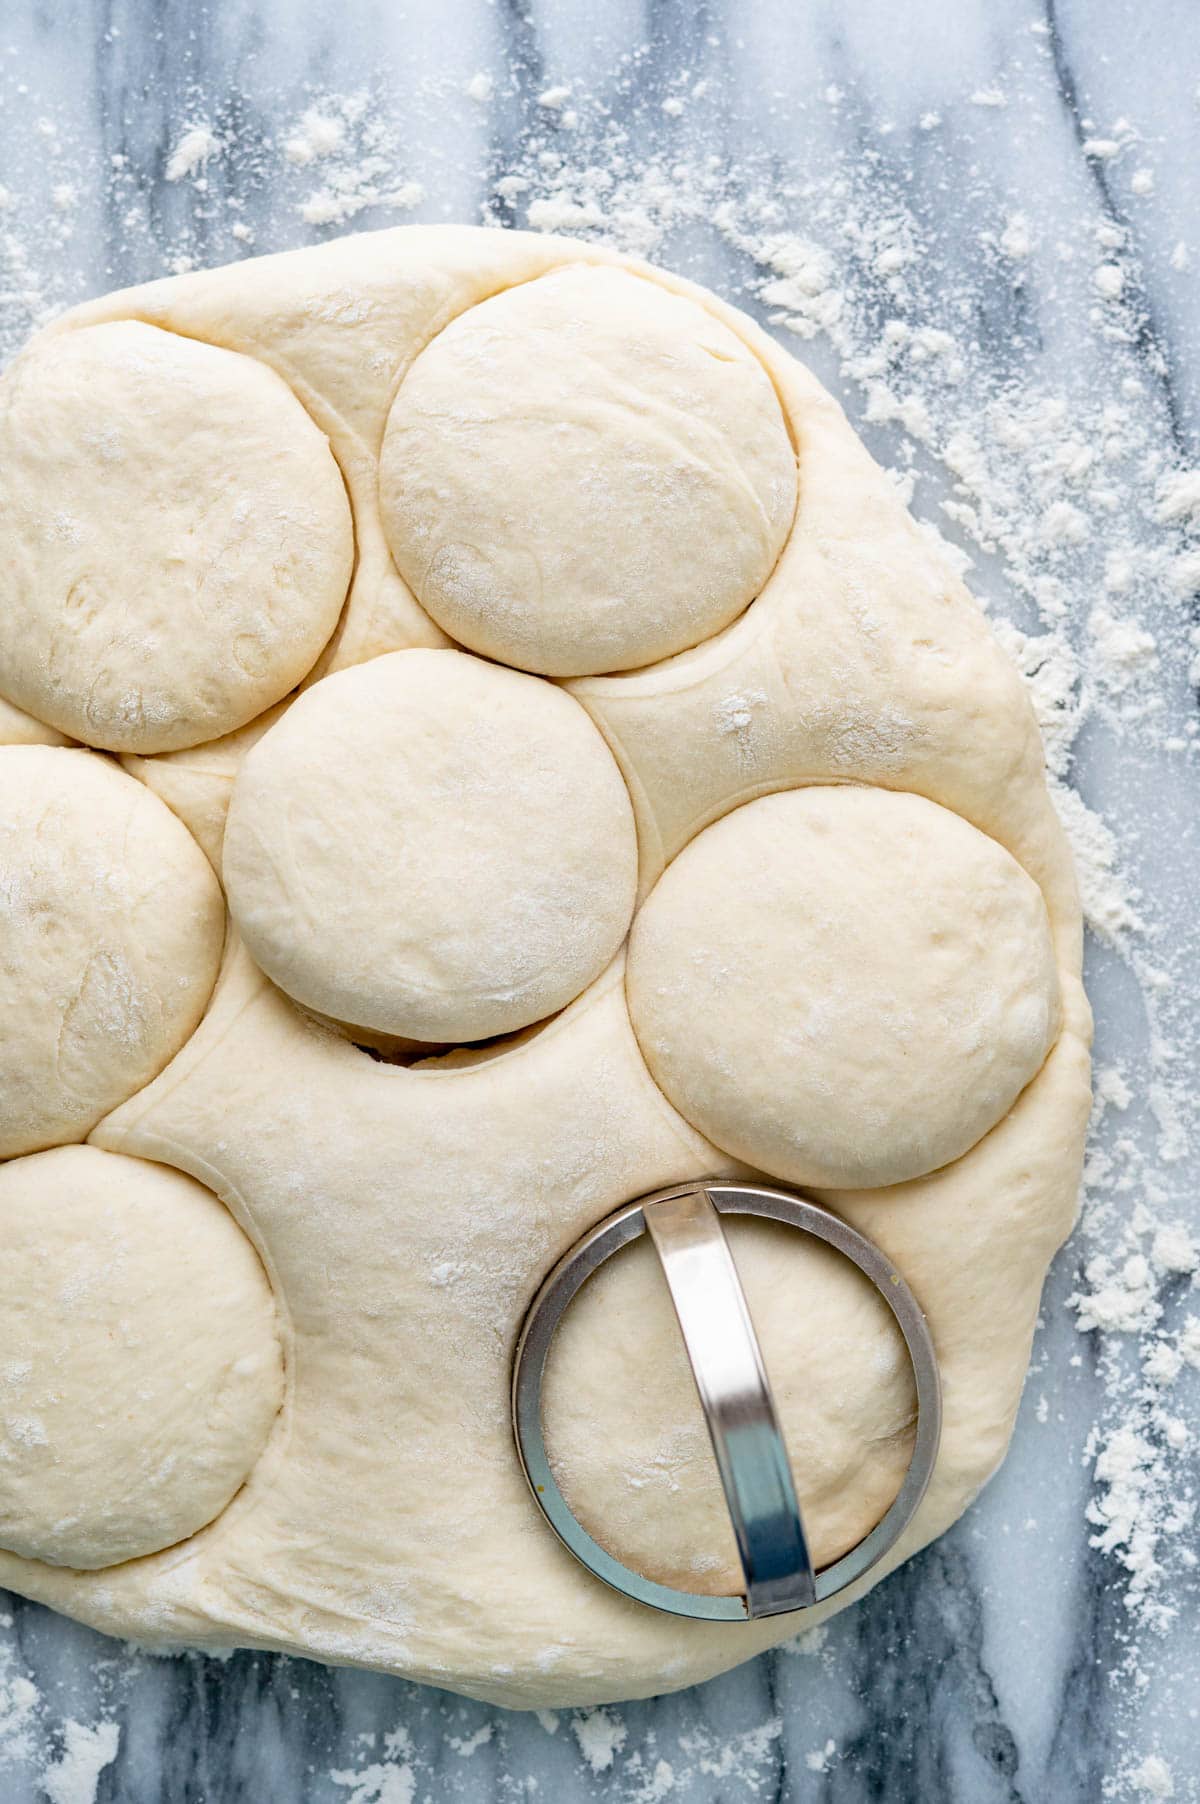
- Use a biscuit cutter to cut the dough into rolls and transfer to a baking pan.
- Cover with a clean dish towel and let the dough rise until about doubled in size.
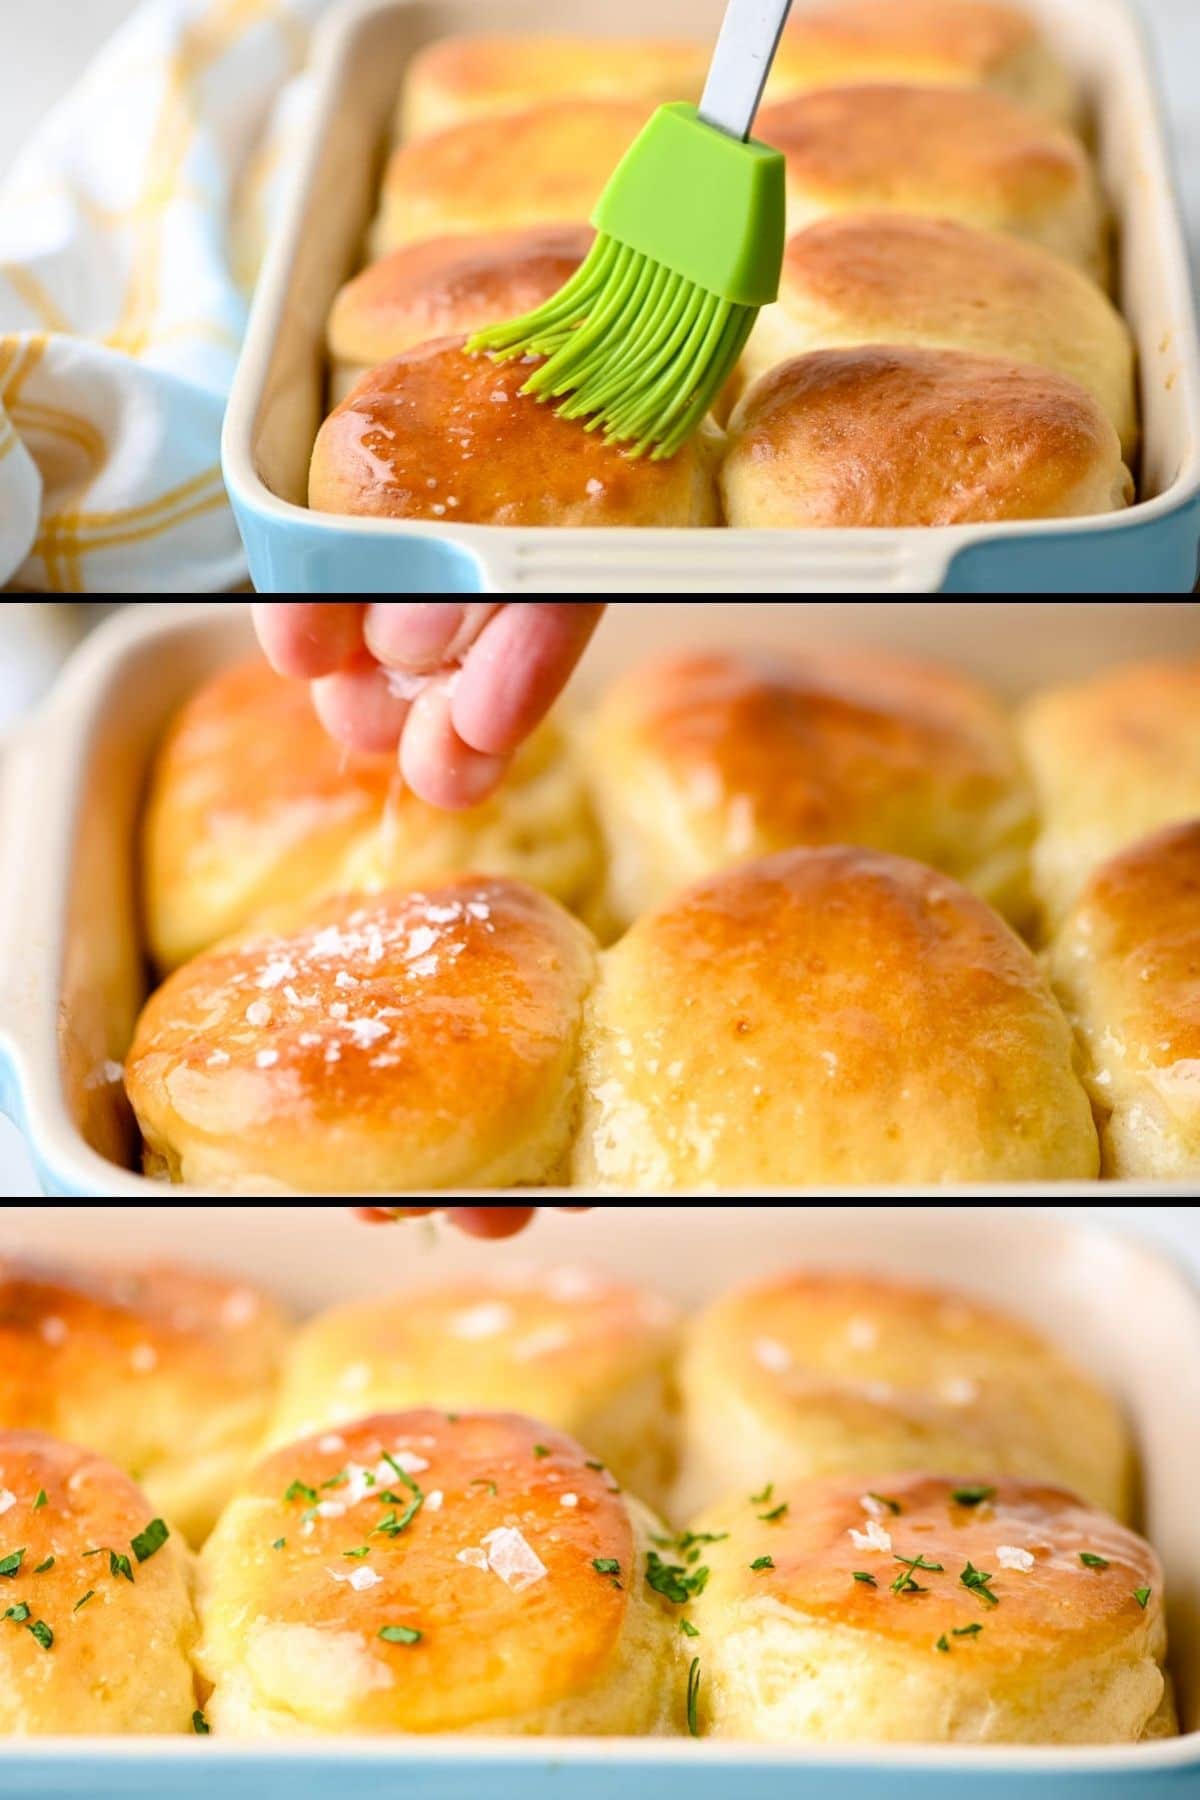
- Brush the tops of the yeast rolls with an egg wash and bake until golden brown.
What does it mean to “punch down” the yeast dough?
Punching down is a term used for “deflating” the yeast dough. This technique (according to Red Star yeast) means gently pushing your fist into the puffed dough, redistributes the cells of the yeast along with the sugar and moisture to allow them to ferment and rise during the proofing stage.
Press your fist, gently, but quickly into the center of the dough, then pull the edges in toward the center and flip the dough out onto a lightly floured surface.
Rolling and cutting the refrigerator rolls
This is a very easy yeast dough recipe to work with. Just lightly flour the work surface and roll the dough out until it’s about ¾” to 1″ thick. I recommend using a ruler, just to be sure.
Incidentally, the kitchen ruler I used (pictured above) is great for not only measuring, but also pulling out a hot oven rack and pushing it back into the oven (that’s what the notches are for).
I have a set of 3 round biscuit cutters and I used the middle cutter which measures 2 ¼” in diameter. Depending on the size of your cutters, you may want to use a larger or smaller baking dish or pan.
Keep in mind that the dough will rise again and the yeast rolls will puff, so having a little space between the butter rolls in the pan is ok.
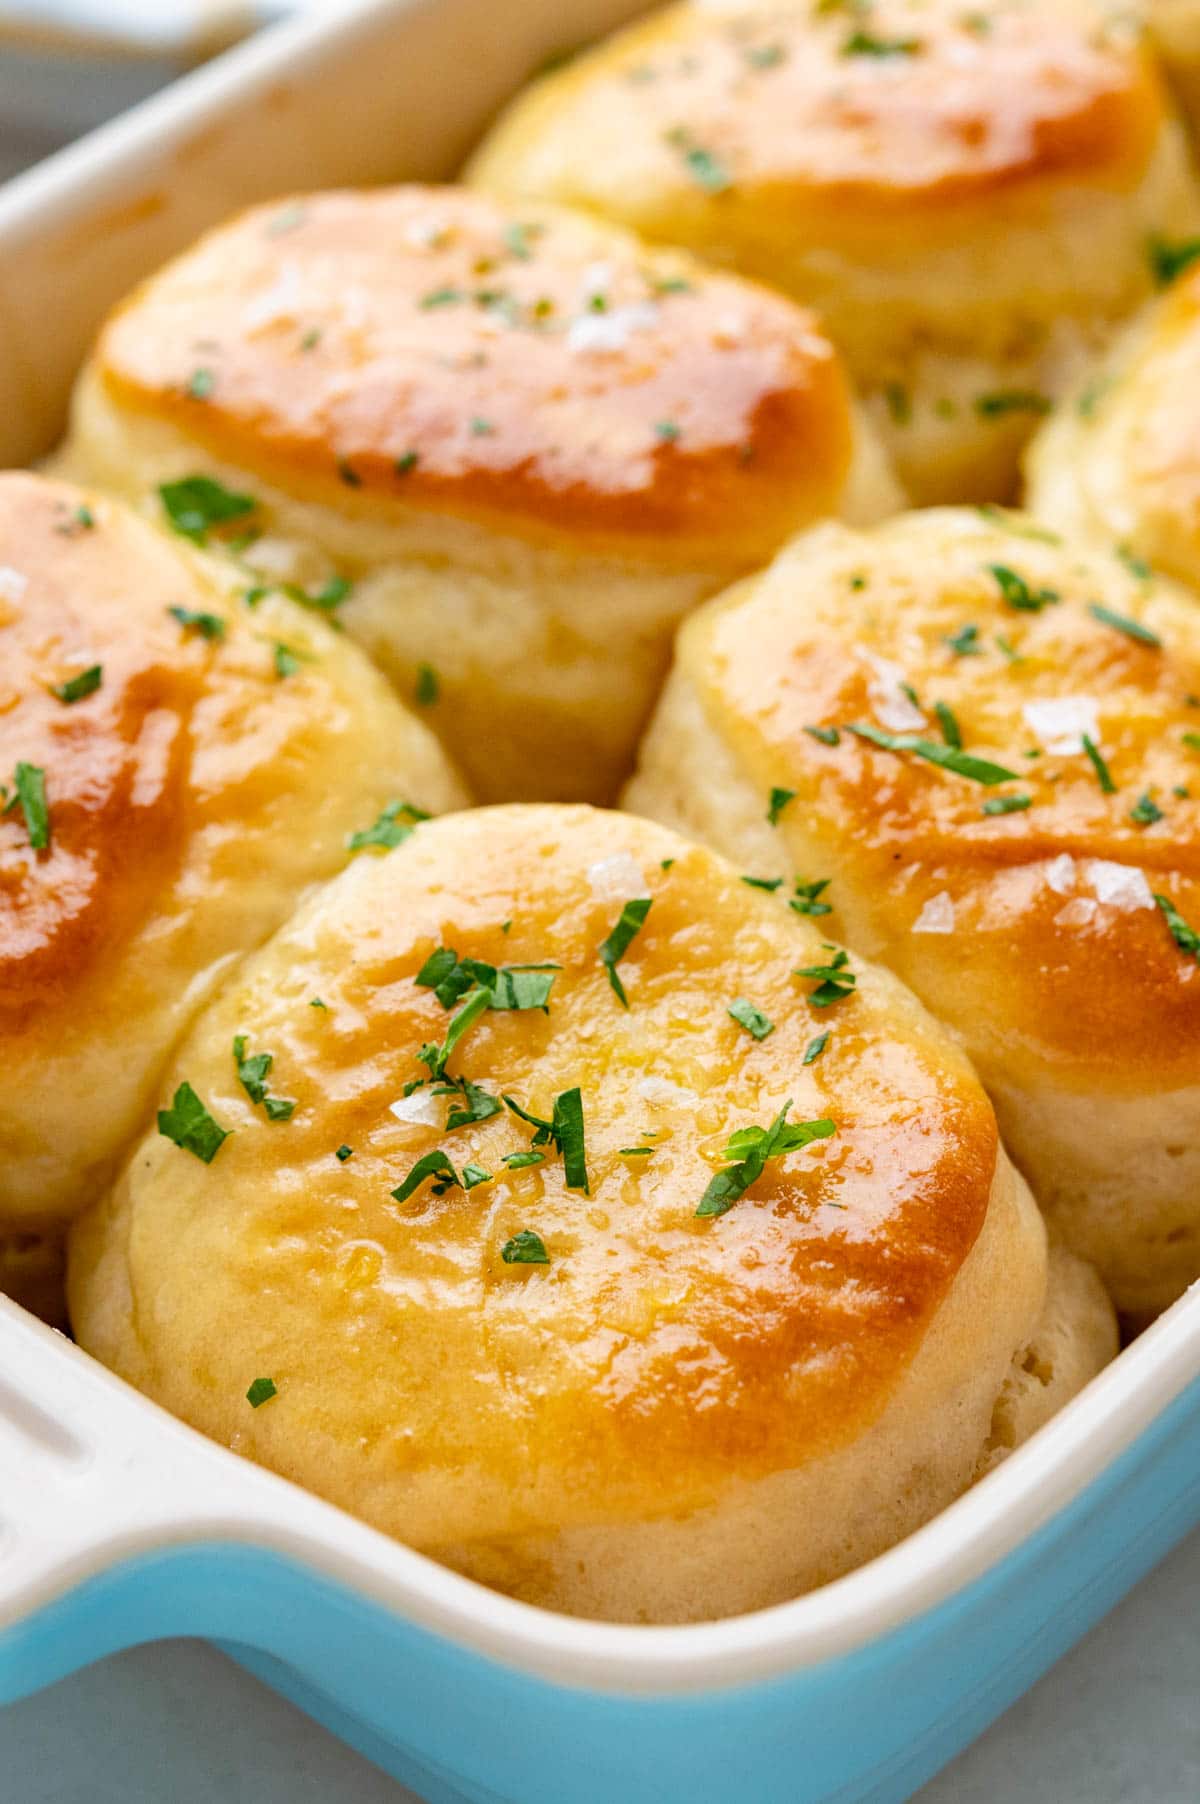
The beauty of this yeast rolls recipe is that while the full recipe makes 24-30 butter rolls (depending on the size of your cutters), you don’t HAVE TO MAKE all of them at once.
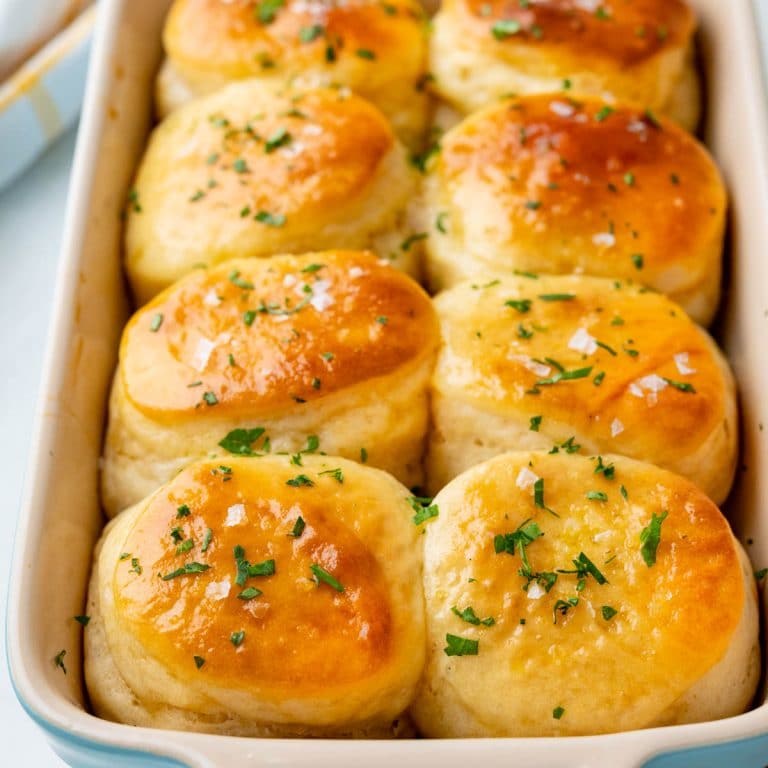
For this batch, I only made 8 rolls for a dinner serving 4 people.
I left the rest of the yeast roll dough in the refrigerator for another upcoming dinner party. How convenient is that?
When I’m ready to make more, it’s just a matter of rolling it out, cutting and baking! Brilliant!
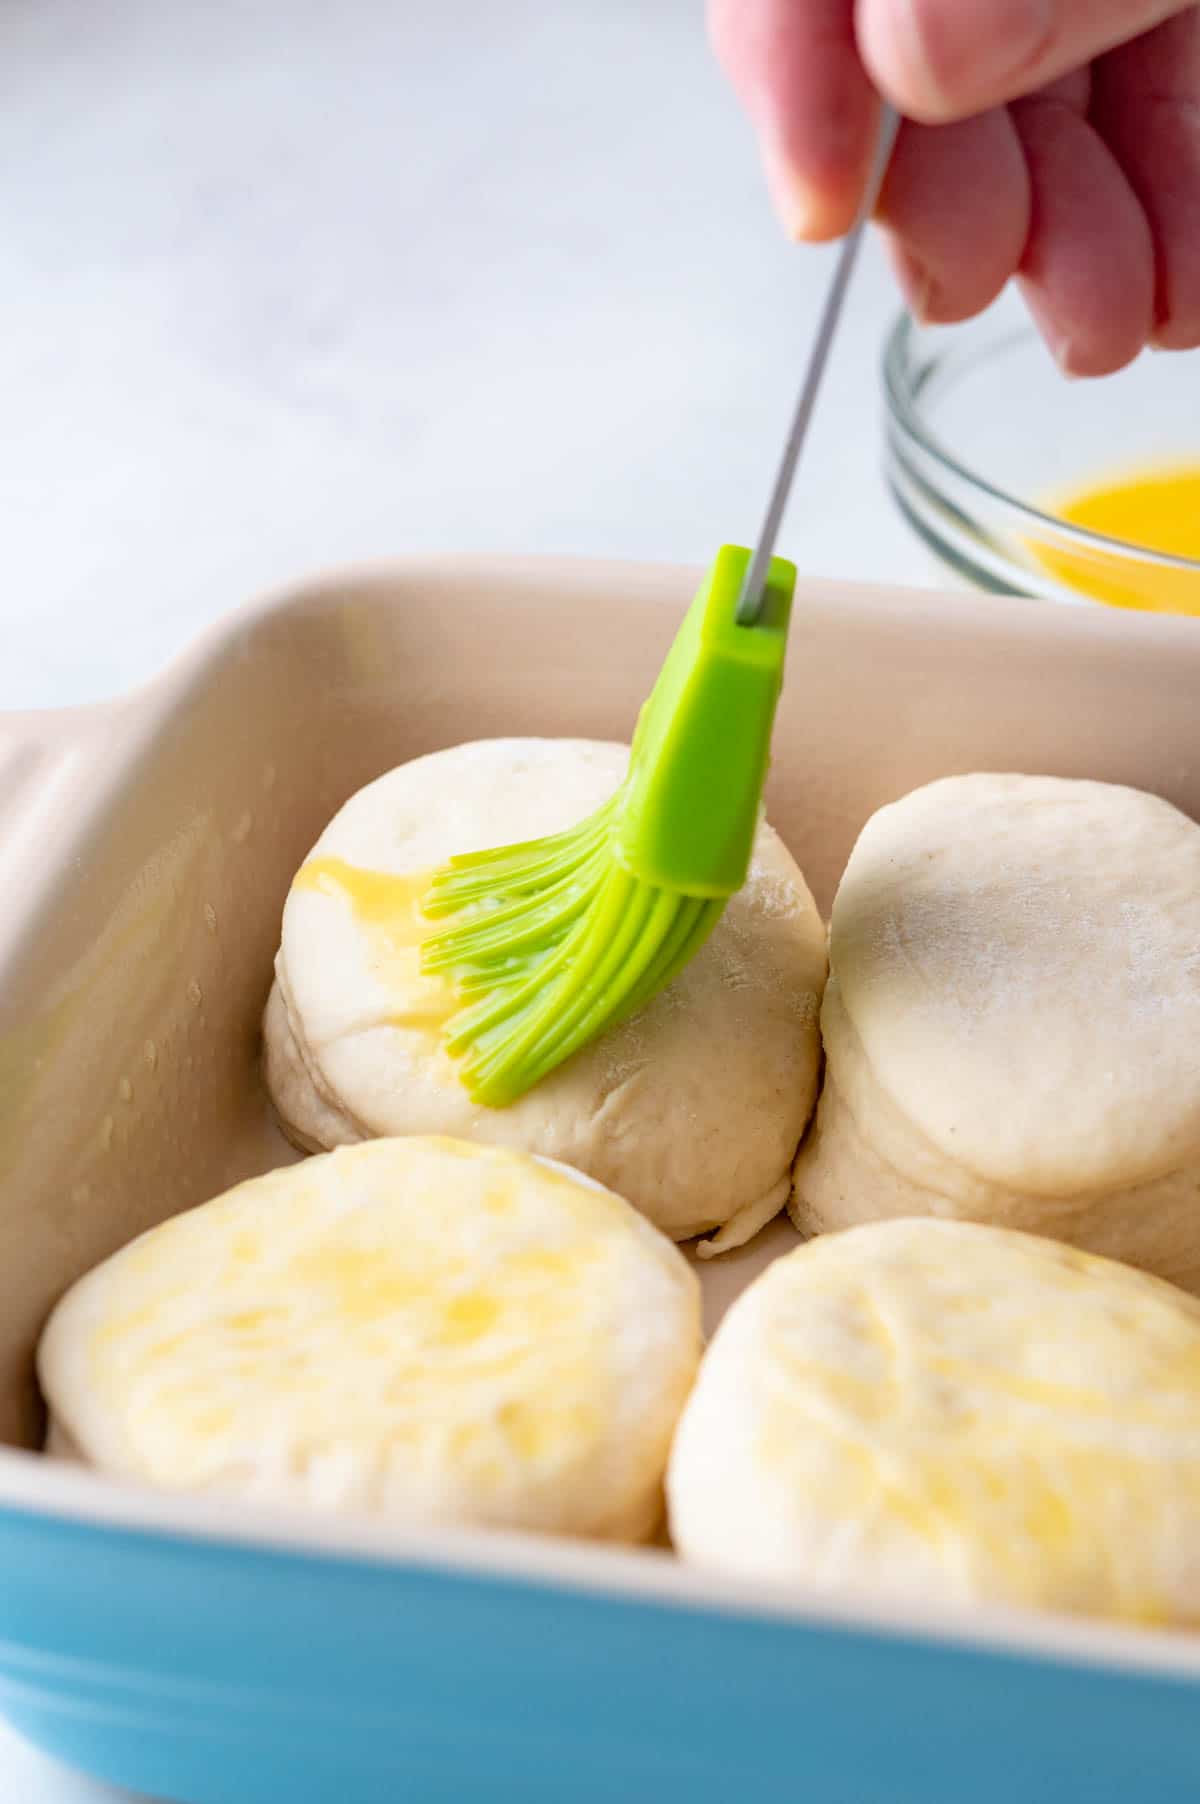
Egg wash vs. butter
Sara’s yeast roll recipe brushes the uncooked rolls with butter instead of the egg wash. I made them that way the first time, but found they didn’t have that beautiful shiny dome that I love on soft, homemade rolls.
Besides, I brushed them with butter after baking, so we really weren’t missing out on anything!
A little flaky sea salt (such as Maldon) gives these butter rolls a beautiful finish and a little bit of fresh chopped parsley gives them a fresh, inviting look.
FAQ’s
About 5-7 days when well covered.
Yes. Yeast dough can be frozen AFTER THE FIRST RISE. Wrap the dough in plastic wrap and then freezer paper and keep it frozen for up to 2 months. Defrost at room temperature, roll and bake as you like.
These rolls are best when they’re hot from the oven, but you can keep them well wrapped in the refrigerator for 2-3 days. Warm them in a low oven (300°) for 8-10 minutes or individual rolls can be warmed in 20 second increments in the microwave.
Variations:
- For seeded refrigerator rolls, sprinkle sesame or poppy seeds over the dough after they’ve been brushed with an egg wash.
- For garlicky butter rolls, mince 3 cloves of garlic to the melted butter and brush the garlic butter over the hot baked bread. Sprinkle parsley over the rolls.
- For caraway rolls, add 1 1/2 teaspoons of caraway seed to the flour mixture and whisk together. Proceed with the recipe.
- For herbed dinner rolls, add 1 tablespoon of finely chopped fresh herbs (such as thyme, sage or dill) to the flour mixture and whisk together before proceeding with the recipe. After the rolls are baked and brushed with butter, sprinkle with more fresh herbs.
Butter Rolls
This recipe makes a big batch of homemade yeast rolls, so they’re great for holidays and entertaining, and it’s easy to flavor them to go with any menu.
They’re soft and supple with a texture that’s perfect for sopping up gravy or helping to nudge peas onto a fork.
My tasters loved the flavor and texture of these butter rolls — but I think the highest compliment I received came from 9-year old Skylar, who’s eyes grew wide when I put the basket of refrigerator rolls on the table. She said, “I could just eat this for dinner!” and then begged for a second one.
What to do with leftovers
If you do end up with any leftovers, they’re great reheated the next day, but we love making breakfast sandwiches with them. Just split a few warm butter rolls in half and add a bit of cheese, a sausage patty and some scrambled or fried egg. They’re so much better than you can imagine.
More homemade yeast rolls and breads you might like:
Refrigerator Rolls
SPECIAL EQUIPMENT:
INGREDIENTS:
- ½ cup warm water 105° to 115° F
- ¼ ounce package Active dry yeast
- ½ cup sugar divided
- 8 tablespoons unsalted butter
- 2 cups whole milk
- 1 teaspoon salt
- ~6 ½ cups all purpose flour
- 1 large egg
- 1 tablespoon water
FOR FINISHING THE REFRIGERATOR ROLLS:
- ¼ cup butter melted
- 1 teaspoon flaky sea salt such as Maldon
- 2 tablespoons chopped parsley
DIRECTIONS:
- Lightly spray a 1/4 sheet pan or casserole dish with vegetable spray and set aside.
BLOOM THE YEAST:
- Measure out the warm water and use your instant read thermometer to be sure that it's between 105° and 115° F. Too cold won't activate it, too hot will kill it.
- Place the warm water, yeast and 1 teaspoon of sugar in a small bowl. Stir once or twice to blend. Let stand in a warm place for 5-7 minutes.
MAKE MILK MIXTURE:
- In a saucepan over low heat add the butter, milk, remainder of sugar and salt. Heat, stirring constantly, until the sugar melts. The butter doesn't need to melt completely. Make sure the milk mixture stays between 105° to 115°F (use your instant read thermometer to be sure).
- If the milk mixture gets too hot, remove from heat, stir to aerate and/or refrigerate for a few minutes until the temperature is in the ideal zone.
ASSEMBLE THE DOUGH:
- Pour the milk mixture into a large bowl and stir in the bloomed yeast.
- Add about 6 cups of flour and stir until it comes together in a shaggy dough. Add additional ½ cup of flour a few tablespoons at a time if the dough is sticky.
- Transfer the dough to a floured work surface and knead briefly, 5-8 times.
- Lightly oil a large bowl and transfer the dough to the bowl. Turn the dough over once or twice to lightly oil the surface. Cover with a clean dish towel and set aside to rise for 30-45 minutes or until doubled in bulk.
- Punch down the dough and divide into two equal pieces. Place the pieces on a work surface and cover loosely with a tea towel and let rest for 5-10 minutes.
- (The dough can be made ahead to this point and refrigerated in an airtight container until ready to use.)Remove from the refrigerator and let rest for 15-20 minutes, then proceed with the recipe.
PREHEAT THE OVEN:
- Preheat the oven to 375°F.
- Work with one piece of dough at a time and roll it out to ¾ to 1" thick on a lightly floured work surface. I like to use a ruler to measure.
- Use a 2" to 2 ½" biscuit cutter to cut out rolls by pressing straight down with the cutter (don't twist).
- Transfer the rolls into the prepared baking dish and set aside to rise about 20-25 more minutes until the rolls have doubled in bulk. (It may take longer to rise if they've been refrigerated previously).
- In a small bowl, whisk together the egg and water to make an egg wash.
- Brush the tops with the egg wash and bake for 20-25 minutes until golden brown.
- Once the rolls are baked, brush them with melted butter and sprinkle on the coarse sea salt and chopped parsley. Serve warm.
NOTES:
NUTRITION:
Pin it for later!
I made these yesterday and was gobsmacked how beautifully they turned out and I only had to knead them 5-8 times!! I will certainly make them again.
I have made this recipe more times than I can count at this point. Amazing backbone for cinnamon rolls, and great dough I can prep beforehand to bring good fresh rolls to gatherings.
Make this recipe all the time, spectacular bread and super easy. Works just fine in a stand mixer. Never fails to impress whether as just rolls, G&Zs orange cardamom rolls, or my own cinnamon rolls.
I love the convenience of these! Will have to try for Easter as they look amazing! Thanks, Lisa!